Category: AI Content & SEO

How to use AI to create content that actually ranks — without the “AI slop” Google ignores. Guides on E-E-A-T, AI content quality, and SEO that survives every algorithm update.

  • How to Optimize Content for AI Overviews: The Passage-Level Method

    How to Optimize Content for AI Overviews: The Passage-Level Method

    You already rank on page 1. You have the traffic data to prove it. And then, sometime in the past year, something shifted — the clicks dropped without the rankings moving. Knowing how to optimize content for AI Overviews is now the difference between keeping those clicks and losing them. An AI Overview sits above your result, summarizes the answer your article took three hours to write, and sends the user on their way without ever touching your link. According to Pew Research Center, about six-in-ten of the 900 U.S. adults studied (58%) conducted at least one Google search in March 2025 that produced an AI-generated summary — and users were measurably less likely to click on result links when that summary appeared. The sources cited inside those summaries? Very rarely clicked.

    So the question isn’t whether AI Overviews are disrupting your traffic. They are. The real question is which passages Google’s system pulls — not your page in general, but your paragraphs specifically. That’s the distinction almost every guide on this topic misses, and it’s the one this article is built around. Here’s the method, at the paragraph level, applied step by step.

    Quick Summary: The Passage-Level Method
    • AI Overviews quote passages, not pages: Google’s system evaluates each paragraph as a micro-document — your article’s overall authority doesn’t guarantee a single sentence gets cited by the AI.
    • Standalone comprehensibility is the key threshold: A citable passage must contain a clear subject, a single verifiable claim, and enough context to be understood without the rest of the article.
    • One claim per paragraph: In practice, single-claim paragraphs tend to be pulled closer to verbatim, while multi-claim paragraphs are more often paraphrased — and paraphrase is where distortion creeps in.
    • Inline source attribution matters: Citations placed inside the paragraph signal to the AI that the claim is checkable; checkable claims are cited more often.
    • A summary block is your highest-leverage edit: A 130–170-word structured synopsis at the top of the article is the most extractable unit on any page.
    • Technical baseline still applies: Pages must meet Google’s crawlability and policy requirements — these are prerequisites for AI feature eligibility, not differentiators.

    Why AI Overviews Quote Passages, Not Pages

    Here is the claim that changes how you think about this entire optimization problem: article-level quality signals — domain authority, word count, schema markup, E-E-A-T signals at the site level — do not guarantee passage-level extraction. A page can hold a featured snippet, rank in the top three results, and still produce zero AI Overview citations if individual paragraphs lack the structural pattern the retrieval layer is looking for. Google’s system doesn’t read your article as a unit. It reads passages as micro-documents, each evaluated for its ability to answer a specific subtopic query on its own.

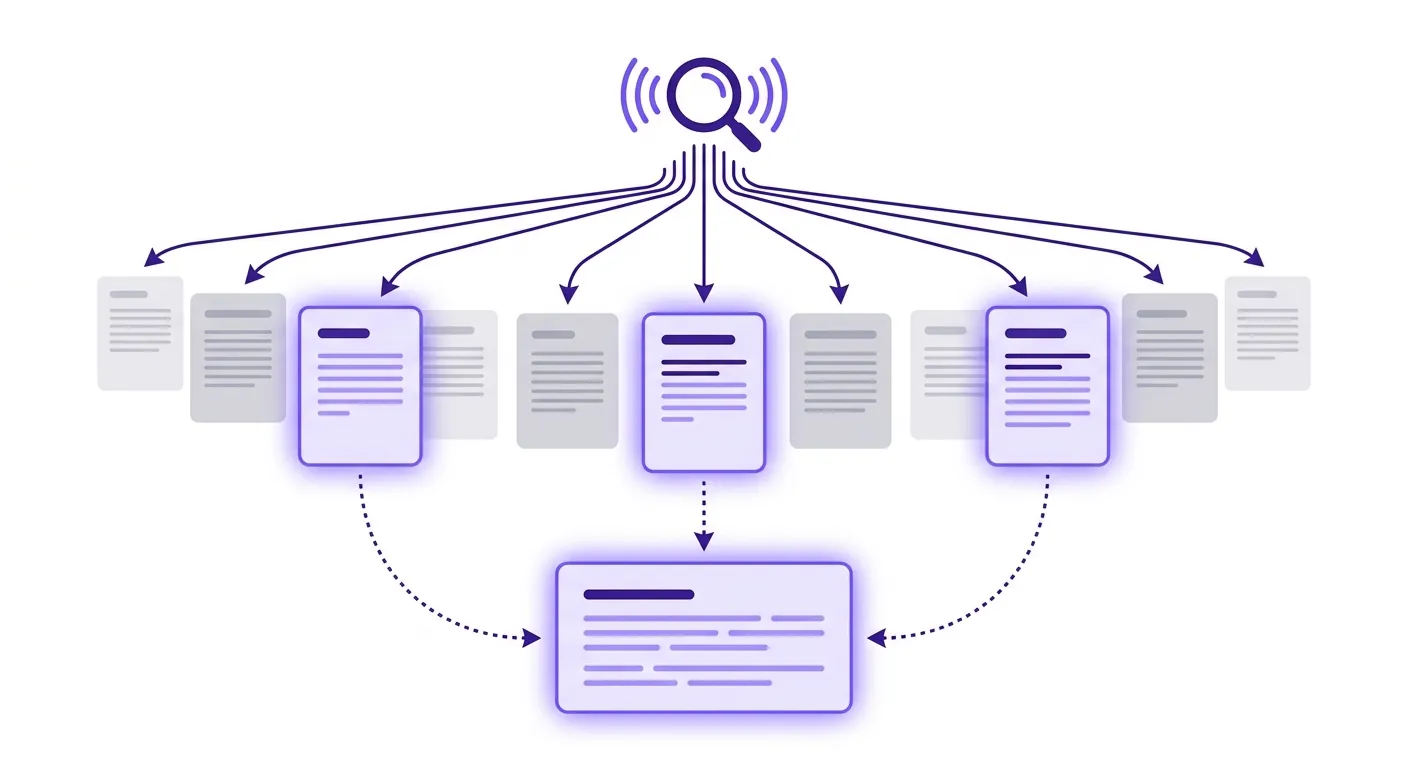
    Google Search Central confirms that both AI Overviews and AI Mode may use a “query fan-out” technique — issuing multiple related searches across subtopics and data sources to build a response. That’s the mechanism behind passage-level extraction. The AI isn’t looking for the best article about a topic. It’s running dozens of smaller queries and pulling the best passage for each one. A paragraph that addresses one of those sub-queries clearly, with a stated claim and enough context to stand alone, gets surfaced. A paragraph that mixes three points and assumes the reader has read the previous section does not.

    Diagram showing how Google query fan-out pulls individual passages from multiple pages to build an AI Overview
    Google’s query fan-out mechanism evaluates passages independently — meaning a single strong paragraph on a weak page can still be cited, and a strong page full of unfocused paragraphs may be ignored entirely.

    How to Write a Citable Passage

    The structure of a citable passage has three parts, and you can apply it as a template to any paragraph in an existing article. First: a direct-answer opener. The first sentence states the claim outright — no wind-up, no “in this section we will explore.” If the paragraph is about the fastest way to reduce page load time, the first sentence is “The fastest way to reduce page load time is to eliminate render-blocking JavaScript.” Second: one sentence of supporting evidence with a source anchor inside the paragraph body, not below it. Third: a closing sentence that limits or contextualizes the claim — what it applies to, when it doesn’t hold, or what the reader should do with it.

    The inline citation placement is not cosmetic. Placing a verifiable source reference inside the paragraph — rather than in a references block at the bottom of the page — signals to the AI’s grounding layer that the claim is checkable without leaving the passage’s context. Checkable claims are preferentially cited over unanchored assertions. This is the specific formatting change most AI Overview guides skip entirely, and it’s the one worth testing first on your highest-traffic posts. If you want to understand how this fits into the broader discipline of ranking AI-generated and AI-optimized content, the complete GEO framework at Contentosapp covers the full picture — from entity optimization to citation architecture — in a way that connects these passage-level tactics to a coherent system.

    The Structural Edits That Change Citability

    Most articles that rank on page 1 were written to be read top to bottom. That architecture works for human readers. It does not work for AI extraction. The edits that change citability are surgical: they don’t require rewriting an article from scratch. They require three specific passes. First, identify every paragraph that makes more than one assertion and split it. One paragraph, one claim. This is the single most impactful change you can make, and it typically takes 30–45 minutes on a 2,000-word post. Multi-claim paragraphs force the AI to paraphrase, which introduces distortion and reduces verbatim citation frequency. Paragraphs with a single falsifiable assertion followed by one piece of evidence are far more likely to be extracted word for word.

    Second, add a tight summary block at the top of each major H2 section — not just the article. The article-level TLDR you see at the top of this page is the right model, scaled down to 2–4 sentences per section. Third, rewrite vague section openers into direct-answer openers. “This section covers the formatting changes that matter” becomes “The formatting change with the highest impact on AI citation is splitting multi-claim paragraphs into single-claim units.” If you’re doing this on AI-drafted content, the sentence-level editing pass at Contentosapp gives you a repeatable workflow for this exact type of structural rewrite without rebuilding the whole piece.
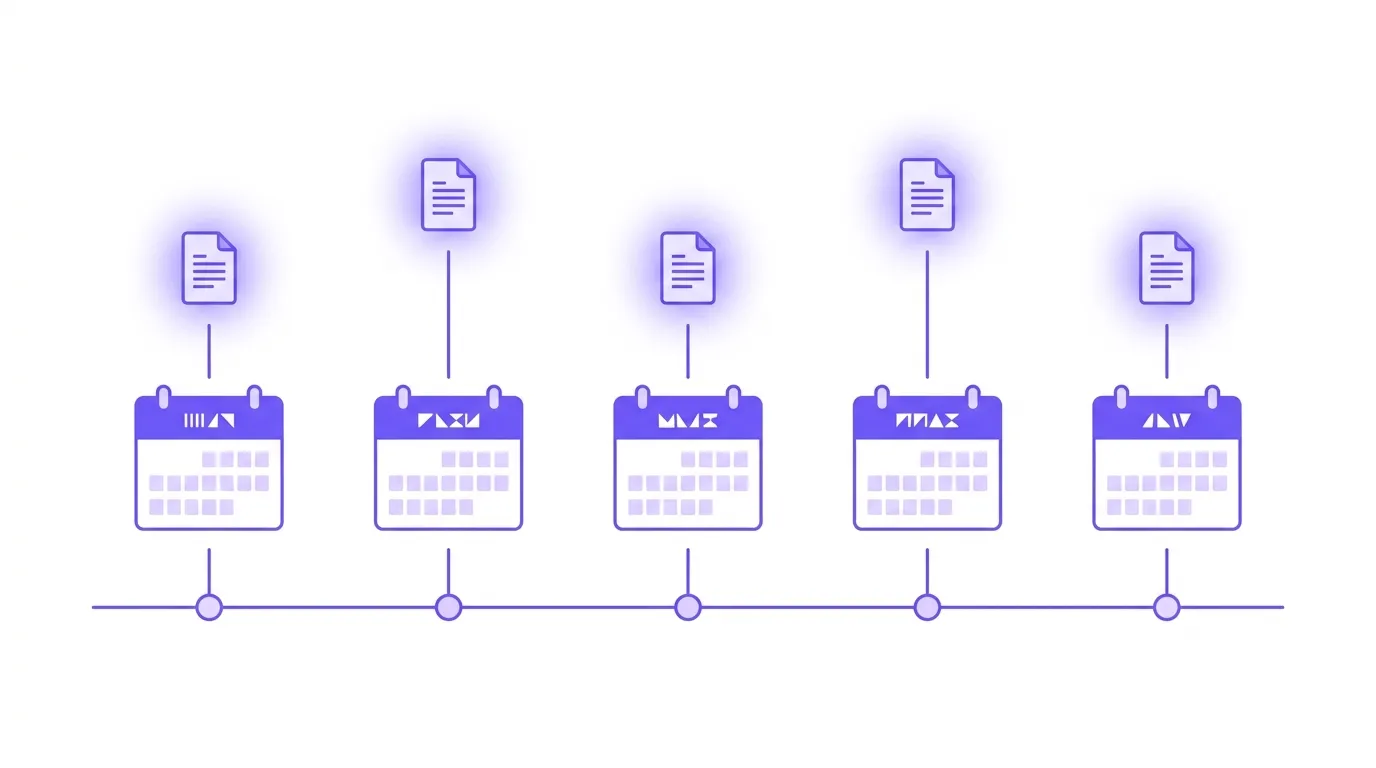
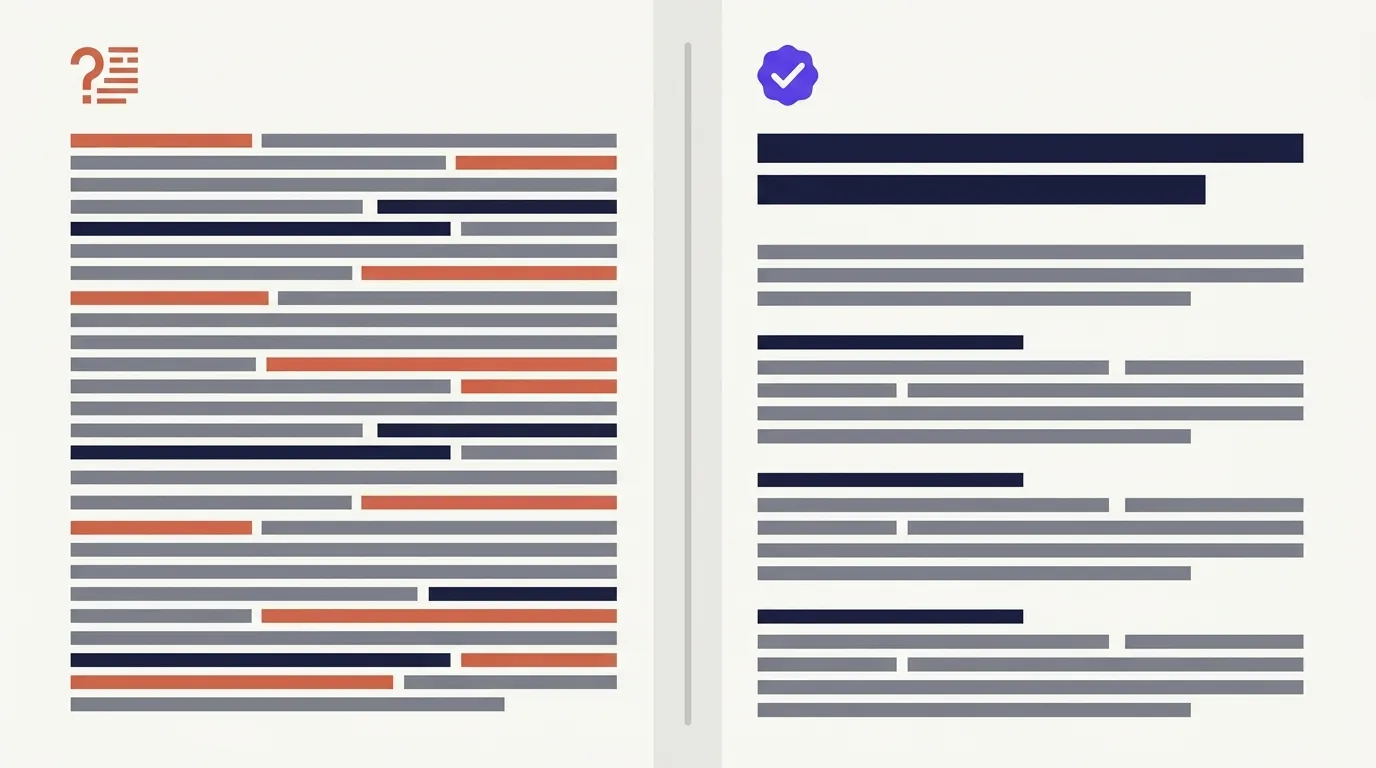
    Before and after example of a multi-claim paragraph rewritten into a single-claim citable passage for AI Overviews
    The structural gap between a passage that gets cited and one that gets skipped is often just two edits: one claim per block and a direct opening sentence that could stand alone as a complete answer.

    The Summary Block: Your Highest-Leverage Formatting Change

    The TLDR block at the top of this article is a deliberate demonstration.

    ◆ From our own build
    We didn’t just write about this method — we ran it on this page. The TLDR box at the top was produced by our own 7-agent pipeline and then edited by hand: six bullets, one self-contained claim each. That’s not decoration. It’s the single most extractable block here, and it’s the first thing we’d copy onto any post you want an AI Overview to quote.

    It’s structured as a series of single-claim bullets, each one resolvable without reading the rest of the article. That structure is precisely what makes it extractable. A summary block — sometimes called a TLDR, sometimes a key takeaways box — is the most citable unit of content on a page because it is already formatted the way AI retrieval systems prefer: short, self-contained, and organized around discrete assertions rather than flowing prose. Every major article on your site that targets informational queries should have one.

    Writing a good summary block takes about 15 minutes if you already know your article’s main claims. Pull the four to six most important assertions from the body, strip them down to their core, and write each one as a standalone bullet with a subject and a resolution. Do not use vague category labels like “Content quality” as bullet headers — write the actual claim. “Content quality matters” is not extractable. “Paragraphs with a single falsifiable claim are cited verbatim more often than multi-claim paragraphs” is. One critical nuance worth noting: Google’s documentation states that AI Overviews “often don’t trigger” because they only appear when the system determines they are additive to classic Search results. That means passage-level optimization serves the full AI surface — AI Overviews, AI Mode, and the complex query handling that replaces multi-step search — not just the overview box. Optimize for the passage, and you’re positioned across all of it. Pairing that with a solid technical foundation covered in how to make AI content rank is the natural next step once your passages are citation-ready.


    Frequently Asked Questions

    Does optimizing for AI Overviews hurt my regular Google rankings?

    No — and Google is explicit about this. The technical requirements for AI features are the same foundational SEO best practices that apply to standard Search: crawlability, policy compliance, and helpful, people-first content. The passage-level edits described here — tighter paragraphs, direct-answer openers, inline citations — improve readability and E-E-A-T signals simultaneously. There is no trade-off between optimizing for AI features and maintaining organic rankings. The risk runs the other direction: ignoring AI Overview optimization while holding a page-1 ranking means losing click-through to a summary that quotes your own content.

    How long should a citable passage be?

    A citable passage typically runs 40–80 words. Long enough to contain a claim, one piece of supporting evidence, and a closing context sentence. Short enough to be self-contained. The summary block format (130–170 words) is the exception — it works at a longer length because it’s explicitly structured as a series of discrete assertions. For body paragraphs, if you find yourself exceeding 90 words, you almost certainly have more than one claim buried in there. Split it.

    Do I need to rewrite my entire article, or can I make targeted edits?

    Targeted edits. A full rewrite is rarely necessary and often counterproductive — you’d be discarding whatever ranking signals the existing page has accumulated. The three-pass approach described above (split multi-claim paragraphs, add section summary blocks, rewrite openers) covers 90% of what changes citability. Start with the paragraphs closest to your target query — usually the first two paragraphs under the most relevant H2 — and work outward. A 2,000-word post can be citation-ready in under an hour with this method.

    Will adding more headers help my content appear in AI Overviews?

    Headers help only if they map to specific sub-queries. Adding H2s to break up visual length without aligning them to distinct subtopics that a user might independently search doesn’t improve citability — it just creates more navigation anchors. The Google query fan-out mechanism means the AI is essentially running separate searches per subtopic. Your H2s should correspond to those subtopics. A header like “Why This Matters” is not a subtopic. “How AI Overviews Select Passages” is.

    How do I know if my content was actually cited in an AI Overview?

    There is no native Google Search Console report for AI Overview citations as of mid-2026. The most reliable manual method is running your target queries directly in Google Search and checking whether an AI Overview appears that cites your domain. Third-party tools including Semrush and BrightEdge have added AI Overview visibility tracking to their rank monitoring suites. For high-priority pages, set up a weekly check using an incognito browser with location set to your primary target market — AI Overview appearance varies by location and device.

    Does schema markup help with AI Overview citability?

    Schema markup meets the technical baseline for AI feature eligibility, but it doesn’t directly control passage selection. Google’s documentation treats structured data as part of the foundational technical requirements — necessary, not sufficient. HowTo schema is relevant for procedural content like this article, and FAQPage schema can surface individual Q&A pairs as extractable units. Both are worth implementing. But a page with perfect schema and weak, multi-claim paragraphs will be outpulled by a page with no schema and tight, single-claim passage structure. Get the passage structure right first.


    Conclusion

    AI Overviews extract passages. That’s the mechanism, and everything else in this article follows from it. Your optimization job is to write passages that can stand completely alone — a claim, a piece of evidence, a source check, a resolution — and to add a summary block that does the same thing at the article level. This week: pull your top-10 informational posts, identify every paragraph with more than one assertion, split them, and add an inline citation to your strongest claim per section. Then write a summary block for each post. These aren’t big changes. But they are the difference between owning a page-1 ranking that feeds an AI Overview and owning a page-1 ranking that the AI Overview quietly replaces.

    References

    External sources

    1. Do people click on links in Google AI summaries? | Pew Research Centerhttps://www.pewresearch.org/short-reads/2025/07/22/google-users-are-less-likely-to-click-on-links-when-an-ai-summary-appears-in-the-results/
    2. AI Features and Your Website | Google Search Central | Documentation | Google for Developershttps://developers.google.com/search/docs/appearance/ai-features

    Related content

  • Generative Engine Optimization (GEO): The Complete Guide to Getting Cited by AI in 2026

    Generative Engine Optimization (GEO): The Complete Guide to Getting Cited by AI in 2026

    You publish every month, keep the cadence, take care of on-page SEO — and the clicks still drop. Not because your articles got worse. It’s because Google now answers questions before it shows links. That is the reality for WordPress publishers in 2026, and it demands a technical response, not a lament. That response has a name: generative engine optimization.

    GEO is not a reinvention of SEO. It is an additional layer that determines whether your content gets cited as a source inside AI-generated answers — in Google’s AI Overviews, in Perplexity, in ChatGPT Search — or sits in the organic rankings below the answer that absorbed the click that used to be yours. The difference between those two positions is measurable. An Ahrefs study of 300,000 keywords found a 34.5% drop in the average CTR of position #1 on queries where an AI Overview is present, comparing March 2024 with March 2025. The pie shrank. GEO is the strategy for being inside the pie that’s left.

    This guide delivers the complete playbook: the precise definition of GEO, the real difference between GEO, AEO, and traditional SEO, the content attributes backed by data, the technical setup most publishers still haven’t implemented, and an operational workflow that fits the routine of someone working solo. No agency pitch. No guaranteed-placement promises. Only what you can apply next week.

    💡 GEO: The Essentials
    • What GEO is: the practice of structuring content to be selected and cited by generative models (ChatGPT, Perplexity, Google AI Overviews) when they compose answers — not just ranked in traditional SERPs.
    • The critical difference: SEO optimizes for ranking position; AEO optimizes for featured snippets and voice; GEO optimizes for being cited as a source inside AI-generated answers. They are distinct mechanics — confusing them is today’s most expensive mistake.
    • The number that matters: AI Overviews correlate with 34.5% less CTR for the #1 organic result. Being inside the Overview is the new being on top.
    • The four attributes that increase citability: verifiable sources embedded in the text, clear H2/H3 structure, proprietary or first-hand data, and factual language without excessive hedging.
    • Priority technical signal: the /llms.txt file lets you flag LLM-friendly content — few publishers have implemented it; it’s the technical edge available right now.
    • The GEO window is real and finite: the criteria are still accessible, the tools are still forming, and structuring verifiable content today builds citation authority before the market saturates.

    What Generative Engine Optimization Is — and Why It Emerged Now

    GEO is the practice of optimizing content to appear cited inside answers generated by AI-powered search engines — ChatGPT, Perplexity, Gemini, Google AI Overviews. It is not “SEO for AI” in the generic sense. It is a specific discipline, formalized academically by Princeton researchers in the seminal paper that coined the term and mapped the content attributes that increase the citation rate in generative systems. The fact that academia documented the discipline before the market standardized it is a relevant signal: this is not agency buzzword material.

    The context that created the urgency is straightforward. 99.2% of the queries that trigger AI Overviews are informational — the exact niche where editorial and affiliate publishers concentrate most of their organic traffic. When an AI Overview is displayed, it compresses the visual space of the organic links and absorbs the user’s answer intent before the first click. The result: a 34.5% drop in the average CTR of the #1 result on keywords with an AI Overview versus informational keywords without one, comparing March 2024 with March 2025. That number is not a projection — it is aggregated GSC data across 300,000 keywords.

    The timeline is short, but the pattern is familiar. Featured snippets appeared in 2014, and it took publishers years to realize that optimizing for them was different from optimizing for position. AI Overviews rolled out in the US in May 2024 — after a 2023 beta as SGE — and are already at global scale. Anyone who learned the snippet lesson knows how this curve works: the first to adapt their content structure harvest disproportionate authority. Everyone else waits and claws back ground later, with far more effort.

    GEO, AEO, and SEO: What Each One Actually Optimizes

    The confusion between the three terms is not semantic — it has a real operational cost. A publisher applying AEO techniques while thinking they’re doing GEO is spending time on featured-snippet formatting when they should be building verifiable-source density per paragraph. They are different optimizations because the systems evaluating them are different.

    DimensionTraditional SEOAEOGEO
    GoalPosition in SERPsFeatured snippets and voice answersBeing cited in AI-generated answers
    Dominant signalBacklinks + domain authorityDirect-answer structure (lists, tables)Source credibility + E-E-A-T + verifiable sources
    Ideal formatKeyword in title, meta, H1, bodyDefinition paragraph + list below the H2Factual language, embedded sources, self-contained paragraphs
    Success metricCTR, average position, impressionsPosition Zero appearancesCitations in AI Overviews, Perplexity, ChatGPT
    Key techniquerobots.txt, sitemaps, schema markupFAQ/HowTo schema, 40–50 word anchor answer/llms.txt, clean markdown, semantic schema
    Who decidesGoogle’s algorithm (PageRank + signals)Google’s algorithm (featured snippet extraction)Language model + retrieval system

    The most common mistake: using AEO when the goal is GEO. AEO prioritizes the extraction of a short, formatted answer block — the famous definition paragraph Google captures for Position Zero. GEO demands something different: paragraphs that work as self-sufficient units of verifiable knowledge, each with an identifiable source, extractable by the model without losing context. An article can be excellent for AEO and invisible for GEO if it lacks the credentialing density generative models look for.

    The practical distinction: if you’re writing for featured snippets, you concentrate the effort on the answer within the first 100 words after the H2. If you’re writing for GEO, you distribute verifiable sources throughout the entire article, structure each section to be understandable without the rest of the text, and document first-hand experience wherever possible. The two goals aren’t mutually exclusive, but the execution priorities differ.

    How Generative Engines Select the Content They Cite

    Understanding the selection mechanics changes what you prioritize. Google, Perplexity, and ChatGPT use distinct systems, but they converge on a few fundamentals. Google’s official documentation for AI features is explicit: to appear as a supporting link in AI Overviews or AI Mode, a page needs to meet Google Search’s technical requirements, follow the search policies, and focus on helpful, people-first content best practices — the same fundamentals as traditional SEO, with an additional citability layer.

    Beyond that, both AI Overviews and AI Mode can use the “query fan-out” technique: when formulating an answer, the system fires multiple related searches across subtopics and data sources to build the response. This has direct implications for publishers. Articles that cover a topic deeply enough to answer related sub-queries have a better chance of appearing in multiple fan-outs of the same query — not just the main one.

    There are two distinct filters that many people collapse into one: being crawled and being cited. An article can be indexed, crawled frequently, and still never appear as a source in an AI Overview. Crawling is the prerequisite; citation is the destination. What determines the passage from one to the other is the combination of precise semantic relevance, source authority as assessed by the model, structural clarity that allows unambiguous extraction, and the presence of verifiable data that increases the model’s confidence in the content’s factuality.

    The Content Attributes That Increase Your Citation Rate

    The data points to a clear pattern. Content that gets cited in AI Overviews shares the same DNA as content that wins featured snippets — but the decisive difference lies in the density of verifiable sources per paragraph, not just the format. A well-structured article with no traceable external citation is invisible to generative models the same way it was invisible to experienced editors before E-E-A-T. Structure opens the door; sources close the deal.

    Four attributes are backed by the data and the technical documentation:

    • High-authority source citations embedded in the text. Not in a references section at the end — in the paragraph, where the model can associate the claim with the source while processing the content. Every important factual claim should have an identifiable credibility anchor in the same paragraph.
    • Semantic structure with clear H2/H3s and self-contained paragraphs. Each section must make sense in isolation from the rest of the article. Models process limited context windows — a paragraph that depends on context from three sections back to be understood is rarely cited.
    • Proprietary or first-hand data. Results from your own tests, original analyses, data collected by the author. This is what no generative model can produce autonomously — which is why models prioritize it as a source.
    • Factual language without excessive hedging. “It may be that”, “some experts believe”, “it’s possible that” — phrases like these reduce the model’s confidence in the content’s factuality. State precisely and attribute with a source. If you’re not sure, don’t state it.
    Research attributes that raise AI citation rates: source citations, statistics, and quotations
    Research from Princeton University and Georgia Tech identified citations, quotations, and statistics as the attributes with the greatest impact on citation rates in AI-generated answers.

    The point about proprietary data deserves emphasis. Solo publishers have a structural advantage here that at-scale content agencies can’t easily replicate: documented niche experience, real tests with real results, and analyses based on direct access to the platform the article discusses. Your own data point, even at a smaller scale, carries more weight in an AI Overview than a paraphrase of another article paraphrasing a third.

    ◆ From our own build
    This guide runs its own advice. Attribute #1 above — sources embedded inside the paragraph — is exactly how this page is written: the 34.5% CTR figure, the Google fan-out detail, and the /llms.txt spec each link to their live source in the same sentence, not a footnote at the bottom. And the whole thing was produced by our 7-agent pipeline, then edited by a human. We’re not describing a method we read about — it’s the one we ship on ourselves.

    Technical Signals AI Engines Read Before Citing You

    Most GEO guides stop at “cite sources and use clear headers”. That is necessary but incomplete. There is a technical layer the vast majority of solo publishers still haven’t implemented — and it is already functional today.

    The /llms.txt file is the most concrete signal in that layer. The proposal, documented at llms-txt.org, was born from a real limitation of language models: context windows are too small to process most websites in full, and converting complex HTML — with navigation, ads, and JavaScript — into LLM-readable text is difficult and imprecise. The proposed solution is direct: a Markdown file at the root domain (yoursite.com/llms.txt) that provides concise, expert-level information in a single place. Complementarily, the proposal suggests that pages with LLM-useful content offer a clean Markdown version at the same URL with .md appended.

    The /llms.txt file is not yet a confirmed ranking factor for any generative engine — but it is exactly the kind of preemptive signal that separates publishers who anticipate changes from those who react after the market has commoditized. You can create this file today in 30 minutes, and none of the traditional SEO tools audit or validate it yet. That means whoever implements it now is technically ahead of the audit curve.

    Beyond /llms.txt, three other technical signals affect citability: Article, FAQPage, and HowTo schema markup applied correctly (they help the model identify the content type and extract specific sections); clean, conflict-free canonical tags (URL ambiguity reduces the model’s confidence in the canonical source); and server response time — models crawling for indexing are latency-sensitive, especially Perplexity’s and ChatGPT’s crawlers, which operate on shorter time windows than Googlebot.

    The Role of E-E-A-T in GEO: First-Hand Experience Is Irreplaceable

    E-E-A-T is not an SEO checklist — it is the criterion by which generative models decide whether they trust your content enough to place it in an answer that goes out to millions of users. And the first “E” — Experience — is what differentiates a solo publisher from an at-scale content generator.

    Generative models favor content that demonstrates real experience, not just encyclopedic knowledge. An article describing a process the author actually executed, with specific results, documented mistakes, and particular lessons, carries signals that generated or rewritten-from-other-sources content cannot replicate. For a technical deep dive into how these signals work in practice, the guide on E-E-A-T for AI content covers the exact signals Google uses to assess authority in AI-assisted content.

    The good news for the solo publisher: adding experience signals to existing posts doesn’t require a full rewrite. In an already-published section, you can insert: the specific result you got with that technique, the exact tool you used at a given step, the mistake you made on the first attempt, or the data from your own Search Console that confirms (or contradicts) what external sources claim. These first-hand paragraphs are the hardest for competing AI to replicate — and the most valued by systems that need to trust the factuality of the content they cite.

    How to Adapt Your Content Workflow for GEO

    Applying GEO doesn’t require abandoning the workflow you already have. It requires adding three layers to the existing process — one in research, one in structuring, one in post-publication review.

    In research: before writing, test the target query in ChatGPT, Perplexity, and Google AI Mode. See which articles are being cited as sources. Analyze what they have in common: structure, source density, use of specific data. This is not for copying — it’s for understanding that query’s citability pattern before you write. If the query already has an AI Overview with fixed sources, your article needs to offer something the current sources don’t have: fresher data, a first-hand perspective, or coverage of an ignored subtopic.

    In structuring: write every H2 section as a self-sufficient block. The test question: if someone read only that H2 and its paragraphs, would they understand the point without the rest of the article? If not, the paragraph is still too anchored in prior context. Add the verifiable source in the same sentence as the claim, not at the end of the section. For the complete workflow of producing SEO articles with AI — including intent research and structuring — the guide How to Write SEO Articles With AI covers the process end to end.

    In post-publication review: one week after publishing, query Perplexity and ChatGPT with the article’s main query. See whether you appear as a source. If you don’t, check: is the article indexed? Is the schema correct? Are there verifiable external sources embedded in the main paragraphs? This manual review is what substitutes, for now, the GEO tracking tools that are still taking shape.

    Editorial workflow adapted for generative engine optimization starting at the briefing stage
    Adapting the editorial workflow doesn’t require rewriting everything — the adjustment starts at the briefing stage, before the first word is written.

    GEO and AI-Generated Content: What the Data Actually Says

    The most common objection from publishers arriving at GEO is blunt: “if I use AI to create content, Google will punish me and I’ll never get cited.” That objection mixes two separate questions that need to be handled separately.

    Google doesn’t penalize content for having been generated with AI. It penalizes content that isn’t helpful, lacks E-E-A-T, has no verifiable sources, and was produced to manipulate rankings instead of informing users. That is the distinction that matters — and it is documented. For a detailed, data-backed analysis of what Google actually penalizes, the guide Does Google Penalize AI Content? dismantles the myth with concrete evidence.

    The real problem with AI slop in a GEO context isn’t the tool used — it’s the result: content with no identifiable sources, no first-hand experience, no structure that allows reliable semantic extraction. Generative engines that need to cite sources for users have a systemic incentive to avoid content they can’t verify. An AI-generated article with embedded sources, clear structure, verifiable data, and human review that adds real experience passes every filter. A human-written article with none of those characteristics does not.

    What to Measure to Know Whether Your GEO Strategy Is Working

    GEO tracking is still an immature market. Enterprise tools are emerging, but most are in beta or priced out of reach for solo publishers. What you can do today, at no additional cost:

    Manual citation monitoring: once a week, run your five main queries through Perplexity and ChatGPT Search. Note whether your domain appears as a source. It takes 15 minutes and is more reliable than any tool that hasn’t stabilized its methodology yet.

    ◆ From our own testing
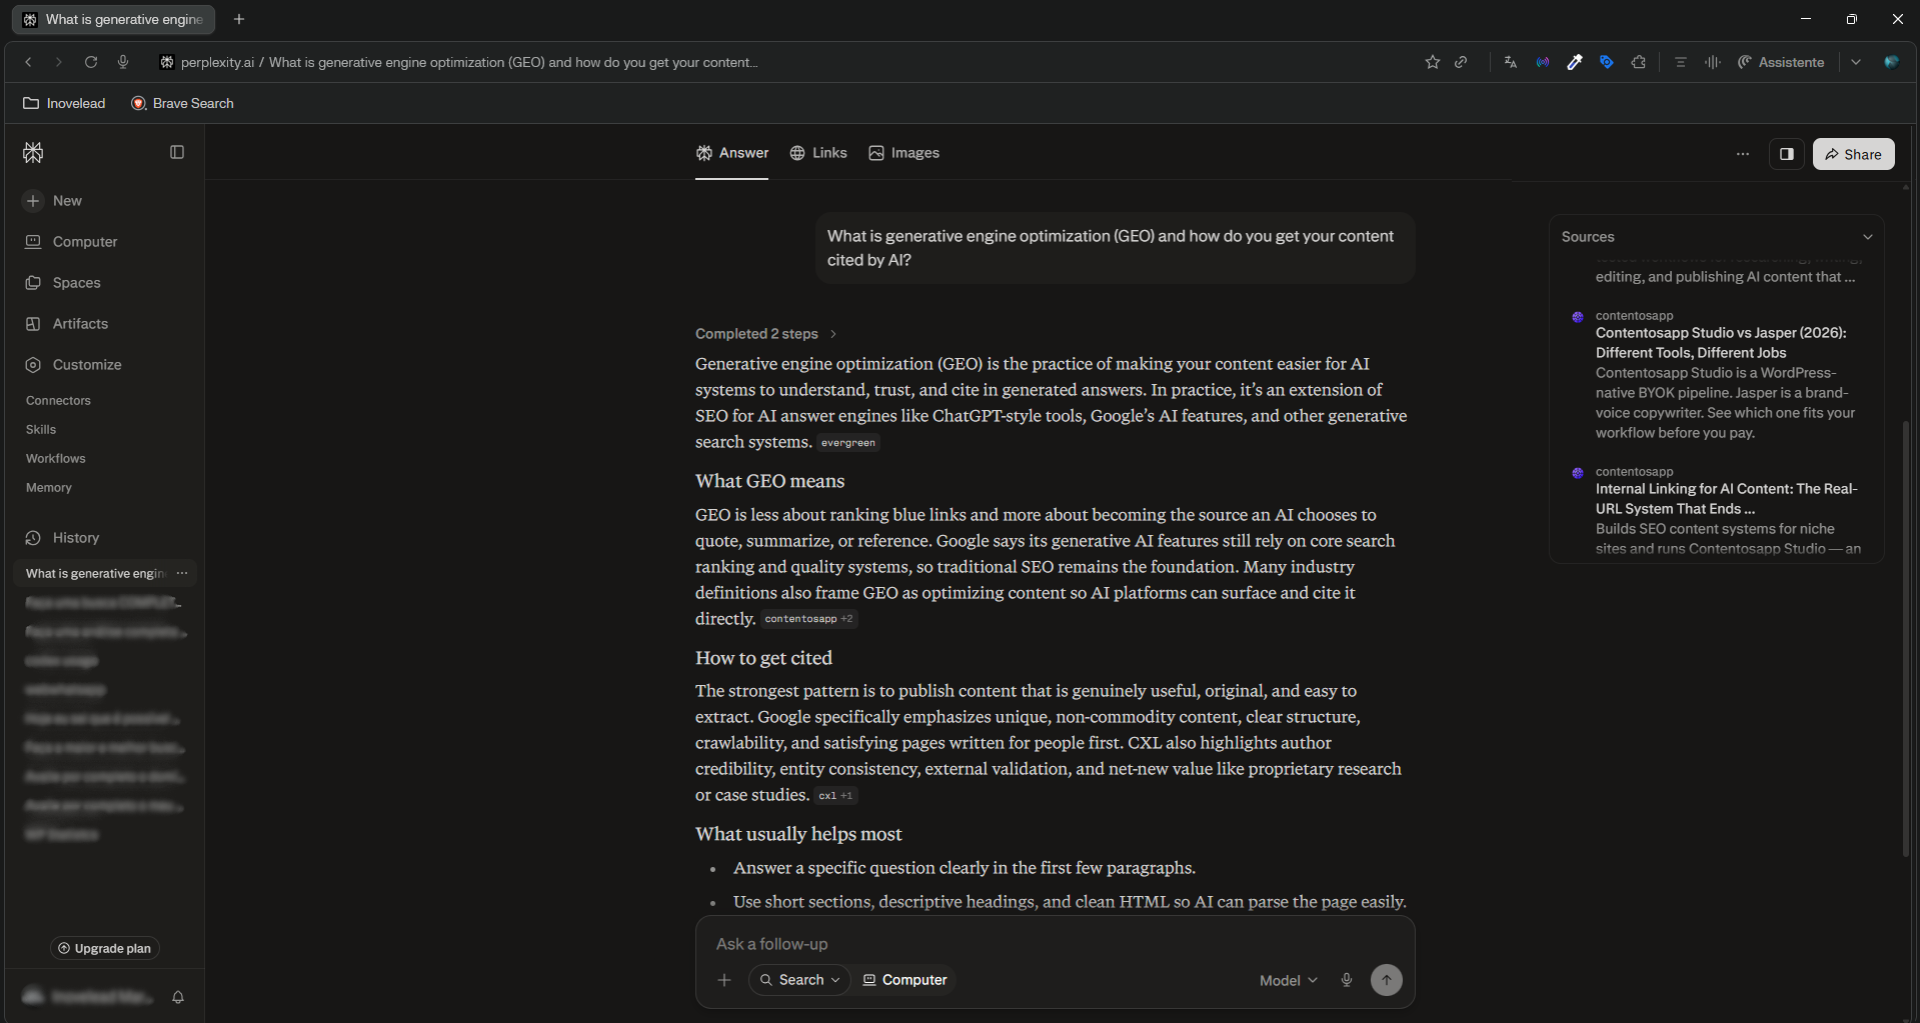
    We ran the exact check described above. We asked Perplexity “what is generative engine optimization and how do you get cited by AI?” — and contentosapp.com came back among the cited sources. The method in this guide, working on our own site. Perplexity listing contentosapp.com among the cited sources for a GEO query Perplexity’s Sources panel citing contentosapp.com — July 2026.

    Search Console as an AI Overviews proxy: when an AI Overview absorbs the click, what you see in Search Console is impressions without clicks — the keyword shows high impressions and very low CTR. A CTR below 0.02 on top informational queries is a sign an AI Overview is present. Use this metric as a priority diagnostic: queries with this pattern are the most urgent candidates for GEO optimization.

    Google Alerts for brand mentions: set up alerts for your site’s name and for specific phrases from key articles. When an AI cites your content in a published answer, the chance of someone linking or mentioning it goes up. Alerts capture the indirect trail.

    The recommended cadence: manual citation review monthly for priority queries; Search Console analysis weekly to identify queries with the AI Overview pattern; and a quarterly GEO content review for the articles that lost the most clicks in the last 90 days.

    Frequently Asked Questions

    Is Generative Engine Optimization the same as Answer Engine Optimization?

    No — and this confusion costs time and effort for anyone applying the wrong technique. AEO (Answer Engine Optimization) is the practice of formatting content to appear in featured snippets and voice assistant answers: short definition paragraphs, structured lists, FAQ schema. GEO is specifically about being cited as a source inside answers generated by language models — ChatGPT, Perplexity, AI Overviews. An article can be excellent for AEO (appearing in Position Zero) and invisible for GEO (no citations in generated answers) if it lacks embedded verifiable-source density. The mechanics converge on some points — clear structure helps both — but the selection criteria are different.

    Can AI-generated content be cited by AI Overviews?

    Yes, as long as it meets the quality criteria. What determines citation isn’t the creation tool — it’s the result: verifiable sources embedded in the text, clear semantic structure, first-hand or verifiable data, and factual language. An AI-generated article with those attributes, plus human review that adds real experience, has the same chances as a 100% human-written article of the same quality. What generative engines avoid is AI slop: content without sources, structure, or verifiability — regardless of who or what wrote it.

    Do I need to rewrite my old articles to apply GEO?

    A full rewrite is rarely necessary. What usually works: adding high-authority source citations to the main claims (directly in the paragraph, not in a references list at the end), inserting one or two first-hand experience paragraphs per section, revising H2s so each section is self-sufficient without external context, and implementing correct schema markup. Start with the three informational articles that lost the most impressions or clicks in the last 6 months in Search Console — they are the candidates with the highest potential return from a GEO revision.

    Is the llms.txt file already an official ranking factor?

    No — no generative engine has officially confirmed /llms.txt as a ranking or selection factor. It is a technical proposal with growing adoption, documented at llms-txt.org, that solves a real limitation: LLM context windows are insufficient to process entire sites with HTML, navigation, and JavaScript. The file works as an LLM-friendly access guide to your content. Implementing it now is a preemptive bet — the kind of move that generates structural advantage before standardization, not after.

    How do I know if my content is being cited by ChatGPT or Perplexity?

    The most reliable method is still manual: run your target queries directly on those platforms and check whether your domain appears as a source. Complement that with Google Alerts for your domain name and key phrases from your most important articles. Dedicated GEO tracking tools are emerging, but the market is still immature — most are in beta with unstable methodology. For now, 15 minutes of weekly manual checking on priority queries beats any dashboard that is still being calibrated.

    Does GEO work for affiliate niches or only editorial content?

    It works for both, with nuances. Informational editorial content is the primary candidate because 99.2% of the queries that trigger AI Overviews are informational — comparisons, guides, definitions. Affiliate articles with a strong informational angle (“best X for Y type of user”, “how to choose X”, “does X work for Z situation”) benefit directly. Purely transactional pages — price, buy button, little context — have less GEO relevance because they aren’t the kind of content generative models cite when answering informational questions.

    What’s the difference between optimizing for AI Overviews and for SGE?

    SGE (Search Generative Experience) was the name of Google’s pilot project that evolved into what is now called AI Overviews and AI Mode. In practical optimization terms, what you find today are two distinct surfaces: AI Overviews, which appear at the top of the standard SERP on informational queries, and AI Mode, described in Google’s documentation as better suited to complex queries that need exploration, reasoning, or detailed comparisons. Google’s documentation indicates both can use query fan-out and display supporting links — the eligibility criteria are the same, but the models and techniques may vary between the two surfaces.

    Conclusion

    GEO doesn’t ask you to throw away the SEO that already works. It asks you to add a layer of rigor that traditional SEO never explicitly demanded: verifiable sources inside the text, structure that works as self-sufficient units of knowledge, and documented experience that no model can fabricate. For a solo publisher, that set is feasible and executable — it isn’t an agency budget, it’s editorial discipline. The window is real: the criteria are still accessible, the tools are still forming, and the publisher who structures verifiable content now will harvest citation authority before the market treats it as table stakes. Start with the diagnosis: open Search Console, identify the three informational articles that lost the most clicks in the last six months, and apply what this guide describes. That is GEO with source-backed proof — not theory.

    References

    External sources

    Related content

  • Internal Linking for AI Content: The Real-URL System That Ends Orphaned Posts and 404s

    Internal Linking for AI Content: The Real-URL System That Ends Orphaned Posts and 404s

    You published 30 articles with AI. Fast, clean, well-structured posts. Then you checked your site and found two problems: half the articles had zero internal links connecting them to anything, and the other half had links pointing to URLs that return 404. Internal linking for AI content isn’t a polish step you add at the end — it’s a structural problem that breaks your entire topical-authority strategy before Google ever crawls the first post.

    The two failure modes have names. Orphan posts: AI writes each article in a vacuum, never referencing other pages on your site because it has no idea what else you’ve published. Hallucinated links: AI generates plausible-looking URLs — the kind that follow your site’s pattern perfectly — but points them at pages that don’t exist. Both failures share one root cause. This article gives you the two-part system — a URL Registry and a Cluster Map — that eliminates both without requiring you to manually audit every post you publish.

    Key Takeaways
    • Root cause: AI has no access to your site’s URL index — so it either ignores internal links entirely or invents URLs that pattern-match your domain but resolve to nothing.
    • Hard data: A study of 16 million URLs found AI assistants send visitors to 404 pages 2.87× more often than Google Search; ChatGPT alone hits a 1.01% broken-link rate on clicked URLs.
    • The URL Registry fix: A plain-text list of every real, published URL on your site — pasted directly into your AI prompt — constrains the model to links that actually exist.
    • The Cluster Map fix: Build a hub-and-spoke diagram before writing begins, assigning each article its hub and sibling links. Internal linking becomes a planning decision, not an editing task.
    • Together, these two artifacts turn a pile of disconnected AI posts into a topical-authority web — no post-publish audit required.

    Why AI Produces Broken Internal Links

    The problem isn’t that AI is careless. It’s that AI has no index of your site. When a language model generates an internal link, it isn’t reading your sitemap or crawling your domain — it’s pattern-matching against URL structures it encountered during training. It knows that cooking blogs tend to use slugs like /recipes/pasta-carbonara/, and affiliate sites often structure URLs as /category/product-name/. So it generates strings that look structurally valid for your domain but point to pages that were never published. The link looks right. It resolves to nothing.

    A 2025 Ahrefs study of 16 million unique URLs confirmed this at scale: AI assistants collectively send visitors to 404 pages 2.87× more often than Google Search. ChatGPT is the worst offender — 1.01% of actually-clicked URLs returned a 404, compared to a 0.15% baseline for Google. That’s a roughly 6.7× gap on real traffic. And that’s the hallucination problem. The orphan problem is quieter but equally damaging: when AI isn’t inventing bad links, it’s producing articles with zero internal links at all, because you gave it no URL data to reference and no instruction to link. Google’s crawl documentation is explicit — links must be standard <a href> anchor elements pointing to URLs that actually resolve. An AI-generated post full of invented slugs, or a post with no links at all, gives Google’s crawlers nothing useful to follow.

    AI assistant hallucinated link rates compared to Google Search baseline — Ahrefs 16M URL study
    Ahrefs analyzed 16 million URLs and found AI assistants hallucinate links at a rate that makes unreviewed AI output structurally unreliable for internal linking — the exact problem a URL Registry solves.

    Building a URL Registry Your AI Can Actually Use

    The fix is structural, not editorial. A URL Registry is a plain-text or spreadsheet document with two columns: Article Title and Full URL. Every post you’ve published goes in. Every time a new post goes live, you add it before you close the browser tab. That’s the entire artifact — but it’s the only thing standing between your AI sessions and another round of invented 404s.

    You paste this registry directly into your AI prompt under a clearly labeled header, like ## AVAILABLE INTERNAL LINKS. Immediately below that, you add one hard constraint: “You may only insert internal links from the list above. Do not invent, infer, or suggest any URLs not present in that list.” That single instruction eliminates hallucination at the source. The AI can’t link to a page that isn’t in the registry because you’ve explicitly forbidden it from doing so. This system slots naturally into a broader AI writing workflow — if you’re building a full content pipeline, the complete approach to writing SEO articles with AI covers how the registry fits alongside research, briefing, and draft generation. And if your goal is for those linked articles to actually rank, the playbook in how to make AI content rank in 2026 addresses the broader quality signals that determine whether your topical clusters gain traction.

    Cluster Mapping: Design the Links Before You Write

    Most operators treat internal linking as an editing task — something you do after the article exists. That framing is the reason AI-written content ends up full of orphans. By the time you’re editing, the AI has already written 1,500 words with no context for what else lives on your site. The right frame is architectural: you design the link structure before the first word is drafted.

    A cluster map is a simple table — Notion, Google Sheets, a plain text file — that lists every planned article in a topic cluster and assigns three things to each: (1) the hub page it links to, (2) one or two sibling spoke articles it links to, and (3) the intended anchor text for each link. Build this once per cluster, update it as new spokes are added, and pull from it every time you open a new AI writing session. This is how you prevent orphans structurally rather than fixing them after the fact. Google’s helpful-content guidance makes clear that content depth and topical completeness are real ranking signals — a cluster where every article connects to every other relevant article is the mechanical expression of that depth. The cluster map is what makes that connection intentional rather than accidental.

    The Prompt Template That Runs the System

    Here’s what the actual prompt structure looks like, ready to adapt for your next session:

    ## AVAILABLE INTERNAL LINKS
    [Article Title 1] — [Full URL]
    [Article Title 2] — [Full URL]
    [Article Title 3] — [Full URL]
    
    ## LINKING INSTRUCTIONS
    You may ONLY insert internal links from the list above.
    Do not invent, infer, or suggest any URL not present in that list.
    Insert 2–3 internal links within body paragraphs — not in a references section.
    Use descriptive anchor text that reflects the linked page's core topic.
    Vary anchor phrasing across links — do not repeat the same anchor text twice.

    Paste your URL Registry under the first header. Pull only the relevant cluster URLs — the hub and one or two siblings — not your entire 200-post site index. Giving AI too many options produces the same noise problem as giving it none.

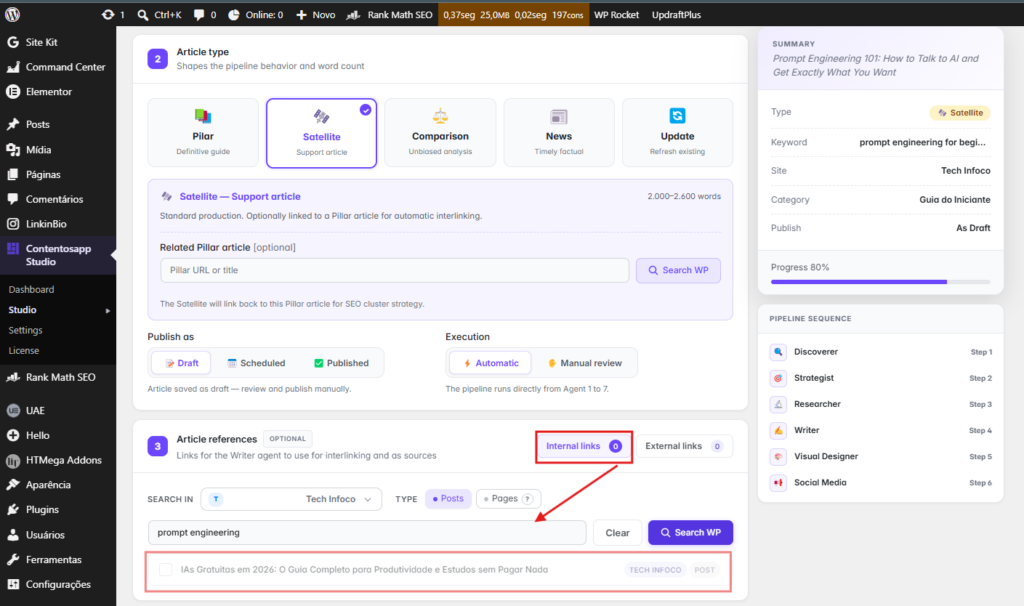
    The system only holds if the registry stays current. Most operators build it once and stop updating it after the first 20 posts. Then six months later they discover every article published after that date is either orphaned or 404-linked. The fix is a 30-second habit: when a post publishes, you add its title and URL to the master registry doc before navigating away. That single trigger, repeated consistently, is what keeps a 100-post or 200-post site’s internal link structure accurate without any retroactive auditing. Or you can skip the manual registry altogether: a tool like Contentosapp Studio reads the live URLs from your connected WordPress site and lets you insert internal links by selecting from those real pages — so the list is always current and the AI never invents a URL, because it’s choosing from your actual site, not generating one.
    Contentosapp Studio internal-link selector showing real published URLs from the connected WordPress site
    Real-URL grounding in practice: you pick internal links from pages that actually exist on your connected site — the agent never invents a slug.

    Frequently Asked Questions

    Can I just ask ChatGPT to add internal links after the article is written?

    You can, but without a URL Registry in the prompt, ChatGPT will invent links. The Ahrefs study found ChatGPT sends 2.38% of all cited URLs to 404 pages — more than double the baseline rate for Google Search. Asking it to “add relevant internal links” after writing, with no list of real URLs to reference, is exactly the scenario that produces those broken links. The fix is to provide the registry before generation, not to ask for links after the fact.

    How many internal links should each AI-generated article include?

    Two to four contextual links per article is a reasonable target for most niche sites. More important than the number is the quality: each link should connect to a semantically related page, use descriptive anchor text, and appear inside a body paragraph — not in a sidebar, footer, or standalone references block. Google’s link documentation confirms that anchor text is a direct relevance signal, so a single well-placed link with precise anchor text outperforms four links stuffed at the bottom with generic labels.

    What is the best anchor text strategy for AI content internal links?

    Use anchor text that describes the target page’s specific topic — not generic phrases like “click here” or “read more,” and not exact-match keyword repetition across every link pointing to the same page. Vary the phrasing: if your hub page is about keyword research, acceptable anchors include “keyword research process,” “how to find target keywords,” and “building a keyword list” — all pointing to the same URL. This variety signals natural editorial linking to Google rather than manufactured anchor-text patterns.

    Will Google penalize internal links added by AI?

    Google’s ranking systems evaluate whether content is helpful and created to benefit people — not whether it was produced by a human or an AI tool. The issue isn’t that AI added the links; it’s whether those links resolve to real pages and whether the anchor text is meaningful. A broken link or a manipulative anchor pattern creates the same problem regardless of who wrote it. Verify every URL before publishing and you’re working within Google’s published helpful-content standards.

    How do I find which of my AI articles have no internal links pointing to them?

    Run a site crawl with any standard SEO crawler — Screaming Frog, Sitebulb, or Ahrefs Site Audit. Filter for pages with zero inbound internal links. That list is your orphan report. Once you have it, use the cluster map to retroactively assign each orphaned page to its appropriate hub and update the URL Registry so future AI sessions include that page as a valid link target. Do this quarterly if you’re publishing at volume.

    Does internal linking between AI articles actually improve rankings?

    Internal linking distributes PageRank across your site and signals to Google’s crawlers which pages are thematically connected and which are most authoritative. A cluster where spoke pages consistently link to a hub page concentrates topical signals on that hub — which is how many niche sites earn rankings for competitive keywords with moderate domain authority. The mechanism works the same whether the content was written by a human or an AI; what changes is that AI-generated content needs the cluster structure to be designed explicitly, since the tool won’t infer it on its own.

    Conclusion

    The entire internal linking problem for AI content comes down to one missing input: AI doesn’t know your site, so you have to tell it exactly what exists. Build the URL Registry today — export your published URLs into a plain-text doc, two columns, every live post. Build the cluster map before your next article series begins, not after. Then add the constraint instruction to every AI writing prompt that involves links. These three habits take less than an hour to set up and roughly 30 seconds to maintain per publish. Start with the URL export right now — that list is your registry, and it’s the only thing standing between your next AI session and another batch of posts linking to pages that don’t exist.

    References

    External sources

    1. New Study: How Often Do AI Assistants Hallucinate Links? (16 Million URLs Studied)https://ahrefs.com/blog/how-often-do-ai-assistants-hallucinate-links/
    2. SEO Link Best Practices for Google | Google Search Central | Documentation | Google for Developershttps://developers.google.com/search/docs/crawling-indexing/links-crawlable
    3. Creating Helpful, Reliable, People-First Content | Google Search Central | Documentation | Google for Developershttps://developers.google.com/search/docs/fundamentals/creating-helpful-content

    Related content

  • How to Keep AI Content On-Brand: Build a Voice Profile That Works Every Time

    How to Keep AI Content On-Brand: Build a Voice Profile That Works Every Time

    Every AI draft sounds the same. Not because you’re using the wrong tool, not because you need a better prompt — because you’re feeding the model a description of your voice instead of your actual voice. That’s the core problem with how to keep ai content on-brand, and it’s a structural one. Fixing it requires a different type of input, not a longer prompt.

    You type “write in a direct, conversational tone” and get… medium. The kind of medium that fills the internet. Technically functional, stylistically nobody. You spend 15 minutes rewriting it until it sounds like you again — and then you do exactly the same thing next week, and the week after. The problem doesn’t go away, the cost doesn’t drop, and the output still blends into the SERP like every other AI-drafted post in your niche. The fix is a reusable voice profile: a short document — 300 to 450 words — built from three components: real writing samples pulled from your best content, a behavioral do/don’t list, and a one-paragraph persona card. You build it once. You paste it at the start of every session. Your drafts start sounding like you by default, not by coincidence.

    Quick Guide: Keeping AI Content On-Brand
    • The real problem: Tone adjectives like “conversational” map to average internet prose — not your style. The model has nothing specific to pattern-match against.
    • The fix is a document, not a prompt: A reusable voice profile — built once, pasted at every session — makes “on-brand” a default setting, not a per-post rewrite ritual.
    • Three components: 2–3 real writing samples from your best posts, a behavioral do/don’t list with specific sentence patterns (not adjectives), and a one-paragraph persona card.
    • Why it works: Real sample paragraphs trigger few-shot prompting behavior — the model matches your token patterns directly, not abstract style labels it has to guess at.
    • Audit the profile every 8–10 articles. If the AI’s description of your voice drifts from your persona card, update the do/don’t list and add a fresh sample paragraph.

    Why Describing Your Voice in a Prompt Doesn’t Work

    When you type “write in a friendly, direct tone,” you’re giving the model an instruction it cannot precisely follow — not because it’s bad at following instructions, but because “friendly” and “direct” are abstractions. The model has to interpret those words, and it does so statistically: it maps “direct, conversational” to the center of all training data ever associated with those labels. That center is average internet prose. Not yours. Not anyone’s in particular. Everyone’s at once, averaged out. This is the mechanism that produces AI slop — it’s not carelessness, it’s architecture. LLMs predict the most probable next token given a context, and a vague style label points straight at the median.

    Giving the model a tone adjective is like telling a contractor to build “a nice kitchen” without measurements or photos. They’ll produce something competent and generic, because “nice” lives in a probability distribution, not a blueprint. The fix isn’t a more precise adjective — it’s a sample. Two or three paragraphs from your actual published writing give the model token-level patterns to match against: sentence length, punctuation rhythm, the specific vocabulary anchors you habitually use, how you close a paragraph. As OpenAI’s own prompt engineering documentation makes clear, examples in a prompt anchor model behavior in a fundamentally different way than instructions do. That’s not a style preference — it’s a different input type with a different output mechanism. Description asks the model to imagine your voice. Samples show it exactly what your voice looks like in practice.

    Describe your voice and the model hands you the blurry average on the left. Show it real samples and it matches the distinct thing on the right — same model, different input type.
    Describe your voice and the model hands you the blurry average on the left. Show it real samples and it matches the distinct thing on the right — same model, different input type.

    How to Build a Voice Profile You Paste Once and Reuse Forever

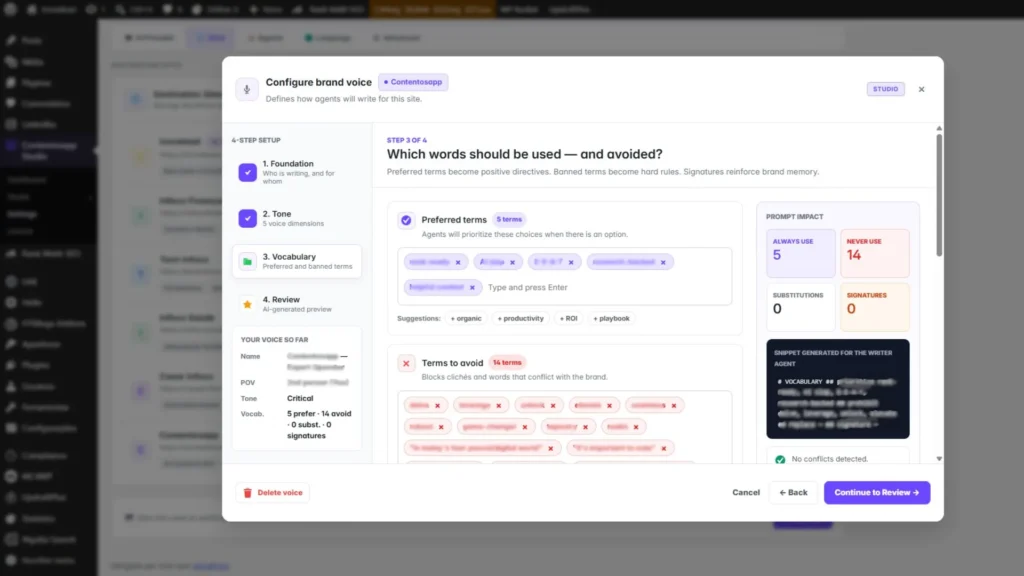
    A voice profile is a document — 300 to 450 words is the practical ceiling — that you store in a Notion page, a Google Doc, or a plain text file. You paste it into the system prompt field or custom instructions at the start of every AI session. You never re-explain your voice. You never re-type it from memory. You paste it, then you brief the article. This is the shift that changes how you work: “on-brand” stops being a judgment call you make fresh each time and becomes a default state your workflow produces automatically. And if you’d rather not paste anything at all, a tool with a built-in Brand Voice layer — like Contentosapp Studio — stores the profile once and injects it into every article automatically, so on-brand becomes a saved setting instead of a per-session step.

    Contentosapp Studio Brand Voice settings in WordPress showing saved writing samples, tone, vocabulary, and an author persona applied to every article automatically
    The voice profile as a saved setting: store your samples, your do/don’t, and your persona once — and every article is drafted on-brand, with nothing to paste each session.

    The document has three components that each do a distinct job. First, 2–3 paragraphs pulled verbatim from your best-performing or most authentic posts — real sentences, not summaries or descriptions of those sentences. Second, a behavioral do/don’t list that specifies sentence-level patterns (the next section covers how to build this correctly). Third, a persona card: one short paragraph that names who is writing, who they’re writing for, and what makes the point of view distinct. The compounding effect here is real and measurable. Every article you run through this profile reinforces a consistent brand footprint across your entire content library — a recognizable perspective that signals genuine expertise rather than generated text shaped to resemble expertise. If you’re building a full content production system around AI, the broader workflow for how this profile fits in is covered in detail in how to write SEO articles with AI — but the voice profile is the component most solo publishers skip, and it’s the one that determines whether your site accumulates a recognizable identity or a pile of competent-but-interchangeable posts. That recognizable identity is only half of a coherent site; the other half is structure — connecting those posts through a deliberate internal-linking system so the library reads as a navigable whole, not a content dump.

    The Do/Don’t List: Why Generic Tone Labels Produce Generic Output

    The do/don’t list is the highest-leverage component of your voice profile because it gives the model behavioral constraints — things it can actually execute — rather than aesthetic aspirations it has to interpret. “Be conversational” is an aspiration. “Never open a paragraph with ‘It’s important to note that’; address the reader directly as ‘you’ throughout; end opinion sections with a single declarative sentence, not a summary sentence” — those are constraints. The model can follow a constraint. It cannot follow a vibe.

    Here’s how to build one in under 20 minutes. Pull three sentences from your writing that you consider distinctly yours. For each one, identify what it does structurally: does it use a short punchy close? A second-person challenge? A stated observation with no hedge? Then flip each structural pattern into an explicit don’t. If you write short standalone sentences for emphasis: “never wrap a key point inside a subordinate clause.” If you typically open sections with a direct claim: “don’t begin a section with a question unless it’s genuinely unanswered.” Six to eight pairs is the right range — fewer leaves too much guessing room; more than ten creates noise that the model starts ignoring. Once you have the list, test it against a draft and add a new don’t for each drift pattern you catch. And if the output still feels slightly off even after the profile is in place, the right next step is a sentence-level editing pass to catch the residual drift before anything goes live.

    Example do and don't list for an AI brand voice profile showing specific sentence-level behavioral constraints
    The most effective voice profiles aren’t long — they’re specific. A 10-item behavioral list outperforms a 500-word tone description every time.

    How to Test and Maintain Voice Consistency Across Posts

    A voice profile doesn’t expire, but it does drift — slowly, the way any static document drifts from a moving target. Your writing evolves. New content formats introduce structural patterns your original samples didn’t cover. After 8 to 10 published articles, run a lightweight audit. It takes about ten minutes and it’s the step that determines whether your voice stays consistent or slowly reverts to the statistical mean over a few dozen posts.

    Three steps. First, paste a recent published paragraph into a fresh AI session — no voice profile included — and ask the model to describe the writing style in four or five sentences. Second, compare that description against your persona card. If the characterization matches your intended voice, the profile is working. If it doesn’t, you’ve caught the drift before it compounds into a brand perception problem your audience notices in retrospect. Third, update the do/don’t list with any new structural pattern you’ve noticed emerging in your recent writing. This is the step no competing guide addresses: the profile itself needs to evolve as your writing does, and skipping this audit is exactly why brand voice reverts to generic over time — not because the tool failed, but because the calibration document went stale. The stakes here exceed aesthetics. Google’s guidance on people-first content explicitly asks whether your content provides “insightful analysis or interesting information that is beyond the obvious” and whether it delivers “substantial value when compared to other pages in search results.” Generic AI output fails both tests structurally. Voice consistency isn’t a stylistic preference — it’s a direct input into the criteria Google uses to assess whether your content is worth ranking.


    Frequently Asked Questions

    What is a voice profile for AI content and what should it include?

    A voice profile is a short reusable document — 300 to 450 words is the practical target — that you paste into an AI tool’s system prompt or custom instructions before starting any draft. It contains three core components: 2–3 real writing samples pulled verbatim from your best posts (full paragraphs, not excerpts), a behavioral do/don’t list of specific sentence-level patterns to follow or avoid, and a persona card that describes who is writing and for whom. It exists outside any individual article workflow, so you build it once and reuse it across every session. The key distinction is that it replaces tone description entirely — you stop telling the model how you write and start showing it.

    How many writing samples do I need to calibrate my AI to my brand voice?

    Two to three full paragraphs is the right amount. Each sample should come from content you consider distinctly representative of your current voice — not your oldest posts, which may reflect an earlier style. The goal is to give the model enough token-level patterns to match: sentence length variation, punctuation habits, vocabulary anchors, how you close a paragraph. More than four or five samples introduces inconsistency, especially if the pieces were written at different stages of your writing. Quality of the examples matters more than quantity.

    Can I use a voice profile across different AI tools like ChatGPT and Claude?

    Yes. The sample-based calibration approach works across model families because the underlying mechanism — few-shot prompting via concrete examples — is a foundational technique that isn’t specific to any single model. Anthropic’s Claude prompt engineering documentation confirms that providing real examples is one of the most reliable ways to anchor model behavior. Paste your profile into the system prompt field in ChatGPT, the system block in Claude, or the equivalent persistent context field in whichever tool you use. The behavioral constraints in your do/don’t list translate across all of them.

    How do I know if my AI content is actually matching my brand voice?

    Run the quick audit: paste a recently published paragraph into a fresh AI session — no voice profile loaded — and ask it to describe the writing style in four or five sentences. Then compare that description to your persona card. Match means your profile is calibrated correctly. Mismatch tells you exactly what to fix: which component of the do/don’t list needs a new rule, or which sample paragraph has been superseded by how you write now. This self-assessment works because the model is reflecting back what it detects in the text, stripped of any instructions you gave it — it’s the closest thing to an objective voice audit you can run without a second editor.


    The voice profile isn’t a creative project you schedule for later. It’s an engineering decision with a measurable output: you’re changing the input type from abstract descriptor to concrete example, and the quality of the AI’s output changes because the underlying mechanism changes. Build the document today — it takes about an hour the first time. Keep it under 450 words. Paste it every session. The 15 minutes you currently spend rewriting each draft gets redirected into content that actually moves the needle. And as your library grows, the consistency compounds: a recognizable point of view accumulating across dozens of posts, signaling to both readers and Google’s systems that there’s a genuine perspective behind the work. Start with the samples. Everything else follows from there.

    References

    External sources

    1. Prompt engineering | OpenAI APIhttps://developers.openai.com/api/docs/guides/prompt-engineering
    2. Creating Helpful, Reliable, People-First Content | Google Search Central | Documentation | Google for Developershttps://developers.google.com/search/docs/fundamentals/creating-helpful-content
    3. Prompt engineering overview – Claude API Docshttps://platform.claude.com/docs/en/build-with-claude/prompt-engineering/overview

    Related content

  • How to Use Your Own AI API Key in WordPress: The Honest BYOK Guide

    How to Use Your Own AI API Key in WordPress: The Honest BYOK Guide

    Every subscription AI plugin eventually hits you with the same wall: a monthly fee, a word cap, and a price-per-article that makes scaling your content feel like rationing. Knowing how to use your own AI API key in WordPress — what the industry calls BYOK, or Bring Your Own Key — sounds like the obvious fix. And it often is. But the “96% cheaper!” claims floating around content marketing circles are a marketing number, not a guarantee, and they gloss over three things that actually determine whether BYOK works for your site: your real output volume, how you store the key, and which model you’re actually calling.

    This article gives you the honest version. You’ll see exactly what BYOK means in a WordPress context, the real per-article cost math using current pricing from OpenAI and Anthropic, the security risks WordPress-specific tutorials routinely skip, and a tiered model strategy that determines whether your savings are real or theoretical. If BYOK isn’t right for your current output level, you’ll know that too — before you spend an afternoon configuring it. For a broader look at building an AI content workflow that holds up under Google scrutiny, the complete AI writing workflow guide lays out how BYOK fits into a full production system.

    Key Takeaways: BYOK in WordPress
    • What BYOK means: You authenticate directly with OpenAI, Anthropic, or Google — the plugin is just a UI wrapper. No subscription markup, no proxy server.
    • The honest cost math: A 1,500-word article costs roughly $0.011 with GPT-5.4-mini or $0.035 with GPT-5.4. At 15+ articles/month, BYOK saves real money. Below that threshold, a subscription plugin’s support and zero-setup value may be worth the markup.
    • Security is your responsibility now: Keys stored in WordPress’s database are exposed by backup exports and poorly secured phpMyAdmin access. Store yours as a PHP constant in wp-config.php or a server-level environment variable — not just pasted into the plugin UI.
    • Model choice matters more than the BYOK decision itself: Defaulting to a flagship model when Claude Haiku 4.5 or GPT-5.4-nano handles bulk content just as well can erase most of your savings (often a 10–15x price difference per article at current published rates).
    • Set a hard spend cap at your provider dashboard before your first API call — this one step prevents a compromised key from becoming a real financial event.

    What BYOK Actually Means in a WordPress Context

    BYOK is not a plugin feature — it’s an authentication model. When you bring your own key, your WordPress site sends API requests directly to OpenAI, Anthropic, or Google’s servers using credentials you generated at those providers’ dashboards. The plugin handles the prompt formatting, streaming, and UI; it never touches the billing layer. Contrast that with subscription plugins that proxy your requests through their own infrastructure, apply a per-word or per-credit markup on top of whatever the provider charges them, and call it a flat monthly fee. That markup is the entire economic case for BYOK. What you trade for it is the support layer, the pre-built prompt templates, and the setup hand-holding those services provide.

    Three categories of WordPress plugins support BYOK today: AI writing assistants like Contentosapp, block editor extensions that add generation inside the Gutenberg interface, and SEO plugins with AI-powered features for meta descriptions and outline generation. Setup varies by plugin — some offer a dedicated API settings screen inside the WordPress dashboard; others expect a PHP constant defined in your server configuration. Either way, once authenticated, the plugin calls the provider’s API on your behalf and bills directly to your account. No intermediary, no markup, no monthly word cap.

    The Contentosapp Studio settings screen in WordPress showing the AI provider selector and an API key field with the key masked, used to connect your own OpenAI, Gemini, or Claude key
    BYOK in practice: pick your provider and paste your own key into the plugin’s settings — it then calls the API directly on your account, with no markup. The key is masked in the UI so it’s never shown in plain text.

    The Real Cost Math: When BYOK Saves Money and When It Doesn’t

    Here’s the calculation competitors never show. A 1,500-word article requires roughly 2,000 input tokens (your prompt plus context) and 2,000 output tokens. Using current OpenAI token pricing, GPT-5.4 costs $2.50 per million input tokens and $15.00 per million output tokens — which works out to $0.005 in input cost and $0.030 in output cost, about $0.035 per article. GPT-5.4-mini, at $0.75 input and $4.50 output per million tokens, drops that to roughly $0.011 per article. GPT-5.4-nano is cheaper still at $0.20 input and $1.25 output per million tokens — approximately $0.003 per article. On the Anthropic side, Claude Haiku 4.5 is priced at $1.00 input and $5.00 output per million tokens, landing at around $0.012 per article.

    Model Cost per article (est.) Monthly bill at 50 articles Monthly bill at 200 articles
    GPT-5.4 ~$0.035 ~$1.75 ~$7.00
    GPT-5.4-mini ~$0.011 ~$0.55 ~$2.20
    GPT-5.4-nano ~$0.003 ~$0.15 ~$0.60
    Claude Haiku 4.5 ~$0.012 ~$0.60 ~$2.40

    At those numbers, BYOK is cheaper than a $29/month subscription at essentially any realistic publishing volume — even GPT-5.4 costs less than $8/month at 200 articles. But that comparison is misleading on its own. A subscription plugin isn’t just selling you tokens. It’s selling you a managed interface, pre-engineered prompts, support when something breaks, and zero configuration overhead. If you’re publishing fewer than about 15 articles a month, your total API bill may be under $0.25 — and spending two to three hours setting up BYOK for $0.25 in savings is not a rational trade. The real question isn’t whether BYOK is cheaper on raw token cost (it always is). It’s whether your output volume justifies taking on the self-management it requires.

    Bar chart comparing BYOK per-article API costs vs. subscription plugin pricing across three publishing volumes
    At fewer than 20 articles per month, the per-article cost advantage of BYOK can shrink to near zero once you account for plugin license savings — volume is the deciding variable.

    How to Add Your API Key to WordPress Without Exposing It

    The mechanics are straightforward. Generate a key at your provider’s dashboard — OpenAI’s API keys page, Anthropic’s Console, or Google AI Studio for Gemini. Before you copy that key anywhere, set a spend limit. OpenAI’s production best practices documentation notes that new accounts start with a $100/month approved usage limit, and you can configure a notification threshold to catch runaway usage early. Do this first. A compromised key with no spend cap is a real financial exposure, not a theoretical edge case.

    For storing the key in WordPress, you have three practical options: paste it into the plugin’s Admin UI settings screen, define it as a PHP constant in wp-config.php, or pass it as a server-level environment variable. The Admin UI is the easiest path and works fine for most setups — but OpenAI is explicit that “you must be vigilant about securing these keys,” and the database-storage risk is real. Keys in the WordPress options table are exposed by unencrypted backup exports, readable by any other plugin with database access, and potentially visible through phpMyAdmin on shared hosting environments. Defining the key as a PHP constant in wp-config.php puts it outside the WordPress database entirely — and on a properly configured server, that file sits outside the webroot and isn’t web-accessible. Use a server-level environment variable when your host supports it for the strongest isolation. Rotate keys every 90 days regardless of which method you choose.

    // In wp-config.php — keeps the key out of the WordPress database
    define( 'OPENAI_API_KEY', 'sk-your-key-here' );
    Diagram comparing three WordPress API key storage methods — Admin UI, wp-config.php constant, and environment variable — with security level indicators
    Storing your API key in the WordPress Admin UI is the most convenient option — and the riskiest; environment variables sit at the opposite end of that trade-off.

    Picking the Right Model So Your Savings Are Real

    The most common BYOK mistake isn’t in the setup — it’s defaulting to the flagship model for every task. GPT-5.4 costs $15.00 per million output tokens. GPT-5.4-nano costs $1.25 per million output tokens. For bulk informational content — supporting cluster posts, FAQ sections, how-to guides, meta descriptions — the output quality difference is difficult to detect in practice. You’re choosing between roughly $0.035 and $0.003 per article for content that often performs identically at the search results level. Pairing BYOK with an automated publishing workflow multiplies this decision across dozens of pieces, making the model tier you default to the single biggest driver of your total spend.

    The tiered approach that makes BYOK savings concrete: use your flagship model — GPT-5.4 or Claude Sonnet 4.5, priced at $3.00 input and $15.00 output per million tokens — for money pages, comparison articles, and anything feeding directly to a conversion event. Reserve GPT-5.4-nano and Claude Haiku 4.5 for supporting content, internal link anchor suggestions, FAQ drafts, and meta description generation. This single decision can cut your total BYOK spend by 60–70% compared to using one model across your entire operation. The “96% cheaper than subscription” claim only holds if you’re also choosing the right model for the right task. Migrate to BYOK and default to GPT-5.4 for everything, and your bill grows with your output — the savings evaporate at exactly the scale where you expected them to kick in.

    Frequently Asked Questions

    Do I need a paid API plan to use my own key in WordPress, or does a free tier work?

    Google’s Gemini API offers a rate-limited free tier through Google AI Studio, which works for low-volume testing in WordPress. OpenAI and Anthropic do not offer ongoing free API tiers — new accounts receive initial credits at signup, but any sustained content operation requires a paid plan. For production use, budget a paid account from the start. OpenAI’s billing defaults to a $100/month approved usage limit, which you can adjust through your account’s limits settings page.

    Can I use more than one AI provider’s key in the same WordPress site?

    Yes. Most BYOK-compatible plugins support multiple provider credentials simultaneously. You can configure OpenAI, Anthropic, and Gemini keys in the same installation and route different tasks to different providers. Some AI writing plugins let you set per-task model preferences — useful when you want Claude Haiku 4.5 for bulk supporting content and GPT-5.4 for high-stakes pillar pages. The configuration interface varies by plugin, but the underlying approach is the same: each provider has its own key stored separately.

    What happens if someone steals my API key — am I liable for the charges?

    Yes. You are liable for any usage billed to your key, regardless of who initiated the requests. Neither OpenAI nor Anthropic covers fraudulent charges resulting from key exposure on your end. This is why a hard spend cap at the provider dashboard is non-negotiable before you connect a key to WordPress — not an optional step. If a key is compromised, revoke it immediately from the provider’s dashboard and generate a replacement. The financial risk is the primary argument for using wp-config.php storage over the Admin UI option on shared hosting environments.

    Does using my own API key mean the AI provider can see my WordPress content?

    The content you include in API requests — your prompts, outlines, and draft text — does pass through the provider’s servers. OpenAI, Anthropic, and Google all publish data usage policies that address whether API inputs are used for model training; generally, API data is not used for training by default on paid plans, but you should read each provider’s current terms directly. Your WordPress database, site files, and content that you don’t explicitly send in an API request are not accessible to the provider.

    Which AI model gives the best output quality per dollar for long-form blog posts?

    For supporting informational content, GPT-5.4-nano and Claude Haiku 4.5 offer the strongest quality-to-cost ratio at current pricing — both under $0.015 per 1,500-word article. For pillar pages, comparison posts, or any content where depth and nuance matter, GPT-5.4 or Claude Sonnet 4.5 are worth the step up. “Best per dollar” is genuinely task-dependent: a flat model recommendation ignores the 10–15x cost difference between the nano and flagship tiers, which is the core variable that makes or breaks real BYOK savings.

    Will switching to BYOK break the AI plugin’s existing generated content or settings?

    No. Switching to BYOK changes how the plugin authenticates future API calls — it has no effect on content already generated and saved in WordPress. Your existing posts, customizations, and plugin configurations stay intact. The only thing that changes is where future API requests are billed: previously through the plugin provider’s account (with their markup), now directly to yours. Run one test generation after setup to confirm the connection is live before committing to a full workflow.

    BYOK in WordPress is a genuine cost optimization — but only under the right conditions. If you’re publishing consistently at 15 or more articles per month and willing to manage one extra configuration layer, the math is clear: even a flagship model costs a fraction of what any subscription plugin charges per article. The decision rests on two things most guides skip. First, store your key in wp-config.php or a server-level environment variable, not the WordPress database, and set a hard spend cap before your first API call. Second, match your model tier to the task — nano and Haiku for bulk supporting content, flagship models for your highest-value pages. That one decision is what separates real BYOK savings from the same bill in a different line item. Start with a $10 spend cap, verify the connection, and scale from there.

    References

    External sources

    1. Pricing | OpenAI APIhttps://developers.openai.com/api/docs/pricing
    2. Pricing – Claude API Docshttps://platform.claude.com/docs/en/about-claude/pricing
    3. Production best practices | OpenAI APIhttps://developers.openai.com/api/docs/guides/production-best-practices

    Related content

  • How to Auto-Publish AI Content to WordPress (Without Becoming a Spam Blog)

    How to Auto-Publish AI Content to WordPress (Without Becoming a Spam Blog)

    You have the AI drafts. You’ve done the research, run the prompts, done the editing pass. Now you’re copy-pasting each post into WordPress, setting the slug, attaching the featured image, picking the category, writing the excerpt — and it’s eating 20 minutes per article. That’s the problem this article solves. If you want to know how to auto-publish AI content to WordPress, the answer is the REST API combined with a draft-first workflow. The REST API handles the plumbing: it moves your content from wherever your AI tool outputs it into WordPress automatically, with every field mapped correctly. The draft-first workflow is what keeps you out of trouble.

    Here’s the distinction that matters. Automating the mechanical steps — formatting, field mapping, scheduling, category assignment — is smart operations. Automating the quality gate, meaning letting unreviewed AI output go directly live, is what gets sites flagged. Google doesn’t penalize AI content as such — it penalizes manipulation and low quality, which is exactly what skipping the review gate produces. That single-field decision in your API call is the line between a growing content operation and a site eating a manual action. This article covers the full technical setup: REST API credentials, the right publish status, scheduling logic, and how to stitch it into a pipeline where the only step that stays human is the final approval click.

    Quick Guide: Auto-Publishing AI Content to WordPress
    • The core mechanism: WordPress’s REST API accepts POST requests with your content, slug, categories, and featured media — no copy-pasting required.
    • The safety field: Always set “status”: “draft” in your API payload, not “publish”. This routes every post through your WordPress draft queue for human review before anything goes live.
    • Authentication: Use Application Passwords — a dedicated WordPress user with Author role only, not your admin account. A leaked credential can then only create drafts, nothing more.
    • Scheduling cadence: Use the “date” field with ISO 8601 format to stagger posts across days. Publishing 40 articles overnight is a scaled-content spam signal regardless of quality.
    • No-code options: Make (formerly Integromat), n8n, and Python’s requests library all support this workflow without custom infrastructure.
    • Google penalizes intent to manipulate rankings — not AI content or automation itself. A reviewed draft pipeline meets the quality bar Google’s systems are looking for.

    The Status Field Is the Most Important Line in Your Automation

    Most tutorials on auto-publishing to WordPress show you a JSON payload, point at the endpoint, and tell you to set "status": "publish". That one default turns your automation into a liability. According to the WordPress REST API Handbook, the status field accepts five values: publish, future, draft, pending, and private. Setting it to draft means the automation becomes a delivery mechanism only — the post lands in your WordPress queue, fully formatted with every field populated, and it waits. You review it. You hit publish. The automation did the boring part; you retained the only part that matters.

    This is not a minor implementation detail. It is the architectural decision that defines whether your pipeline is a managed editorial tool or an unreviewed auto-blog. Change "draft" to "publish" in your payload and you’ve removed the human gate entirely. Every AI-generated post goes live the moment your script runs, with no review, no quality check, and no chance to catch a hallucinated stat or a formatting error before Google crawls it. The minimal viable payload for a safe setup includes title, content, status (set to draft), slug, categories, and featured_mediaall documented fields in the Posts schema. Get those six fields mapped correctly and you’ve replaced 80% of the manual publishing workflow with a single API call.

    Content pipeline splitting at a review gate, routing AI posts into a human-review queue instead of publishing live automatically
    Setting status to draft instead of publish is a one-character decision that determines whether your automation is an asset or a liability.

    Creating a Locked-Down WordPress API User for Your Automation

    Every tutorial tells you to generate an Application Password. None of them tell you which account to generate it on — and that’s the mistake. If you create the Application Password on your admin account, a compromised credential gives an attacker full site access: plugin installation, user deletion, settings changes, everything. The correct setup is a dedicated WordPress user with the Author or Editor role only. That account can create and edit posts. It cannot touch anything else. A leaked key from that account has a contained blast radius — draft posts at most.

    Application Passwords are the official WordPress authentication mechanism for REST API calls, introduced in WordPress 5.6 and now the production standard. To set this up: create a new WordPress user, assign the Author role, log in as that user, navigate to Users → Profile, scroll to the Application Passwords section, and generate a new password named something like “AI Publisher.” Store the credential immediately — it’s shown only once. From that point, every API call from your automation uses HTTP Basic Auth with the format Authorization: Basic base64(username:app_password). One additional advantage that competitors never mention: Application Passwords generate a read-only audit trail. The schema fields last_used (GMT datetime) and last_ip (IP address) let you verify when and where the credential was last used — something standard username/password authentication cannot provide. That audit visibility alone makes Application Passwords the security-superior choice for any automation pipeline, not just the “official” one.

    Scheduling and Cadence: The Part Everyone Skips

    Here’s a risk that almost no auto-publishing guide addresses. Even if every post is reviewed, well-edited, and genuinely helpful, publishing 50 articles in 24 hours through an automated pipeline can still look identical to a spam operation to Google’s systems. Google’s spam policies define spam as techniques used to manipulate Search systems — and scaled-content behavior is precisely the pattern SpamBrain is trained to detect. Quality is necessary but not sufficient. Cadence is part of the signal.

    The fix is one extra field in your API payload: "date". When used alongside "status": "future", this field schedules the post for a specific future datetime in ISO 8601 format — for example, "2025-09-15T09:00:00". In your publishing script, calculate the date for each post in the queue by incrementing by one day per article. One post per day is the conservative, safe-growth cadence for a solo niche site. Two per day is workable if your site already has traffic history. More than that on a young domain without established authority is the publishing equivalent of waving a red flag. A basic loop in Python or a scheduler node in Make or n8n can stagger an entire backlog of reviewed drafts across weeks — automatically — without you touching each one individually. Just remember what happens to all those posts once they’re live: published at volume with no linking plan, they pile up as orphans. Building a real-URL internal linking system into the pipeline keeps each new post connected to the cluster instead of stranded.

    Diagram showing staggered AI content publishing schedule in WordPress using the date field in REST API calls
    Publishing 5 posts all at once is a pattern crawlers notice. Staggering the date field across 5–7 days costs you nothing and signals an organic editorial rhythm.

    Connecting the Workflow: From AI Draft to WordPress Without Copy-Pasting

    The full pipeline has five stages, and only one of them should involve you sitting at a keyboard. Stage one: your AI tool generates the draft based on your brief. Stage two: your script (or no-code automation) calls the WordPress REST API with the reviewed draft, setting status to draft and date to its scheduled slot. Stage three: the post appears in your WordPress draft queue, fully formatted — title, content, slug, excerpt, featured media ID, categories all pre-populated.

    Contentosapp Studio event log showing an AI article being sent as a draft to a connected WordPress site over the REST API, then created as a remote post
    The draft-first pattern in action: the pipeline sends the finished article to the connected WordPress site as a draft over the REST API — it lands in the queue fully formatted, waiting for the one human approval click.

    Stage four: you open the draft, read it, make any edits. Stage five: you click “Schedule” or “Publish.” That last click stays human. Everything else is automated. For the content generation layer that happens before Stage two — prompt structure, research integration, E-E-A-T signals — the complete AI writing workflow at Contentosapp covers that in full. This satellite is about the deployment layer only.

    For the automation script itself, you don’t need custom infrastructure. Three tools handle this without writing a web server from scratch. Make (formerly Integromat) has a native WordPress module that maps fields visually and triggers on a schedule or webhook. n8n has a WordPress node that does the same thing in a self-hosted setup. If you prefer code, Python’s requests library handles the entire API call in under 20 lines — authenticate with Basic Auth, POST to https://yoursite.com/wp-json/wp/v2/posts, pass your JSON payload. All three approaches support the draft-first pattern natively. For the editing step before you trigger the API call, a sentence-level review pass is what separates rank-ready content from AI slop — it’s worth building that step into the workflow explicitly, not treating it as optional. And if you’re worried about whether the automation itself creates Google risk, Google’s own guidance is unambiguous: “Our focus on the quality of content, rather than how content is produced, is a useful guide.” The spam trigger is intent to manipulate rankings — not the use of AI or REST APIs.

    Frequently Asked Questions

    Does auto-publishing AI content to WordPress violate Google’s guidelines?

    Not if the content is reviewed before it goes live. Google’s official guidance states that “using automation — including AI — to generate content with the primary purpose of manipulating ranking in search results is a violation of our spam policies.” The operative phrase is “primary purpose of manipulating ranking.” A reviewed, helpful article published via the REST API is not categorically different from a reviewed article published manually. Google’s SpamBrain targets manipulation intent and quality signals, not the publishing mechanism you used.

    What is an Application Password in WordPress and why do I need one?

    An Application Password is a WordPress-native credential system for authenticating REST API requests from external applications. It generates a unique UUID-based token that you use in the Authorization header of every API call. Standard login passwords don’t work for REST API authentication in modern WordPress setups. The official Application Passwords documentation shows the full schema, including the audit fields last_used and last_ip — which give you visibility into when and where the credential was used. Generate it on a dedicated Author-role account, not your admin account.

    Can I auto-publish directly to “published” status, or does it have to be “draft”?

    Technically, the WordPress REST API supports setting status to publish directly. Nothing in the API prevents it. But doing so means unreviewed AI content goes live the moment your script runs. The draft status is the architectural choice that keeps the human review gate intact. If you want a reviewed post to go live later, set status to future with a date field — WordPress then publishes it automatically at that datetime, with no further gate. So only switch a draft to future after you’ve actually approved it: draft is the review gate; future is for scheduling content you’ve already cleared.

    How many AI posts can I publish per day without triggering spam signals?

    There’s no published threshold from Google, but the principle is clear: scaled content behavior is explicitly flagged in Google’s spam policies as a manipulation technique. For a solo niche site under 12 months old, one post per day is the conservative cadence. Two per day is workable on a site with established traffic and link history. The risk isn’t the number per se — it’s the combination of rapid volume, thin content, and no editorial fingerprint. If every post is reviewed and genuinely helpful, lower cadence is still the safer operational choice.

    What tools can connect an AI writing tool to WordPress without coding?

    Make (formerly Integromat) has a native WordPress module that handles REST API calls visually, no code required. n8n offers a WordPress node in its self-hosted automation environment — similar logic, more control. For those comfortable with a small amount of code, Python’s requests library makes the API call in under 20 lines. All three support draft-first workflows, field mapping (title, content, slug, categories), and scheduled publishing via the date field. Note: XML-RPC is deprecated in modern WordPress — avoid any workflow that relies on it.

    Will auto-published posts have the correct SEO metadata (title tag, meta description, slug)?

    The slug maps directly to the REST API’s slug field, so yes — if your script passes the correct slug, WordPress sets it on creation. The excerpt field functions as a meta description fallback for themes and most SEO plugins. For SEO plugins like Yoast or Rank Math, you’ll need their specific REST API fields (typically in the meta object) to set the Yoast/Rank Math title and description explicitly. The core post fields — title, content, slug, excerpt — map cleanly out of the box. Plugin-specific meta fields require a one-time check of that plugin’s REST API extension documentation.

    Conclusion

    The entire auto-publish setup reduces to three decisions: what field you set for status (always draft until reviewed), which WordPress account holds the Application Password (a dedicated Author-role user, never admin), and how you stagger the date field across your publishing queue (one post per day as the safe default). Get those three right and the automation handles all the mechanical friction — formatting, field mapping, featured media ID, category assignment — while you keep the only decision that matters: whether the content is actually good enough to send live. The review gate isn’t a concession to caution. It’s the operational detail that separates a site that compounds in authority from one Google’s systems eventually tune out.

    References

    External sources

    1. Posts – REST API Handbook | Developer.WordPress.orghttps://developer.wordpress.org/rest-api/reference/posts/
    2. Application Passwords – REST API Handbook | Developer.WordPress.orghttps://developer.wordpress.org/rest-api/reference/application-passwords/
    3. Spam Policies for Google Web Search | Google Search Central | Documentation | Google for Developershttps://developers.google.com/search/docs/essentials/spam-policies
    4. Google Search’s guidance about AI-generated content | Google Search Central Blog | Google for Developershttps://developers.google.com/search/blog/2023/02/google-search-and-ai-content

    Related content

  • How to Write SEO Articles With AI: The Complete Workflow That Actually Ranks

    How to Write SEO Articles With AI: The Complete Workflow That Actually Ranks

    Most people who try to learn how to write SEO articles with AI make the same mistake twice. They open ChatGPT, type something like “write me a 2,000-word article about [keyword],” paste what comes out into WordPress, and wonder why it reads like a Wikipedia summary with extra steps. Then they try a better model, get the same kind of output, and conclude that AI content just doesn’t work. The problem was never the model. It was the absence of a workflow.

    What actually produces rank-ready content isn’t a prompt — it’s a system. You need keyword and intent research done before the AI touches anything, a structured brief that tells the model what matters, section-by-section prompting instead of a full-article dump, a surgical human edit pass, post-draft on-page optimization, schema markup, and a clean publish checklist. Every one of those steps changes the output. Skip any of them and you get the kind of article Google’s quality systems were built to ignore: technically readable, structurally generic, and indistinguishable from the other twenty pages already ranking for the same query. This article gives you the complete process, step by step — the workflow that scales.

    Key Takeaways
    • Workflow, not prompts: A single ChatGPT prompt produces output that mirrors the top results without adding anything unique. The fix is a repeatable, staged process.
    • The brief is the critical step: Most solo operators skip the structured content brief and go straight to prompting — which is exactly why the output reads like AI slop.
    • Prompt section-by-section: Break drafts into intro, TLDR, H2-by-H2, FAQ, and conclusion. Never ask for a full article in one shot.
    • Edit surgically, not stylistically: Replace hedge stacks, insert cited data, add one first-person observation per section, break repetitive sentence rhythms.
    • Optimize after the draft exists: Semantic gap scanning, title/H1 alignment, meta description, and schema markup are deliberate post-draft steps — the AI does not handle them automatically.
    • Schema matters for E-E-A-T: Article/BlogPosting structured data tells Google who wrote it, when, and what it’s about — a trust signal the AI draft won’t add for you.
    • Build systems: Brief templates, prompt libraries, and quality gates make the workflow repeatable at scale without quality degrading.

    Why One Prompt Never Produces a Ranking Article

    The single-prompt approach fails for a structural reason. AI language models generate content that is statistically plausible — meaning the output tends to resemble the dominant pattern in training data for that topic. For any popular keyword, the dominant pattern is the top-ranking SERP results. So a single-prompt article doesn’t just sound generic; it literally is generic, shaped by the average of whatever already exists. It has no original angle, no cited evidence, no experience signal. It’s AI slop by design.

    Google’s own ranking guidance on this is more nuanced than most people realize. Google states clearly that “our focus on the quality of content, rather than how content is produced, is a useful guide.” The method of production — AI or human — is not the issue. Intent and quality are. The violation isn’t using AI. It’s using AI with the primary purpose of manipulating rankings, producing content that doesn’t serve the reader. A workflow built around people-first output avoids that entirely.

    The practical implication: your workflow needs to be the differentiator, not the model. GPT-4o, Claude 3.5, and Gemini 1.5 all produce comparable first drafts given the same generic prompt. What separates a ranking article from a forgettable one is everything that happens before and after that draft — the research, the brief, the edit, and the optimization. That’s the machine you’re building in this article.

    Complete AI SEO article workflow showing 8 stages from keyword research to publish
    Skipping even one stage in this sequence typically collapses the output quality at the next step — intent mapping without a proper brief produces a draft the human edit layer can’t fix efficiently.

    Step 1: Keyword Research and Intent Mapping Before You Touch AI

    The search intent for “how to write seo articles with ai” is not informational in the academic sense. The person typing that query isn’t looking for a definition of AI content. They want a process — specific, repeatable, practical. That distinction matters because it tells you exactly what the article needs to contain, how long it should run, and what format Google is currently rewarding for this query. You read all of that from the SERP before you write a single word.

    Open an incognito window and search your target keyword. Look at the top five results: are they step-by-step guides or concept overviews? How long are they? Do they use numbered H2 sections or thematic ones? What questions appear in People Also Ask? This isn’t optional research — it’s the spec sheet for your article. You’re not trying to copy those pages. You’re trying to understand what Google has determined satisfies the query, then build something that does it better and differently. Without this step, your brief is guesswork.

    Beyond the primary keyword, map the secondary terms your article needs to cover: content brief for SEO, AI prompting for blog posts, on-page optimization checklist, E-E-A-T signals, Article schema WordPress. These aren’t synonyms — they’re the semantic territory your article needs to own. Any draft that misses three or four of these terms has a structural semantic gap that no amount of human editing fixes after the fact. Identify them before you brief the AI, and include them explicitly in your outline.

    Step 2: Building the Brief AI Can Actually Use

    Here’s the gap most tutorials skip entirely: they go from keyword research straight to a prompt, treating the prompt as the brief. It isn’t. A prompt is an instruction. A brief is context — and without context, the AI fills the gaps with the most statistically average answer available, which is exactly what you don’t want. The brief is where you inject the specificity that separates your article from everything else ranking for the same query.

    A rank-ready content brief contains: the confirmed search intent statement (one sentence, stated explicitly), the primary and secondary entities the article must cover, the target word count and structural requirements (number of H2s, whether a TLDR and FAQ are required, tone), the angle — meaning the specific editorial claim or approach this article takes that the top competitors do not — and two to three content gaps you found during SERP analysis. For this article, for example, a real brief entry would read: “Gap: no competitor article explains that Google’s people-first checklist questions map directly onto the workflow stages — original info = research stage, no rewrites = draft stage, expertise visible = edit and schema stages. Make that connection explicit.” That instruction cannot emerge from a generic prompt. It has to be in the brief.

    Feed the brief to the AI before any draft instruction. Paste it as the first message in the conversation, have the model confirm it understood the brief, then begin the section-by-section prompting. The quality of the output changes immediately and measurably — not because the model became smarter, but because you stopped asking it to invent the article and started asking it to execute a spec. This is the original assertion that almost no workflow guide makes explicit: the brief is the real work. The prompting is execution.

    Step 3: The Prompting Framework for SEO Drafts

    Prompting in sections outperforms full-article prompting for one concrete reason: attention and coherence degrade over long output windows. Ask a model to write a 3,500-word article in one shot and the second half loses consistency with the first — tone shifts, claims get vaguer, structure drifts. Break the same article into discrete prompted sections and each section gets the model’s full attention against the brief context.

    The architecture looks like this: System role first (“You are an expert SEO content writer producing a pillar article for [niche], writing for [reader profile]”). Then paste the brief. Then prompt the introduction only, review it, and approve before moving to the TLDR. Then prompt each H2 section individually, providing the heading, the key claim to make, any specific data to use, and the approximate word count for that section. Each completed section becomes context for the next — paste the approved previous sections at the top of each new prompt so the model maintains continuity. FAQ and conclusion follow the same pattern.

    A concrete section prompt looks like: “Write the H2 section ‘Step 2: Building the Brief AI Can Actually Use.’ Key claim: the brief is the real work — most operators skip it and go straight to prompting, which produces generic output. Cover what a rank-ready brief contains: intent statement, entities, content gaps, tone, angle. Include a real example entry for this article’s keyword. Approximately 350 words. Tone: direct and practical, no hedging, 2nd person.” That is an executable instruction. “Write the section about content briefs” is not.

    Step 4: The Human Edit Layer — Where Rankings Actually Happen

    “Add your own voice” is not a workflow step. It’s an outcome — and it doesn’t tell you what to actually do at the sentence level. Here’s what you actually do: open the AI draft and work through it in four specific passes.

    First pass: find every hedge stack and delete it. AI-generated text is full of constructions like “it’s worth noting that,” “arguably,” “one might consider,” and “it is generally believed that.” These phrases exist because the model is trained to avoid definitive claims. Replace each one with a direct declarative sentence. If the claim is accurate, state it plainly. If it isn’t accurate enough to state plainly, cut it. Second pass: replace every vague statistic or attribution with a named source. “Studies show that longer content ranks better” becomes either a citation from a specific study or it gets cut. Vague attribution is a negative E-E-A-T signal — it tells Google the article can’t actually verify what it’s claiming. Third pass: insert one concrete first-person data point or observation per section. Not a generic example — a specific one tied to your actual experience. Fourth pass: break repetitive sentence rhythm. AI text has a characteristic pattern — medium-length declarative sentence, connector word, next medium-length declarative sentence. Read each paragraph out loud. Where three consecutive sentences run the same length, rewrite the middle one shorter or the last one longer. Burstiness is the primary anti-slop signal at the sentence level.

    The sentence-level edit guide on Contentosapp goes deeper on each of these passes with specific before/after examples. The point here is that the edit is surgical, not stylistic. You’re not “making it sound human.” You’re adding the specific signals — verified sourcing, direct assertion, original experience — that Google’s E-E-A-T framework was designed to surface. Those signals don’t emerge from the draft. They have to be installed by a human who knows the topic.

    Step 5: On-Page Optimization Before You Hit Publish

    Most AI content workflow guides treat on-page optimization as something the draft handles automatically. It doesn’t. The AI draft contains the text. On-page optimization is a separate, deliberate step that happens after the draft is final and before you hit publish — and it requires human judgment at every point.

    Google’s quality guidance asks whether content “provides original information, reporting, research, or analysis” and whether it “provides a substantial, complete, or comprehensive description of the topic.” Those standards map directly onto a post-draft checklist. Run a semantic gap scan: take the final draft, compare it against the top three ranking pages for your keyword, and list any subtopics or entities those pages cover that yours doesn’t. Not every gap needs to be filled — some are irrelevant — but missing three or four core semantic concepts is a structural weakness no keyword density fix will solve. Add the missing coverage as a short new section or as additional sentences within existing sections.

    After the gap scan: check title/H1 alignment (your exact primary keyword should appear in the title tag, ideally near the front), write your meta description manually (the AI draft’s first paragraph is not a meta description), confirm that every H2 includes at least one secondary keyword naturally, and verify that every image has descriptive alt text containing the keyword. Internal links go in at this stage too — not at the drafting stage, where the model tends to hallucinate URLs. Check that your planned internal links use descriptive anchor text and point to real, published pages. The real-URL system for internal linking in AI content covers how to build that link structure across a whole cluster — without orphaning posts or inventing URLs that 404.

    On-page SEO optimization checklist for AI-written articles before WordPress publish
    On-page optimization applied after drafting — not before — is one of the most common workflow mistakes: the AI draft and the final SEO structure should be reconciled in one dedicated pass, not retrofitted in the editor.

    Step 6: Adding Structured Data and Technical Signals in WordPress

    Article structured data tells Google what it can’t reliably infer from the page text alone: who wrote it, when it was published, when it was last updated, and what type of content it is. Google’s Article structured data documentation shows that adding BlogPosting schema to your posts helps Google “understand more about the web page and show better title text, images, and date information” in search results. That’s not a minor aesthetic win — it’s a direct E-E-A-T signal at the technical level.

    The fields that matter most for a blog or affiliate article are: headline (your exact published title), author (type: Person, with a URL pointing to your author page), datePublished and dateModified in ISO 8601 format, image (three aspect ratios: 1×1, 4×3, 16×9, per Google’s examples), publisher (type: Organization, with your site name and logo), and description (your meta description). If you’re using Yoast SEO or Rank Math, most of these fields populate automatically from what you’ve already filled in — check the schema preview before publishing to confirm the author field isn’t defaulting to the site name. If you’re implementing manually, paste the JSON-LD block inside a <script type="application/ld+json"> tag in the <head> of the page using a Custom HTML block in WordPress.

    The reason this belongs in the workflow — not as a developer afterthought — is that it directly affects how Google categorizes the content during indexing. An article without author markup and without explicit date signals gets treated differently than one with both. For AI-produced content specifically, establishing clear authorship and publication dates is one of the fastest ways to attach human accountability to the page and address the trust dimension of E-E-A-T.

    Step 7: The Publishing Checklist — From Draft to Live Without Breaking the Workflow

    WordPress introduces its own set of failure points between “final draft” and “live post.” Most of them are boring and easily missed. Running a checklist at this stage costs three minutes and prevents the kind of errors — a wrong slug, a broken internal link, a missing canonical — that are invisible in the editor but expensive once the page is indexed.

    The checklist in order: Confirm the URL slug matches your target keyword and is clean (no stopwords, no duplicate words, no underscores). Assign the correct category and one or two relevant tags — not a dozen. Set the featured image and confirm its alt text contains the primary keyword. Open every internal link in the draft in a new tab and verify it loads the correct page. Check the canonical tag (Yoast or Rank Math shows this in the advanced settings) — it should point to the page’s own URL, not a category or pagination URL. Decide publish vs. schedule: publishing immediately is fine if you’re ready to share it; scheduling has no SEO advantage unless you’re managing editorial calendar logic. If you’re publishing at volume, auto-publishing reviewed drafts straight to WordPress automates this final step safely — without turning into an unattended spam blog.

    One thing that happens specifically with AI-drafted content: the model sometimes generates numbered lists or formatted tables that WordPress renders incorrectly when pasted as raw Markdown. Check the rendered preview, not just the block editor view. Broken formatting degrades time-on-page and is a user experience signal that affects how Google interprets the page’s quality over time. For a deeper look at what happens after the article goes live, the complete system for making AI content rank covers the post-publish signals in detail.

    Step 8: Scaling the Workflow Without Losing Quality

    Running this workflow once on a single article is useful. Running it on forty articles across six months without quality degrading is the actual goal. The difference between the two is systems — specifically, documented templates and quality gates that remove discretionary decisions from each individual article.

    Brief templates: build one for each content type you produce (pillar, comparison, satellite). The template is a document with fixed fields: intent statement, primary entity, secondary entities, angle, content gaps (blank until SERP research fills them), structural requirements (word count, H2 count, FAQ required, TLDR required), and tone notes. Every article starts by filling in the template, not by writing a fresh brief from scratch. This alone halves the time spent at the most critical stage of the workflow. Prompt libraries: keep a running document of your best section-specific prompts — the exact language that consistently produces output you need minimal editing time on. When a prompt works well for an introduction, save it. When a prompt for a data-table section produces clean output, archive it. A saved brand voice profile — real writing samples plus a do/don’t list — keeps tone consistent across every article without re-describing it each prompt.

    Quality gates are non-negotiable before any article publishes: minimum word count hit (verify in WordPress editor), minimum citation count (two named sources per article, minimum), at least two internal links pointing to related published content, semantic gap scan completed and documented. A shared checklist — even in a simple Notion database — turns this from “stuff you remember to do” into a documented process anyone on your team can execute. The workflow becomes a machine, not a skill that lives in your head.

    Contentosapp Studio production view showing a seven-agent SEO content pipeline — Discoverer, Strategist, Researcher, Writer, Editorial Reviewer, Visual Designer, and Social — all completed for one article
    The workflow as a machine: a real seven-stage pipeline taking one keyword from research to a reviewed, published draft — the same research→write→review system this guide describes, running end to end inside WordPress.

    Frequently Asked Questions

    Can AI write SEO articles that rank on Google?

    Yes — but with a critical condition. Google’s official guidance states that its systems aim to reward original, high-quality content that demonstrates E-E-A-T “however it is produced.” Using AI is not a violation. Using AI with the primary intent of manipulating rankings, while ignoring quality, is. AI-produced content ranks when it goes through a workflow that produces genuine value: original research, verified sourcing, clear authorship, and deliberate on-page optimization. A single-prompt AI article rarely meets that bar. A structured workflow article consistently can.

    What is the best AI tool for writing SEO articles?

    There is no single best tool — and the question usually leads people to the wrong conclusion. The output quality difference between GPT-4o, Claude 3.5, and Gemini 1.5 Pro on the same brief is marginal compared to the quality difference between a good brief and a bad one. A weak brief given to any of these models produces weak output. A strong brief with section-by-section prompting produces strong output from any of them. Pick one and learn its instruction-following patterns well. Switching models every month in search of better output is almost always solving the wrong problem. Whichever model you pick, connecting it through your own API key means you pay the provider’s real rate — here’s the honest BYOK cost breakdown.

    How do you make AI-generated content sound less like AI?

    Four specific interventions matter more than any others. First, remove every hedge stack (“it’s worth noting,” “one might argue,” “arguably”). Second, replace vague attributions (“studies suggest”) with named, linked sources. Third, insert one concrete first-person observation or data point per section — something specific to your actual experience or testing. Fourth, break the uniform sentence rhythm AI text defaults to: vary sentence length aggressively, with some sentences running five words and others running thirty. These changes don’t cosmetically disguise AI origin — they add the substance that makes the article actually better.

    Do I need to edit AI-written articles before publishing?

    Every time, without exception. The edit is not optional polish — it’s the step where E-E-A-T signals get added that the AI cannot produce: verified sourcing, original experience, direct assertion, and authorial accountability. An unedited AI draft has structural credibility problems that on-page optimization cannot fix. The question isn’t whether to edit; it’s how surgical the edit needs to be. A well-briefed, section-by-section draft typically needs 20–30 minutes of focused editing. A single-prompt dump may need a near-complete rewrite.

    How long should an AI-written SEO article be?

    Match the length to what’s ranking for your specific keyword, not to a generic “longer is better” rule. Search the keyword, check the word counts of the top three results (a browser extension like WordCounter or SEO Minion shows this quickly), and target the range they represent — not significantly shorter, not arbitrarily longer. For competitive pillar-type keywords, 2,500–4,000 words is common. For more specific long-tail queries, 800–1,500 words often outperforms a padded 3,000-word article. The AI makes hitting any word target easy; the goal is to hit the right one.

    Is it safe to publish 100% AI-generated content on my blog?

    “Safe” depends on what 100% means to you. Publishing content that received zero human review, no sourcing, no original perspective, and no on-page optimization is high-risk — not because it’s AI-generated, but because it’s almost certainly low-quality by Google’s standards. If 100% means the first draft was AI-generated but then went through a full editorial workflow — human edit, cited sourcing, schema markup, optimization — that’s exactly the production model Google’s guidance accommodates. The percentage of AI vs. human input in the draft is far less important than the quality of the finished article.

    How do I add E-E-A-T to AI-written content?

    E-E-A-T is added at multiple workflow stages, not in one step. Experience comes from the human edit — inserting specific observations, test results, or use cases you can personally verify. Expertise comes from sourcing — citing named studies, regulatory bodies, or industry sources rather than vague attributions. Authoritativeness comes from the page’s technical structure — author markup in Article schema, a linked author page, and internal links from and to established content on your site. Trustworthiness comes from all of the above plus accurate, verifiable information. The complete E-E-A-T framework for AI content breaks this down signal by signal if you want to go deeper.


    Conclusion

    The workflow is the article. Not the model, not the prompt, not the word count. If you run keyword research properly, build a real content brief, prompt in sections, edit at the sentence level, optimize post-draft, add schema, and publish through a clean checklist — the AI handles execution and you handle judgment. That division of labor produces articles that are faster than fully human-written and better than fully AI-generated. The bottleneck in your content operation almost certainly isn’t the AI tool you’re using. It’s the absence of a repeatable process around it. Build the process once, document it properly, and run it on every article you publish from here on out. The output compounds.

    References

    External sources

    1. Google Search’s guidance about AI-generated content | Google Search Central Blog | Google for Developershttps://developers.google.com/search/blog/2023/02/google-search-and-ai-content
    2. Creating Helpful, Reliable, People-First Content | Google Search Central | Documentation | Google for Developershttps://developers.google.com/search/docs/fundamentals/creating-helpful-content
    3. Learn About Article Schema Markup | Google Search Central | Documentation | Google for Developershttps://developers.google.com/search/docs/appearance/structured-data/article

    Related content

  • How to Edit AI Content: The Sentence-Level Pass That Makes It Rank

    How to Edit AI Content: The Sentence-Level Pass That Makes It Rank

    Most people publishing AI content aren’t failing because of the AI. They’re failing because they’re skipping the edit. If you’ve ever stared at a draft and felt something was off — but couldn’t name what to fix — that’s not an intuition problem. That’s a missing framework problem. Knowing how to edit AI content systematically is the skill that separates blogs that rank from blogs that produce polished-looking slop nobody reads twice.

    This isn’t a guide about prompts or tools. It’s a sentence-level editing walkthrough: what to cut on sight, how to rewrite the one paragraph that matters most, and what to inject so Google’s quality systems recognize actual human experience in your content. If you’ve already checked whether AI authorship itself is the ranking issue and ruled that out, then the problem is squarely in your editing pass — or the absence of one. That’s what this fixes.

    Key Takeaways: How to Edit AI Content
    • Delete before you add: The highest-ROI editing move is removing the three sections where AI adds zero value — the scene-setting opener, the filler transitions, and the restatement conclusion. Only then do you add original content.
    • Run a slop-pattern scan first: Phrases like “delve into,” “it’s worth noting,” and “in today’s fast-paced world” are sentence-level signals that a draft is unedited. Find them before you touch anything else.
    • Rewrite the first three sentences cold: Don’t edit the AI opener — replace it entirely. This single move has more impact on perceived authority and E-E-A-T than any other edit you’ll make.
    • Inject real experience, not humanizer output: Google’s quality signals reward original information, sourced claims, and evidence of genuine expertise. AI detector scores are irrelevant to rankings — experience signals are not.
    • Use a five-pass sequence: Slop scan, intro replacement, specificity check, experience injection, and a final read-aloud rhythm pass. Run them in order, every time, on every draft.
    • Counter-takes matter: One sentence where you genuinely disagree with the consensus — or qualify a popular claim — signals more editorial authority than five paragraphs of well-phrased agreement.
    How to edit ai content: Common AI slop patterns to identify and cut when editing AI-generated content for SEO.
    Patterns like hollow transitions, redundant summaries, and generic hedging phrases can appear multiple times in a single 1,000-word AI draft — identifying them by type, not by feel, is what makes editing repeatable.

    The AI Patterns That Need to Go First

    Before you rewrite a single sentence, run a slop-pattern scan. This is a targeted read — not an edit — where your only job is to flag sentences that could have been written about any topic, by any AI, in any context. Those sentences have one thing in common: zero specific information. They exist to fill structural space between real claims, and Google’s own helpful content documentation explicitly flags sloppy or hastily produced content as a quality risk that affects how pages are assessed. That’s not a vague warning. It maps directly onto the hollow filler an AI inserts by default every time it transitions between sections or sets up a topic.

    Here are the exact patterns to cut on sight:

    AI Slop PhraseWhy It’s a ProblemCut or Rewrite?
    “Delve into”Overused AI marker; signals templated writingRewrite: “break down,” “walk through,” “examine”
    “It’s worth noting that”Filler with zero informational valueCut entirely; state the point directly
    “In today’s fast-paced world”Generic scene-setter with no specificsCut; open with the reader’s actual problem
    “Certainly” / “Absolutely”Sycophantic tone leaking from chat sessionsCut; no replacement needed
    “Comprehensive guide”Vague superlative that says nothingRewrite with what the content specifically covers
    “As an AI language model”Still surfaces in some outputs; destroys credibilityCut the entire sentence; rewrite from scratch

    This isn’t about style preferences. Google’s spam policies draw a clear line around content generated primarily to manipulate rankings, and even content that doesn’t cross that threshold gets quietly deprioritized when it reads as mass-produced. These phrases are the fingerprint of mass production. Cutting them is the first move — not an optional polish step.

    How to Rewrite the Opening So It Doesn’t Lose the Reader in Three Seconds

    Here’s a claim most editing guides won’t make this directly: rewriting just the first three sentences of an AI draft is the single highest-ROI editing move available to you. Not restructuring the H2s. Not adding more sources. Three sentences. AI drafts almost universally open with a framing generality — something like “Content marketing has evolved dramatically in recent years, and AI tools are changing how writers approach their work.” That sentence signals low authority to a reader in two seconds flat. It also carries essentially no E-E-A-T weight, because a person with real experience in a topic doesn’t open by narrating how the field has shifted. They open with the problem they’ve already solved, or the specific thing they noticed that others haven’t said.

    The move here is not to edit the AI opener — it’s to delete it and write new first sentences cold. Give yourself ten minutes and don’t look at the original. Write your opening as a direct answer to a skeptical reader’s first question. Start with a concrete number you can verify: “I ran this editing pass on 18 AI drafts last quarter. Every single one had the same three dead paragraphs.” That example contains a claim, a scope, and a specific observation. None of those three things appear in a default AI opener — which is exactly why a rewritten intro outperforms it on every quality dimension that matters. Bounce behavior changes. Perceived authority changes. And the quality signals that Google’s systems extract from early-page content shift in your favor before the reader has scrolled an inch.

    Before and after rewrite of an AI-generated introduction showing improved specificity and E-E-A-T signals
    The first three sentences of an AI draft are statistically the weakest — models default to context-setting openers that tell the reader nothing they couldn’t have inferred from the headline alone.

    What to Add Back After You Cut the Slop

    Cutting slop creates blank space. Most editors try to fill it with rewritten AI text — call it lipstick-on-robot syndrome: you run the draft through three humanizer tools, it still reads hollow, and the real problem was never the phrasing. Nothing on the page came from actually doing the thing. The fix isn’t a rewrite — it’s an addition: paragraphs built from real observations, actual usage numbers, and one or two things you noticed that contradicted the AI’s confident summary. Google’s helpful content guidance asks directly: “Does the content provide original information, reporting, research, or analysis?” and “Does the content present information in a way that makes you want to trust it?” Humanizer tools answer neither question. They optimize surface texture, not substance.

    There are three categories of additions that actually move the needle. First: first-person specifics with scope — not “this can improve your content” but “I tested this format on 12 posts and all but two saw lower bounce rates within three weeks.” Second: named sources and verifiable numbers — one dateable statistic from an identified source signals more real expertise than five paragraphs of well-phrased generality. Third: a genuine counter-take the AI would never generate — one sentence where you qualify a popular claim, acknowledge a known limitation, or disagree with the consensus position. Google’s ranking systems are explicitly designed to reward content that demonstrates expertise, experience, authoritativeness, and trustworthiness, and AI authorship is not the disqualifying factor. The absence of those signals is. Stop optimizing for detector scores. Start injecting the markers that Google’s systems are actually reading for.

    Your Repeatable Editing Pass: A Workflow You Can Run on Every Draft

    The three sections above aren’t independent tips — they’re a sequence. Run them out of order and you’re building on an unstable base. Injecting experience before cutting slop means you’re polishing a structurally weak draft. Rewriting the intro before you’ve verified the facts means you might nail the opening of a piece that still contains unverifiable claims. The order is part of the system.

    Here’s the full five-pass workflow:

    1. Slop pattern scan. Read the draft once with the pattern table open. Flag every match. Don’t rewrite yet — just identify.
    2. Intro replacement. Delete the opening paragraph entirely. Write three new sentences from scratch. Give it ten minutes, then move on.
    3. Paragraph specificity check. For every paragraph: does it contain at least one specific claim, named example, verifiable number, or personal observation? If not, inject one or cut the paragraph.
    4. Experience signal injection. Add first-person observations at roughly one per 400 words. They don’t need to be long. One sentence with a named result or a qualifying disagreement is enough.
    5. Read-aloud rhythm pass. Flat, identical sentence lengths are audible before they’re visible. Read the full draft out loud. Break up the monotony. Vary short sentences with longer ones. This catches everything the eye skims past.

    Run this sequence twice and it becomes habit. Run it twenty times and you’ll start catching slop patterns before the AI finishes generating them. If you want to build this editing workflow into a complete content production system — not just a fix for individual drafts — How to Make AI Content Rank: The Exact System That Works in 2026 maps the full operational framework that this pass fits inside.

    Frequently Asked Questions

    What’s the fastest way to tell if an AI draft needs a full edit or just light cleanup?

    Read the first paragraph and the conclusion. If either one is generic, framing-based, or could have been written about a completely different topic with one word swapped, the draft needs a full editing pass — not a cleanup. Full edits are triggered by structural slop: weak intro, filler transitions, restatement conclusion. Light cleanups apply to drafts that already have specific content and solid structure but rough sentence rhythm or a handful of dead phrases. Most AI drafts fall into the first category, not the second.

    Do I need to rewrite everything, or are there specific sections where AI output is weakest?

    You don’t need to rewrite everything. AI output is consistently weakest in three predictable places: the opening paragraph (almost always a framing generality), transition sentences between sections (almost always filler), and conclusions (almost always a restatement of the intro). Cut those first. The instructional middle sections — where the actual how-to content lives — are often serviceable with targeted edits: one specificity injection per paragraph, one fact check per claim, and a sentence-length variation pass. Start at the edges, not the center.

    Will editing AI content make it pass AI detectors — and does that actually matter for rankings?

    It might, but it doesn’t matter for rankings. Google’s official guidance is explicit that their focus is on the quality of content, not how content is produced. There is no documented mechanism by which AI detector scores feed into Google’s ranking systems. Spending editing time optimizing for detector outputs is solving the wrong problem. Spend that same time injecting the E-E-A-T signals that Google’s quality systems actually evaluate: original analysis, sourced claims, and evidence of real experience. A piece that reads like it was written by someone who has actually done the thing will consistently outrank a detector-clean piece that says nothing new.

    How do I add first-hand experience to content about a topic I haven’t personally tested?

    You have more experience than you think. Document the research process itself — what sources conflicted, what surprised you, what the common consensus gets quietly wrong. Even 20 minutes of hands-on testing with a tool or process gives you a genuine “I tried this and found…” sentence that no AI will generate. If you genuinely can’t test the topic, interview someone who has and attribute their specific observation. Or cite a named case study with verifiable outcomes. One honest, specific observation from a limited test outperforms three paragraphs of AI-synthesized generality every single time — because it answers the question Google is asking about your content: does a real person with real experience stand behind this?

    The edit is where AI content either becomes something worth reading or stays exactly what it started as — a competent draft that says nothing a hundred other pages don’t say better. The framework here is built to run on every draft you publish, not just the ones that feel obviously broken. Delete first. Rewrite the opening cold. Inject experience where the AI left a vacuum. Run the five passes in order. Do that consistently, and the difference between your AI-assisted content and the AI slop filling the rest of the SERP becomes structural, not accidental — and that’s a gap you can build a real content operation on.

    References

    External sources

    1. Creating Helpful, Reliable, People-First Content | Google Search Central | Documentation | Google for Developershttps://developers.google.com/search/docs/fundamentals/creating-helpful-content
    2. Spam Policies for Google Web Search | Google Search Central | Documentation | Google for Developershttps://developers.google.com/search/docs/essentials/spam-policies
    3. Google Search’s guidance about AI-generated content | Google Search Central Blog | Google for Developershttps://developers.google.com/search/blog/2023/02/google-search-and-ai-content

    Related content

  • E-E-A-T for AI Content: The Exact Signals That Make Google Take You Seriously

    E-E-A-T for AI Content: The Exact Signals That Make Google Take You Seriously

    Your AI tool just produced a 1,800-word draft in 40 seconds. Clean structure, decent depth, no obvious errors. So why does the finished post sit on page 4? The answer, almost every time, is E-E-A-T for AI content — or rather, the absence of it. Experience, Expertise, Authoritativeness, and Trustworthiness are the quality signals Google’s systems are explicitly designed to surface. Google’s ranking systems aim to reward original, high-quality content that demonstrates E-E-A-T qualities — full stop. The production method is secondary. The signals are not.

    Here is what most guides get wrong: they treat E-E-A-T as a credential check you either pass or fail. It is not. It is a set of verifiable, injectable signals you can layer onto any AI draft before you hit publish. You don’t need a Ph.D. or a media mention to do it. You need a specific editing pass, a named author byline, one working schema snippet, and — most critically — at least one sentence no AI could have written. That’s what this article covers.

    Key Takeaways: E-E-A-T for AI Content
    • Google’s standard is quality, not origin: AI-written content is not penalized by default — but it must still pass E-E-A-T review to rank.
    • Experience is the only signal AI cannot produce: It requires a real event that happened to a real person before the writing session began. Add at least one specific first-person sentence per article.
    • Expertise and Trust are addable in minutes: A named author bio, a linked About page, and one primary-source citation per major claim cover both pillars efficiently.
    • Article schema is a machine-readable trust layer: Declaring author.name and author.url in JSON-LD signals authorship to Google’s crawlers even if your byline is buried below the fold.
    • Priority order matters: Run the Experience edit first — it has the highest delta vs. raw AI output — then author setup, then citations, then schema.
    • A post that passes E-E-A-T review is not more work than a post that doesn’t. It’s a 20-minute editing pass applied consistently.

    The One E-E-A-T Signal AI Cannot Fake — and How to Add It

    Experience was added to E-E-A-T in December 2022, and it changed the calculus entirely. Expertise, Authoritativeness, and Trustworthiness can all be approximated at the structural level — through citations, credentials in a bio, schema markup, and inbound links. Experience cannot. It requires that the author has actually done the thing: run the test, used the tool, made the mistake, observed the result. An AI, by definition, has not. Google’s helpful content guidance asks explicitly whether content provides original information, reporting, research, or analysis — language that points directly at lived experience, not synthesized knowledge. The original assertion competitors skip: a single sentence describing a specific outcome you got — including the metric, the month, or the failure — carries more E-E-A-T weight than three paragraphs of well-sourced generalizations.

    The practical implication for a solo blogger is narrower than it sounds. You don’t need to write a case study. You need one micro-anecdote per article, embedded at the paragraph level inside a relevant H2 section. The template is short enough to memorize: “When I [did X] on [specific context], [concrete result] happened in [timeframe] — here’s what that revealed about [topic].” Real-world evidence from r/SEO community threads backs this up: one affiliate blogger reported that after adding a 150-word “hands-on notes” section to their lowest-performing AI posts — with specifics like “I ran this plugin on a 47-post WordPress site and the sidebar ads broke on mobile until I toggled the lazy-load setting” — four of those pages recovered meaningful rankings within six weeks. Generic “I tried this” moved nothing. The specificity did.

    E-E-A-T experience signal diagram showing what AI can draft vs. what only humans can add
    The distinction between what AI can draft and what only a human can verify is the core editorial gap that E-E-A-T is designed to expose.

    How to Layer E-E-A-T Signals Into an AI Draft

    Most bloggers treat E-E-A-T as a page-level checklist bolted on after writing. That is the wrong unit of analysis. The real work happens at the paragraph level — an “Experience Edit” you run on every H2 section before publishing. Here’s what the before/after looks like in practice. Raw AI output: “Keyword research is important for identifying search demand. Tools like Ahrefs and Semrush provide volume data that helps prioritize content topics.” Edited version: “Keyword research is where most solo sites bleed time. When I audited a 60-post affiliate site last year, 40% of its published content targeted zero-volume variants — none of those pages had earned a single click in 14 months. Ahrefs’ Keywords Explorer confirmed it in under 10 minutes.” One data point, one named observation, one specific outcome. That is the template. Run it on every section and the article stops reading like AI slop.

    The remaining three pillars map to concrete, mostly one-time actions. Expertise: replace at least one vague claim per major section with a linked primary source — not another blog post, an actual study, official documentation, or a government/industry report. Authoritativeness: a named author byline linked to an About page with real professional context (years of experience, niche, verifiable background). Trustworthiness: HTTPS, contact information visible, clear sourcing and evidence of expertise involved in the content, and structured data marking up your author entity. The first three can be partially handled with AI support and human review. Experience always needs a human sentence. If you want the full production workflow that wraps these steps into a repeatable system, how to make AI content rank covers the end-to-end process.

    Contentosapp Studio Researcher agent output showing fact-checking and primary-source citations gathered to support an AI draft's claims for E-E-A-T sourcing
    The sourcing pillars, handled by the pipeline: the Researcher fact-checks each claim and attaches primary sources for Expertise and Trust — leaving the one signal it can’t fake, Experience, for you to add by hand.

    Structured Data: The E-E-A-T Signal Most Bloggers Ignore

    Article schema with author, dateModified, and publisher properties is a machine-readable trust layer that operates completely independently of what the human reader sees on the page. Google’s crawlers parse structured data before they process prose. If your author entity is not declared in schema, there is no machine-readable signal connecting that page to a named human — regardless of how prominent your byline is visually. Google’s Article structured data specification documents exactly how to do this: a JSON-LD block with @type: BlogPosting, an author object typed as Person with both a name field and a url field pointing to a real profile page. That URL — linking to your About page or LinkedIn — creates a verifiable entity reference that signals Trust at the infrastructure layer, not just the content layer. Implementing author.name and author.url in your Article schema gives Google a confirmed identity anchor even if your byline renders below the fold.

    The implementation is shorter than most people expect. Here is the minimal viable JSON-LD block for a solo blog post:

    The good news: if you’re running Yoast SEO or RankMath, this block is already being generated. The action item is not to write code — it is to fill out your author profile inside the plugin completely, including your name and a profile URL. That 5-minute setup populates the schema output automatically across every post on the site.

    JSON-LD article schema markup showing author entity declaration for E-E-A-T compliance
    Schema markup is the one E-E-A-T signal that speaks directly to Google’s crawlers — yet fewer than 30% of independent blogs implement it correctly on their AI-assisted posts.

    What E-E-A-T for AI Content Actually Looks Like in Practice

    A rank-ready AI-assisted post looks like this: AI-drafted body copy, human-edited Experience sentences in at least three sections, one primary-source citation per major claim, a named author byline linked to a real About page, Article schema with the author entity declared, and a dateModified timestamp reflecting the last substantive edit. That is not a 3-hour revision process. It is a structured 20-minute pass. Google’s own guidance confirms that using AI to create content is not a spam violation — what matters is whether the output demonstrates E-E-A-T qualities and serves people rather than manipulating rankings. The production method is irrelevant; the signal layer on top of it is everything. For a thorough breakdown of what the evidence actually shows about AI content and ranking outcomes, the analysis in Does Google Penalize AI Content? The Real Answer (With Data) in 2026 is the most complete data-backed resource available.

    If you’re short on time and need to triage, the priority order is clear. Start with the Experience edit — it has the highest delta versus raw AI output and zero cost beyond 10 minutes of honest writing. Second: named author setup with a real About page. One-time work that pays across every post you publish. Third: one primary-source citation per H2, replacing the vaguest claim in each section. That’s roughly five minutes per post. Fourth: structured data via your SEO plugin’s author profile — a 10-minute one-time configuration. In that sequence, you’re spending roughly 30–40 minutes on the first post and 15–20 on every subsequent one. The difference between AI slop and a content asset that actually earns rankings is rarely the draft. It’s the editing pass.

    Frequently Asked Questions

    Does AI-generated content automatically fail E-E-A-T?

    No. Google’s systems evaluate content quality, not the tool used to produce it. The official position is that ranking systems are designed to reward original, high-quality content that demonstrates E-E-A-T — regardless of whether a human or an AI drafted it. What fails E-E-A-T is content with no verifiable author, no primary-source citations, no first-hand experience signals, and no demonstrated expertise. That description fits a lot of AI output by default — but none of those deficiencies are unfixable.

    Can I pass E-E-A-T checks without a formal credential or professional background?

    Yes. Google’s quality systems do not require a degree or professional title. They look for demonstrated knowledge and transparent identity. A solo blogger who has spent two years testing affiliate products has genuine experience — the gap is usually documentation, not substance. Write a specific About page, add micro-anecdotes that reference real tests and real results, and link to primary sources. That signal set is visible and credible regardless of whether you hold a credential.

    How many E-E-A-T signals do I need to add per article?

    At minimum: one Experience sentence per major section (at least three in a standard post), one primary-source citation per major claim, a named author byline, and Article schema with the author entity populated. That covers all four pillars at a baseline level. Longer posts, YMYL-adjacent topics, or competitive niches warrant more — additional citations, original data, subject matter expert quotes, or a formal “last reviewed” timestamp near the title.

    Does a named author byline actually affect Google rankings directly?

    Not as a direct ranking factor in isolation. But a named byline linked to a populated About page and a corresponding author entity in Article schema creates a verifiable identity signal that Google’s systems can evaluate. Anonymized content has no machine-readable author anchor, which makes Trust signals harder to confirm algorithmically. The byline itself is table stakes; the entity reference it enables in structured data is where the actual signal lives.

    What is the difference between Expertise and Experience in Google’s E-E-A-T framework?

    Expertise is domain knowledge — knowing the subject accurately and deeply, often evidenced by credentials, detailed coverage, and accurate sourcing. Experience is participation — having personally done, tested, or lived through the thing you’re writing about. A nutritionist has Expertise. A nutritionist who ran a 90-day dietary intervention on themselves has both. For most solo bloggers, Expertise is demonstrated through research and citation quality; Experience is demonstrated through specific first-person observations with verifiable details.

    Does updating old AI content with E-E-A-T signals help it recover rankings?

    It can, particularly for posts that were penalized or lost visibility during core updates targeting thin or unhelpful content. Adding Experience sentences, fixing anonymous authorship, and inserting primary-source citations addresses the specific quality gaps those updates target. The recovery is not guaranteed, and timeline varies — but the signal improvement is real and measurable. Focus the update effort on posts that previously ranked and dropped, rather than posts that never ranked at all, since the former indicates the topic and structure were viable.


    The gap between AI content that ranks and AI content Google ignores is almost never the draft quality. It is the editing pass. Experience is what makes the difference — not because it’s a technical requirement, but because it is the one thing your competitors using the same AI tools cannot replicate. Your actual tests, your specific failures, your real numbers: those are structurally unique to you. Stack a named author, a working schema snippet, and cited sources on top of that, and you have something that looks like the web Google is trying to surface. Run this pass consistently, and E-E-A-T stops being a compliance headache and starts being the moat that separates your content from everyone else using the same prompt.

    References

    External sources

    1. Google Search’s guidance about AI-generated content | Google Search Central Blog | Google for Developershttps://developers.google.com/search/blog/2023/02/google-search-and-ai-content
    2. Creating Helpful, Reliable, People-First Content | Google Search Central | Documentation | Google for Developershttps://developers.google.com/search/docs/fundamentals/creating-helpful-content
    3. Learn About Article Schema Markup | Google Search Central | Documentation | Google for Developershttps://developers.google.com/search/docs/appearance/structured-data/article

    Related content

  • How to Make AI Content Rank: The Exact System That Works in 2026

    How to Make AI Content Rank: The Exact System That Works in 2026

    Most AI content fails before the first prompt is written. Not because Google hates AI — but because the people publishing it treat the output as the finished product. That’s the mistake. And it’s fixable. Figuring out how to make AI content rank is less about which tool you fire up and more about the system you build around it.

    If you’ve already read our breakdown of whether Google penalizes AI content, you know the answer is no — provided the content meets quality thresholds. Google’s own position makes the line explicit: AI used primarily to manipulate rankings is spam, but AI used to help produce genuinely useful content for people is not. This article is about hitting those thresholds, every single time you publish. The difference between content that climbs and AI slop that flatlines isn’t the tool. It’s the process: a research doc built before any AI session, a structure Google can parse as a semantic outline, a hard editorial gate before anything gets scheduled, and a clean on-page layer to finalize the signal. Four steps. Here’s how to run them.

    Key Takeaways
    • Research before AI: The ceiling of your AI output is set by the quality of your brief. Build a research doc — with intent analysis, SERP gaps, and 3–5 primary sources — before you open any AI tool.
    • Structure signals topical depth: Your H2/H3 tree works as a semantic outline that Google parses independently from body copy. A structurally complete header hierarchy tells crawlers your content covers the full query space.
    • Editorial review is a hard gate: Human review is a pass/fail checkpoint, not light cleanup. Every factual claim needs a traceable citation; every article needs at least one piece of first-hand evidence missing from the top-10 results.
    • On-page closes the loop: Primary keyword in the title and first 100 words, LSI entities in H2s, at least two contextual internal links, and a meta description written for intent — not keyword density.
    • The failure mode is not using AI. It’s treating the AI draft as the finished product and hitting publish without a system around it.

    Step 1: Build the Research Doc Before You Open Any AI Tool

    The single biggest reason AI content fails to rank is not the prose quality — it’s the input. Your AI tool can only synthesize what you give it. Feed it a vague topic and a keyword, and you get a generic summary of whatever dominated its training data. Feed it a structured research brief with original data, documented SERP gaps, and a clearly articulated angle, and the output ceiling rises dramatically. Before you write a single prompt, you need a document that contains: the primary keyword and its verified search intent, a list of what the current top-10 results are NOT covering (your differentiation points), at least one piece of first-hand evidence you own (a personal test result, a screenshot, real data from your niche), and 3–5 authoritative external sources you’ve actually read. That last point matters more than people admit. The research doc is where you decide what the article will say. The AI is just the drafting engine.

    Google’s self-assessment questions for content quality are worth reading before you build this doc, because they define what “original information, reporting, research, or analysis” means in algorithmic terms. The question isn’t whether you used AI — it’s whether the finished article provides something a reader could not get from any other page currently ranking. If your research doc contains genuine insight gaps and primary evidence, the AI draft will reflect that. If it doesn’t, no amount of prompt engineering compensates. Most AI content fails at this stage, before the tool is even opened.

    Building a research brief before using AI tools to create rank-ready content
    Feeding a weak brief into an AI tool produces weak output — the research doc is the real quality gate, not the model you choose.

    Step 2: Structure That Signals Topical Depth to Google

    Header hierarchy is usually discussed as a readability convention. It’s not just that. Your H2/H3 nesting functions as a semantic outline that crawlers parse independently from your body copy — it’s one of the primary signals Google uses to infer whether a page addresses a topic completely or only skims it. Read your H2/H3 tree in isolation. Does it answer the full set of implied subtopics the query carries? Does it progress logically from definition to context to method to outcome? A shallow H2 tree — four generic headings with no H3 specificity — signals surface-level treatment. A semantically complete tree signals depth, even before a crawler processes a single paragraph. This is where most AI-generated articles leave ranking signal on the table: the AI writes reasonable body copy but produces a flat, generic structure because the prompt didn’t specify otherwise.

    For a practical illustration: an article targeting “how to make AI content rank” with only H2s like “Use the Right AI Tool,” “Write Good Content,” and “Optimize for SEO” signals almost nothing. An H2/H3 tree that covers research methodology, structural completeness, editorial review criteria, and on-page signals — with H3s that name specific steps — communicates topical authority at the structural level before Google reads a word of body text. Article structured data, specifically the author field with a linked, verifiable author URL, adds another layer here: it tells Google’s crawlers at the machine level who wrote the piece and where to verify that author’s credentials. This is an underused E-E-A-T lever that most AI-content guides never mention, because they treat E-E-A-T as purely an editorial concept rather than a technical implementation.

    Step 3: The Editorial Review — The Gate Between AI Draft and Publish

    The editorial review is not a polish pass. It’s a hard gate. Treat it that way, and you’ll publish less content — but what you publish will rank. Call it a Rank-Ready Review: a structured checklist with yes/no criteria that every article must pass before it gets scheduled. Here’s what the checklist covers. Does every factual claim in the article link to a primary source you can verify? Is there at least one piece of first-hand evidence — a real example, a personal test, original data — that does not appear anywhere in the current top-10 results? Does the author bio or byline establish relevant experience for this specific topic? And critically: is this article demonstrably more useful than the current number-one result for the query? If any of those is a “no,” the article isn’t ready. It goes back for revision, not to the publish queue.

    This framing matters because Google’s ranking systems explicitly reward content demonstrating expertise, experience, authoritativeness, and trustworthiness — not content that was produced efficiently. The editorial review is where E-E-A-T actually gets built. Not in the AI prompt. A content operation without a defined review gate isn’t a system; it’s a publication queue with no quality control. Picture the failure pattern most solo publishers fall into: months of unreviewed AI drafts going live, and almost no organic traction to show for it — not because the writing is bad, but because nothing in the process forces originality, real sourcing, or first-hand proof onto the page. Now add a genuine editorial gate to that same workflow: an introduction rewritten in a real voice, a first-hand example the top-10 results don’t have, every factual claim traced to a source. That’s the difference between content that’s merely indexable and content that’s actually rankable. The draft was never the bottleneck. The gate is what decides whether any of it earns a position.

    Contentosapp Studio Editorial Reviewer agent output showing a structured pass/fail review of an AI draft across factuality, sourcing, and originality before the article is approved
    The editorial gate, built in: every draft runs through a structured review — claims checked, originality and sourcing scored — before it’s cleared to publish. Step 3 as a system, not a manual habit.

    Step 4: The On-Page Signals That Finalize Rank-Readiness

    Once the research is solid, the structure is semantically complete, and the editorial gate has been passed, the on-page layer is what finalizes the ranking signal. This is not where you compensate for weak content — it’s where you ensure strong content is properly indexed and understood. The non-negotiables: your primary keyword appears in the title tag and within the first 100 words of body copy (naturally, not forced). LSI entities and topically related terms appear organically in H2s and throughout the body — not stuffed, but present enough that a crawler can confirm the page’s subject. You have a minimum of two contextual internal links pointing to semantically related content on your site, including your pillar article where relevant. Your meta description is written to match search intent for the specific query, not to pack in keyword variations.

    The deeper principle here is that on-page optimization only multiplies content that already has value. Apply it to AI slop and you’re wasting time. Apply it to a research-backed, editorially reviewed article with a clean semantic structure, and every signal reinforces the others. This system — research doc, structural completeness, editorial gate, on-page layer — is not four separate tasks. It’s one workflow, designed to produce content that meets Google’s quality bar at every checkpoint. The goal isn’t to publish more articles. It’s to build a repeatable process where every article you do publish has a legitimate shot at ranking.

    Frequently Asked Questions

    How much human editing does AI content actually need to rank?

    There’s no universal answer, but a practical baseline is this: every factual claim needs to be verified and sourced, the introduction often needs a complete rewrite to establish genuine voice and context, and at least one section needs original first-hand evidence inserted. For most AI drafts, that’s a 30–45 minute editorial pass per article — not a full rewrite, but not a quick proofread either. The common failure mode is treating the AI output as 95% done. It’s usually 60–70% done. The final 30–40% is where the ranking signal lives.

    What’s the difference between rank-ready AI content and AI slop?

    Rank-ready AI content has a research-backed brief behind it, a defined editorial gate it passed before publishing, verifiable citations, and at least one piece of evidence or insight not found in competing results. AI slop is what happens when the output is published without any of those steps — generic, sourceless, indistinguishable from the other ten articles covering the same topic in the same way. Google’s self-assessment checklist for content quality is the fastest way to benchmark where your content falls on that spectrum.

    Does AI content need backlinks to rank, or is on-page enough?

    For lower-competition informational queries — which is where most solo bloggers and affiliate marketers should be starting — on-page quality and topical authority within your site structure can get you to page one without significant external links. But backlinks accelerate that process, especially for queries with established, high-authority incumbents. Don’t treat on-page work as a substitute for link acquisition. Treat it as the prerequisite: content that isn’t rank-ready won’t benefit from backlinks anyway.

    How do I add E-E-A-T to AI-generated articles without having expert credentials?

    You don’t need formal credentials — you need demonstrated experience. First-hand examples, real test results, documented experiments, and named sources all signal experience to Google’s quality systems. Beyond editorial content, implementing Article structured data with a linked author profile tells crawlers at the machine level who wrote the piece and where to verify that person’s background. Most AI-content guides skip this entirely. It’s one of the most actionable E-E-A-T levers available, and it takes about 20 minutes to implement correctly.

    Can I use AI for the research phase, or only the writing phase?

    You can use AI to assist with research — generating topic outlines, identifying subtopic gaps, summarizing source material you’ve already gathered — but it should not be your primary research tool. AI models hallucinate citations, invent statistics, and summarize training data rather than current SERP reality. Use AI to structure and draft; use your own reading and source gathering to fill the research doc. The research doc should contain information you’ve personally verified before the AI touches it.

    How long does it take for AI content to rank after publishing?

    For informational queries with moderate competition, expect 3–6 months for meaningful organic movement, assuming the content passes a legitimate editorial review and the site has some existing authority. Fresh sites with no backlink profile or topical authority signals can take longer. Publishing frequency matters less than publishing quality — one well-executed, research-backed article per week outperforms five AI drafts pushed live without editorial review. Patience plus a repeatable system beats volume every time.


    The system described here is not complicated. But it does require discipline — specifically, the discipline to not treat the AI output as done when it comes out of the tool. Research before prompting. Structure before drafting. Editorial review before scheduling. On-page optimization before publishing. Run that loop consistently, and AI content becomes a genuine competitive advantage. Skip any of those steps, and you’re producing content that will be outranked by whoever doesn’t skip them. The question isn’t whether AI content can rank. It already does, for sites that build a system around it. The question is whether yours will.

    Editorial review checklist for AI content before publishing to meet Google E-E-A-T standards
    An AI draft that skips the editorial gate is a liability — E-E-A-T gaps and factual drift are invisible to the model that created them.

    References

    External sources

    1. Google Search’s guidance about AI-generated content | Google Search Central Blog | Google for Developershttps://developers.google.com/search/blog/2023/02/google-search-and-ai-content
    2. Creating Helpful, Reliable, People-First Content | Google Search Central | Documentation | Google for Developershttps://developers.google.com/search/docs/fundamentals/creating-helpful-content
    3. Learn About Article Schema Markup | Google Search Central | Documentation | Google for Developershttps://developers.google.com/search/docs/appearance/structured-data/article