Author: Alessandro Freitas

  • Claude WordPress Plugin: Four Setups, and How to Pick by Where Claude Works

    Claude WordPress Plugin: Four Setups, and How to Pick by Where Claude Works

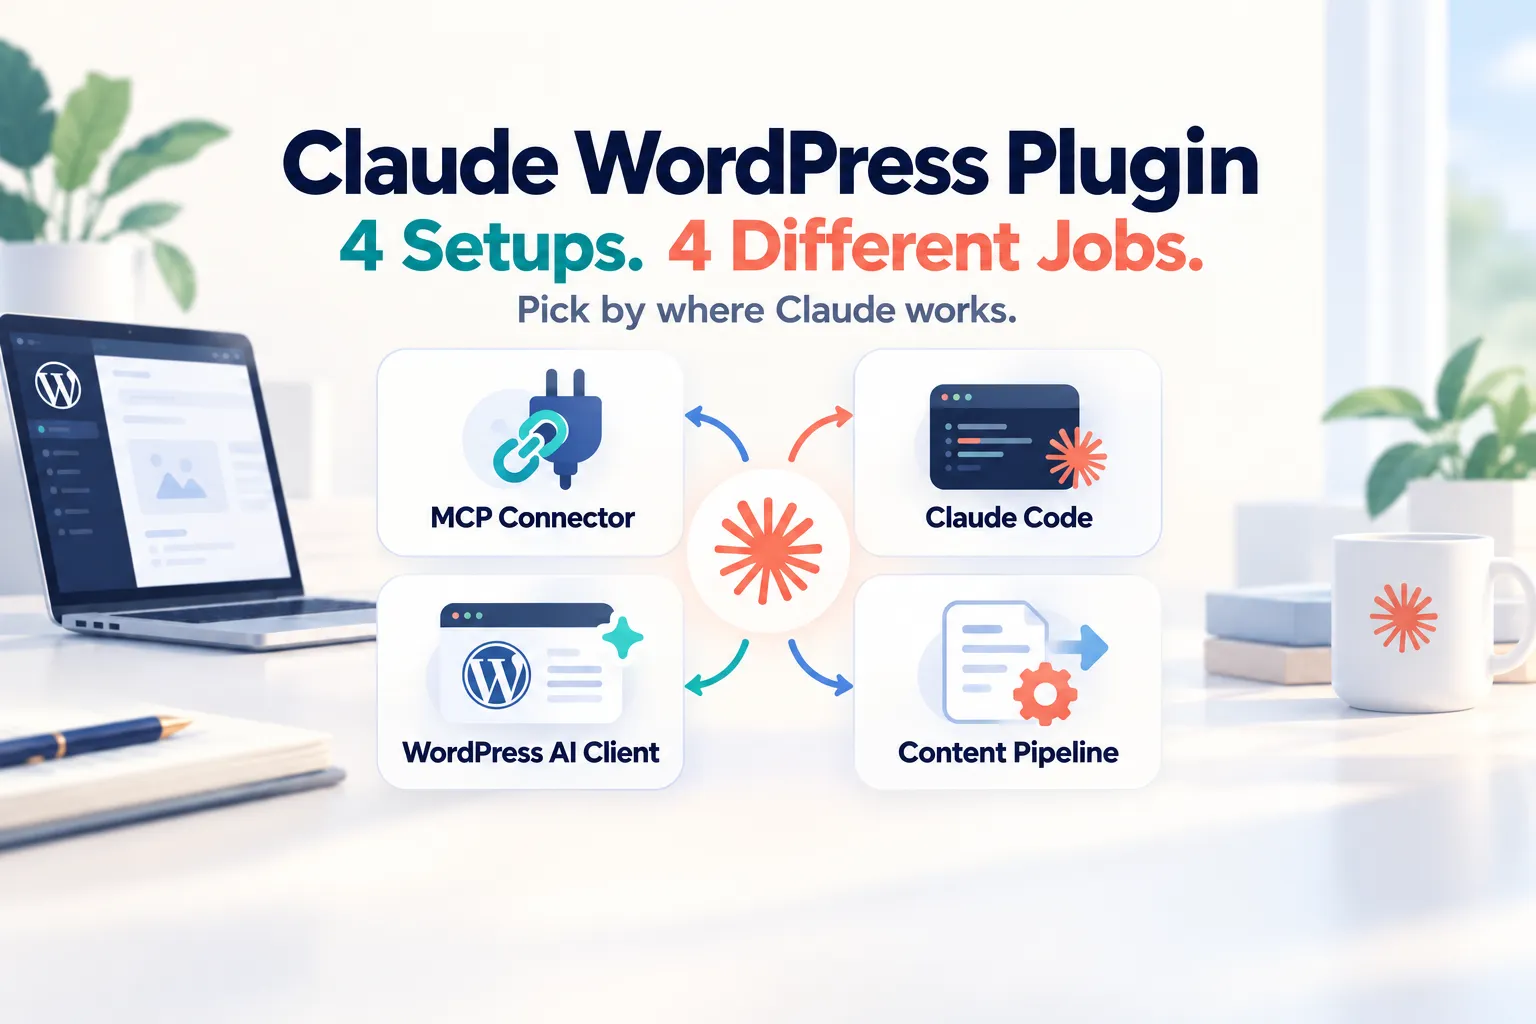
    There is no single Claude WordPress plugin that covers everything people mean by that search. In 2026, the phrase points to four different setups: Claude can operate a WordPress site through MCP, Claude Code can build WordPress code, WordPress can call Claude through the AI Client and Anthropic provider, or a content pipeline can use Claude to produce full article drafts.

    The easiest way to choose is to ask one question first: where should Claude work? If Claude should act on the site from claude.ai, Claude Desktop, Cowork, or Claude Code, you are looking for MCP. If Claude should write themes, plugins, or blocks, you are looking at Claude Code. If WordPress itself should call Claude inside a plugin feature, you need the WordPress AI Client plus an Anthropic provider. If your goal is researched long-form publishing, you are looking at a content pipeline instead.

    That distinction also changes the bill. Anthropic says a paid Claude subscription and the Claude API are separate products. MCP and Claude Code can use your Claude account or plan depending on the client and setup, while WordPress-side Anthropic integrations use an API key and API billing. A set ANTHROPIC_API_KEY can even make Claude Code use API billing instead of included plan usage, so the architecture matters before you install anything.

    i
    Methodology & disclosure
    How this guide was checked
    Facts in this guide were re-checked against primary sources on October 2, 2026: Anthropic documentation, WordPress Core and Learn WordPress documentation, WordPress.com support, official WordPress.org plugin listings, and the official Build with WordPress marketplace page. Contentosapp Studio is made by this site’s publisher. It receives no overall winner label, and its limitations are stated alongside its documented capabilities. Vendor claims are identified as such when independent testing was not available.

    Quick answerClaude + WordPress: the four setups

    • 1. Claude operates WordPress through MCP: use a WordPress.com connector, Easy MCP AI, AI Engine, or the official WordPress MCP Adapter depending on your site and technical level.
    • 2. Claude Code builds WordPress: Build with WordPress is a WordPress.com plugin listed in Claude’s marketplace for themes, plugins, blocks, WooCommerce work, auditing, preview, and deployment.
    • 3. WordPress calls Claude: WordPress 7’s Connectors API and AI Client can use the community AI Provider for Anthropic. This is API-key billing, not your Claude subscription.
    • 4. A content pipeline uses Claude: Contentosapp Studio can use an Anthropic key inside its seven-agent article workflow, or a managed ContentOS Auto plan.
    • Safety: start with the least privilege you need. WordPress.com confirms writes; Easy MCP AI now documents destructive-action approval prompts, capability checks, per-connection permissions, an audit log, and change history.

    Claude WordPress Plugin: Four Setups in One View

    The word connector causes most of the confusion because it is used in two opposite directions. In Claude, an MCP connector lets Claude call tools on WordPress. In WordPress 7, the Settings → Connectors screen stores credentials that WordPress-side features use to call AI providers. Both are connectors, but the data flow, permissions, and billing are different.

    Setup 1
    Claude → WordPress through MCP Claude is the operator. WordPress exposes tools that Claude can read or call. Examples: WordPress.com connector, Easy MCP AI, AI Engine, MCP Adapter
    Setup 2
    Claude Code → WordPress codebase Claude works as a coding agent on themes, plugins, blocks, stores, previews, and audits. Example: Build with WordPress
    Setup 3
    WordPress → Claude through the AI Client A WordPress plugin sends prompts to Claude through an Anthropic provider connection. Example: AI Provider for Anthropic
    Setup 4
    WordPress content pipeline → Claude API Claude is one model inside a larger research, writing, review, and publishing workflow. Example: Contentosapp Studio

    There is also a reachability split. Anthropic’s remote custom connectors connect to your MCP server from Anthropic’s cloud, so a private network, VPN-only staging site, or ordinary localhost URL is not reachable that way. For local development, WordPress now documents an official MCP Adapter route using STDIO with WP-CLI on the same machine, or HTTP/tunneling when a remote agent needs access.
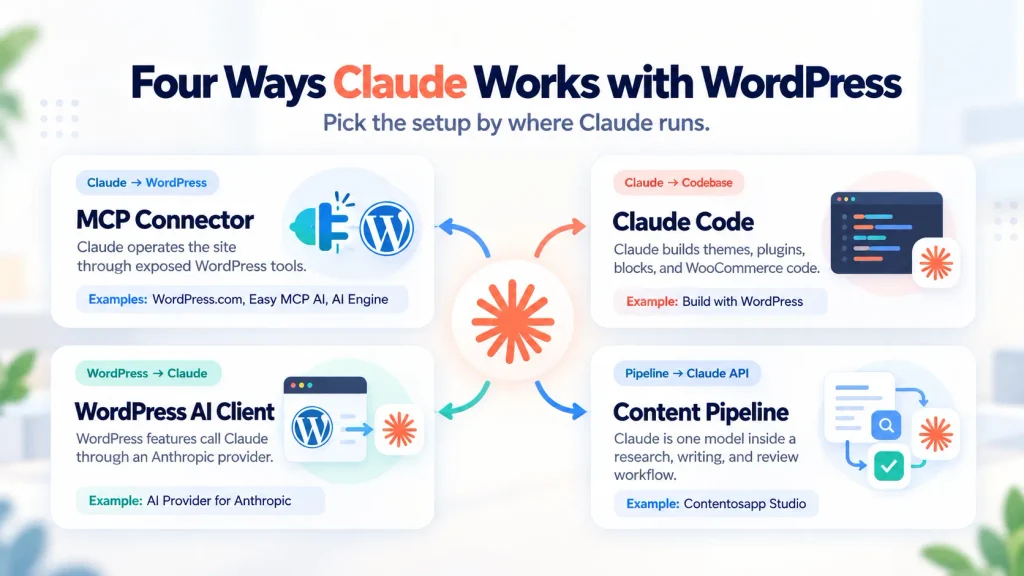
    Infographic showing four ways Claude works with WordPress: MCP Connector, Claude Code, WordPress AI Client, and Content Pipeline
    Claude can work with WordPress in four different ways: operating the site through MCP, building WordPress code with Claude Code, being called by WordPress through the AI Client, or powering a content pipeline.

    Setup 1: Claude Operates WordPress Through MCP

    If what you want is “tell Claude to update my site,” you are in MCP territory. Your WordPress site becomes an MCP server, Claude discovers the tools that server exposes, and Claude calls those tools under the permissions granted to the connection. This is fundamentally different from a WordPress plugin sending text to the Anthropic API.

    WordPress.com Claude Connector

    The official WordPress.com Claude connector is the most direct path for WordPress.com users and for eligible self-hosted sites connected through Jetpack. WordPress.com is listed in Claude’s connectors directory. The current support guide says Claude can view site information and traffic, create and edit posts and pages, organize categories and tags, manage comments, and update media metadata.

    The current WordPress.com MCP tool reference is broader than the early read-only launch. It now documents operations for site settings, content, media, themes and styles, patterns, templates, navigation menus, domains, users, and other account-level functions. Not every WordPress object is editable: for example, some WooCommerce store data, page-builder layouts, and types not exposed through the REST API remain outside the documented content-editing scope.

    For safety, WordPress.com states that write operations require confirmation before Claude executes them, including deletes. Deleted posts and pages can remain recoverable in trash for 30 days, while some deleted objects such as media, categories, and tags are permanent. MCP access is available on paid WordPress.com plans; free WordPress.com sites receive MCP access for their first 30 days. Self-hosted sites can use the WordPress.com MCP path when connected through eligible Jetpack plans. Check current plan terms before choosing this route.

    Easy MCP AI

    Easy MCP AI is a self-hosted MCP server plugin by Themeisle. As of October 2, 2026, WordPress.org lists version 2.0.1, 10,000+ active installations, WordPress 6.0+, and testing through WordPress 7.1.2. It connects Claude on the web, Claude Desktop, Cowork, and Claude Code, along with many other MCP clients.

    The plugin’s public feature surface is unusually broad: the listing documents 280+ MCP tools spanning WordPress content, Gutenberg/site editing, WooCommerce, ACF, events, BuddyPress, multiple SEO plugins, Google Analytics, Search Console, Semrush, and other data sources. These are vendor-documented capabilities, not independent benchmark results.

    The safety model is also documented in more detail than it was earlier in 2026. Version 2.0.1 added approval prompts for destructive tool calls. The listing documents OAuth 2.1, WordPress capability checks, per-connection permissions, rate limits, an Audit Log, Change History, optional IP restrictions, read-only/full/custom access profiles, and a “Force Draft on Create” option. Change History stores before/after snapshots of AI edits; the Audit Log can record refused and successful tool calls when logging is enabled.

    AI Engine

    AI Engine is the larger general-purpose AI framework in this comparison. WordPress.org lists version 3.8.3 and 90,000+ active installations as of October 2, 2026. Its MCP server is only one part of the product; the same plugin also includes chatbots, editor/content tooling, model providers, images, knowledge features, and other AI modules.

    For Claude Desktop, Meow Apps documents an OAuth 2.1 flow: enable the MCP server, paste the site’s MCP URL into Claude’s custom connector screen, sign in to WordPress, and approve. The guide says the server exposes 30+ tools and that the connection operates through the WordPress user account you approved. Claude Code can use a bearer token with selectable access levels. The same guide now explicitly states that AI Engine’s remote MCP connector also works in Claude Cowork because Cowork uses the same remote custom-connector system.

    Do not mix the MCP billing path with AI Engine’s model-provider features. When Claude acts on the site through MCP, the model is running in your Claude client. When AI Engine itself sends prompts to Anthropic for a chatbot or content feature, that WordPress-side request uses the provider account and can create API charges. Same plugin, two directions.

    WordPress MCP Adapter

    The WordPress MCP Adapter is the developer-oriented building block maintained by the WordPress AI Team. It translates public WordPress Abilities into MCP tools while preserving the permission callback on each ability. As of October 2026 it is distributed from the WordPress GitHub releases rather than the WordPress.org plugin directory.

    This option matters because it supports both HTTP and STDIO transports. For an internet-accessible site, an MCP client can use the adapter’s HTTP endpoint. For a local WordPress site on the same machine as the agent, Learn WordPress recommends STDIO through WP-CLI; no public URL is required. If a remote agent must reach a local site, a tunnel such as ngrok or Cloudflare Tunnel can provide a temporary public route.

    Choose this category when you are a developer or technical team exposing your own registered abilities, not when you want a large ready-made library of WordPress actions out of the box. The adapter only exposes abilities that are registered as public, and execution still passes through WordPress permissions.

    Setup 2: Claude Code Builds WordPress

    If your goal is to build rather than operate WordPress, Claude Code is a different category. Build with WordPress is made by WordPress.com and listed in Claude’s plugin marketplace. The listing is explicitly positioned for Claude Code and says it can build themes, plugins, custom blocks, and WooCommerce stores.

    The plugin also includes a guided site builder, an auditor for accessibility, design, and performance, plus WooCommerce and Jetpack skills. It works with WordPress Studio for preview and deployment. The marketplace showed 373 installs when this article was verified on October 2, 2026; that is a maintenance/adoption signal, not a quality score.

    Anthropic’s plugin platform now spans chat, Claude Desktop, Cowork, and Claude Code, with different component types available across surfaces. However, the Build with WordPress marketplace page specifically instructs users to install it in Claude Code, so that is the supported workflow this guide relies on. Do not assume every WordPress-specific behavior shown on the marketplace page works identically in Cowork or ordinary chat unless the product page documents it.

    For billing, supported Claude plans can include Claude Code usage. Anthropic also warns that if ANTHROPIC_API_KEY is set in your environment, Claude Code uses that API key instead of plan authentication, which means API charges apply. That is worth checking on any development machine where you have previously configured an Anthropic key.

    Setup 3: WordPress Calls Claude Through the AI Client

    This setup reverses the direction again. WordPress 7.0 introduced the Connectors API and the AI Client. Core does not bundle Claude itself. Instead, provider plugins register Anthropic, Google, OpenAI, and other providers so WordPress features can call them through a common interface.

    AI Provider for Anthropic is the WordPress community provider plugin for Claude. As of October 2, 2026, WordPress.org lists version 1.0.5, 60,000+ active installations, WordPress 6.9+, and testing through WordPress 7.1.2. Its documented features include Claude text generation, function calling, extended thinking, and dynamic discovery of available Anthropic models.

    On WordPress 7, the provider integrates with Settings → Connectors, where WordPress can source an API key from an environment variable, PHP constant, or database setting. The provider’s installation instructions also document ANTHROPIC_API_KEY as an environment variable or constant. The key point is billing: this is an Anthropic API integration. Your Claude Pro, Max, Team, or Enterprise subscription does not include Claude API credit.

    Also be clear about what the provider does not do. Installing AI Provider for Anthropic does not by itself create a writing assistant, chatbot, or site-management agent. It supplies Claude models to WordPress’s AI Client. Another plugin or feature built on the AI Client must decide what prompts to send, what permissions to enforce, and what user-facing workflow to provide.

    Setup 4: A Content Pipeline Uses Claude to Draft Full Articles

    Publisher disclosure: Contentosapp Studio is made by the publisher of this site. The statements below are limited to its public WordPress.org listing and linked product documentation.

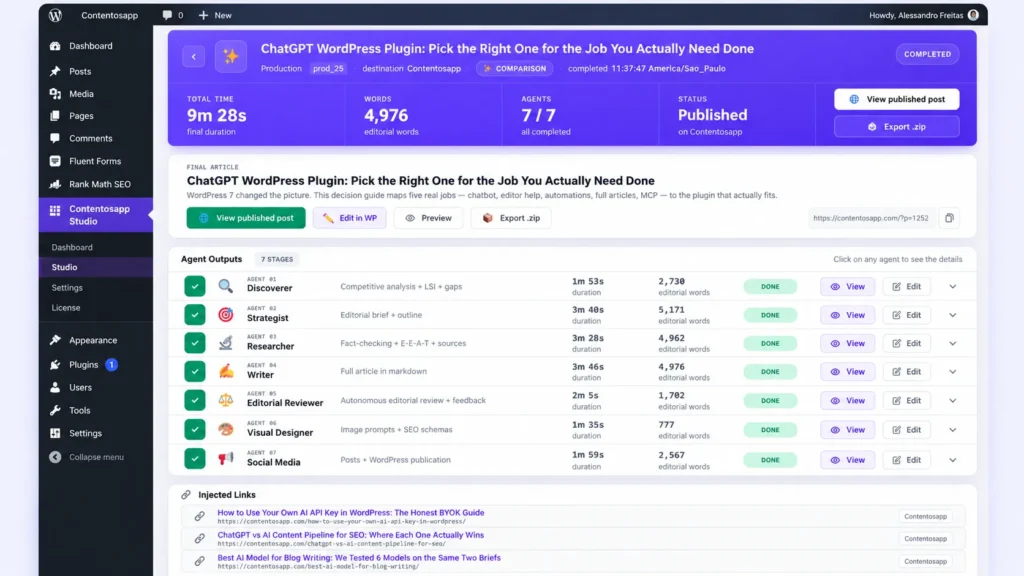
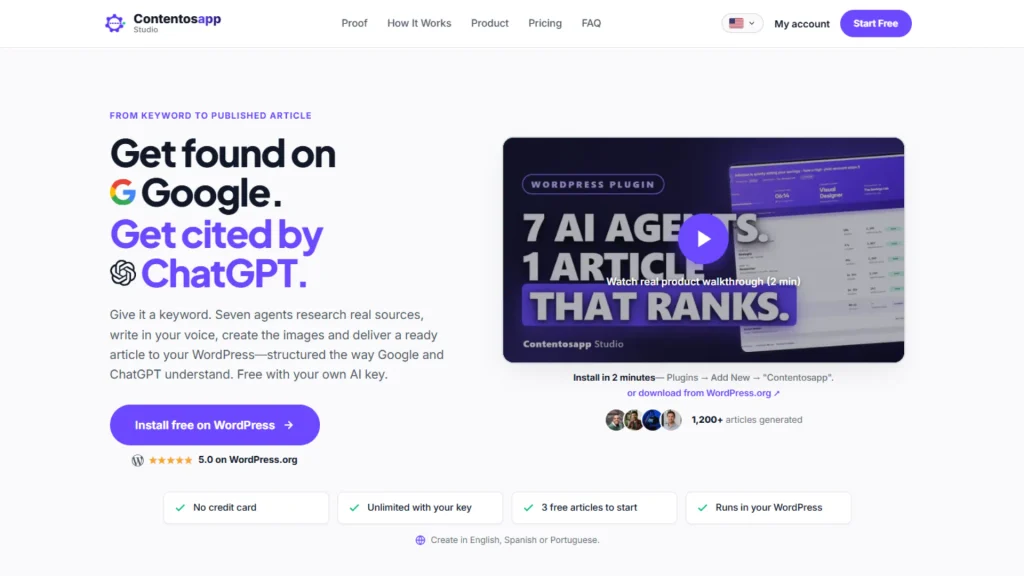
    Contentosapp Studio is not an MCP connector and does not make Claude a general WordPress operator. It is a seven-agent publishing workflow inside WordPress: Discoverer, Strategist, Researcher, Writer, Editorial Reviewer, Visual Designer, and Social Media. The listing says the workflow researches, sources, writes, reviews, prepares visual direction, and creates distribution copy before delivering content into WordPress.
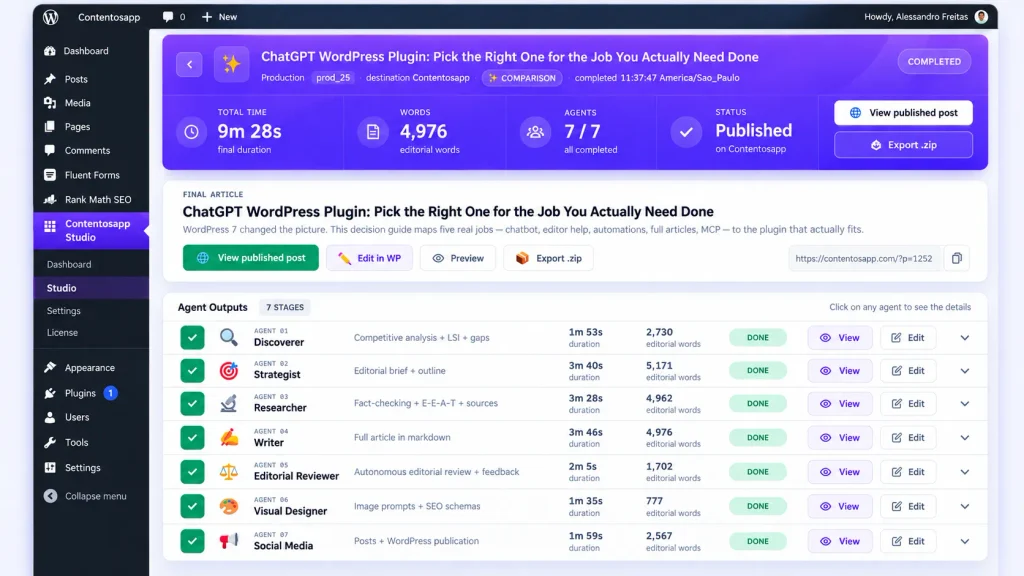
    Contentosapp Studio dashboard in WordPress showing a completed seven-agent AI content workflow from Discoverer to Social Media
    Contentosapp Studio runs a seven-agent content workflow inside WordPress, covering discovery, strategy, research, writing, editorial review, visual planning, and social distribution.

    In BYOK mode, the plugin supports user-provided Anthropic Claude, OpenAI, and Google Gemini keys. The listing states there is no plugin markup, no per-article cap, and no local production limit in BYOK mode; provider quotas and billing are the limiting factors. This corrects an older description of the product as “one production at a time.” That limitation is not stated by the current official listing and should not be presented as a verified constraint.

    If you do not want to manage an API key, ContentOS Auto is the optional managed route. The current Free plan includes unlimited BYOK plus three one-time ContentOS Auto trial productions; paid managed quotas are controlled by the hosted service, so check current pricing instead of relying on a static article. Supported output languages are English, Brazilian Portuguese, and Spanish.

    The documented boundaries are useful: Contentosapp Studio is not a visitor chatbot, does not expose an MCP server, and does not make Claude operate media, comments, themes, or arbitrary site settings. It is for article production. The WordPress.org listing also states that keys entered into the plugin are encrypted at rest in the WordPress database. The publisher’s own case study reports roughly $0.20 per article in AI usage across 25 articles; treat that as a vendor case study rather than an independent benchmark.

    If your real decision is which model to run inside a content pipeline, see the six-model blog-writing benchmark. If you are comparing site-operating agents with editorial pipelines, the agentic AI for WordPress guide goes deeper on that architectural difference.

    Claude Plan vs. Anthropic API: Who Pays?

    Anthropic explicitly separates paid Claude subscriptions from the Claude Console and API. A subscription improves access to Claude’s consumer and work surfaces; it does not automatically provide API credit. The practical billing map looks like this:

    Billing map

    Three Ways Claude Usage Can Be Paid

    The same Claude model can sit behind very different billing paths. Check which direction the integration runs before assuming your plan covers it.

    Claude Account / Plan

    Claude itself is the client doing the work — for example through MCP, Claude Desktop, Cowork, or Claude Code.

    Typical direction Claude → WordPress

    Anthropic API

    WordPress or another application calls Claude with an Anthropic API key and usage is billed separately by the API.

    Typical direction WordPress → Claude

    Vendor-Managed AI

    The plugin or service manages model access and gives you a quota, allowance, or paid production plan.

    Typical direction Product → AI provider
    The rule to remember: paying for Claude does not automatically give a WordPress plugin Anthropic API credit. Always verify which account is actually making the model request.
    Setup Claude runs where? Typical billing path Important caveat
    1. MCP connectorClaude app / Desktop / Cowork / Code, depending on connectorClaude account/plan usage, plus any WordPress or plugin plan requiredFree Claude users get one custom remote connector; product-specific access can have separate requirements
    2. Claude CodeDeveloper machine / IDE / terminalIncluded plan usage on supported plansANTHROPIC_API_KEY can switch Claude Code to API billing
    3. WordPress AI ClientInside WordPressAnthropic API key, billed by usageClaude subscription does not include API credit
    4. Content pipelineInside WordPress / managed serviceBYOK Anthropic API or vendor-managed quotaManaged plan terms are separate from a Claude subscription

    If you want a current API-cost reference, Anthropic’s pricing page listed the following base-token prices on October 2, 2026. These are provider prices, not plugin prices, and they can change:

    Claude modelInput / output per 1M tokens
    Claude Haiku 4.5$1 / $5
    Claude Sonnet 5.5$2 / $10
    Claude Opus 5.5$4 / $20
    Claude Fable 5.1$10 / $50

    Check the live Anthropic pricing page before budgeting. Prompt caching, batch processing, data residency, server-side tools, and other features can change the effective price. For a WordPress-specific BYOK walkthrough, see How to Use Your Own AI API Key in WordPress.

    Safety Checklist Before Claude Can Change WordPress

    MCP can give an AI assistant the ability to create, edit, publish, delete, install, or configure things on a real site. Treat the connection the way you would treat a new contractor account: scope it, observe it, and make the first tasks reversible.

    1. Use staging first when the workflow can modify code, themes, plugins, or global design. Build with WordPress is a development tool; review code before deploying it. For MCP site operators, test the exact tool set and permissions before connecting production.
    2. Use the least-privileged WordPress user that can do the job. WordPress permissions still matter for MCP Adapter abilities, Easy MCP AI connections, and AI Engine’s user-scoped OAuth flow.
    3. Prefer read-only or draft-only access for editorial experiments. Easy MCP AI documents read-only/full/custom profiles and a Force Draft option. WordPress.com confirms writes. Those controls materially reduce the blast radius of a bad instruction.
    4. Keep an audit trail. Easy MCP AI documents an Audit Log and Change History. WordPress.com has an account/site activity log, but that is not the same thing as a plugin-specific before/after record for every agent edit.
    5. Know which deletes are reversible. WordPress.com states that deleted posts and pages can remain in trash for 30 days, while some other deleted objects are permanent. Backups and revisions are still prudent.
    6. Review custom connectors and third-party MCP servers carefully. Anthropic explicitly warns that custom connectors may connect Claude to services that Anthropic has not verified. Review permissions and trust the server operator before authorizing access.
    7. Revoke access when the task is over. Use the connector/plugin’s own connected-app or token controls rather than leaving broad credentials active indefinitely.

    Which Claude WordPress Setup Fits Your Job?

    There is no meaningful overall winner because the four setups solve different problems. Use the criterion that matches the job:

    • Manage a WordPress.com or eligible Jetpack-connected site from Claude: evaluate the official WordPress.com connector. Its current documentation covers a broad site-management toolset and confirmation before writes.
    • Operate a self-hosted site from Claude with granular permissions, audit history, SEO integrations, and many ready-made tools: evaluate Easy MCP AI. Those capabilities are documented by its WordPress.org listing; they are vendor claims, not an independent benchmark.
    • Use MCP as part of a broader WordPress AI framework that also includes chatbots and content tools: evaluate AI Engine. Its MCP path and its WordPress-to-provider AI features are separate billing directions.
    • Expose your own WordPress Abilities to AI agents or work locally over STDIO: use the official MCP Adapter as the developer building block.
    • Build themes, plugins, blocks, or WooCommerce projects with a coding agent: Build with WordPress is the Claude Code workflow documented by WordPress.com and listed in Claude’s marketplace.
    • Let WordPress plugins call Claude through a provider-agnostic API: AI Provider for Anthropic plugs Claude into the WordPress AI Client and Connectors stack.
    • Produce researched article drafts with Claude as one model in a multi-agent publishing workflow: Contentosapp Studio is the publisher’s own product for that job; it is not an MCP site operator.

    Frequently Asked Questions

    Is there a Claude plugin for WordPress?

    There are several WordPress plugins and connectors that work with Claude, but no single Anthropic-authored WordPress plugin covers all of the jobs people mean by that phrase. AI Provider for Anthropic connects Claude models to the WordPress AI Client. Easy MCP AI and AI Engine can expose a self-hosted site to Claude through MCP. Build with WordPress is a WordPress.com plugin for Claude Code, and the WordPress MCP Adapter is an official WordPress AI Team building block.

    How do I connect Claude to WordPress with MCP?

    For WordPress.com, enable MCP access and add the official WordPress.com connector from Claude’s connectors directory. For self-hosted WordPress, an MCP server plugin such as Easy MCP AI or AI Engine gives Claude a site endpoint to connect to. Remote custom connectors must be reachable from Anthropic’s cloud; for a local site, the official WordPress MCP Adapter supports STDIO through WP-CLI on the same machine.

    Does Claude Code work with WordPress?

    Yes. Build with WordPress is specifically listed for Claude Code and is designed for themes, plugins, custom blocks, WooCommerce work, auditing, previews, and deployment. Claude Code can also connect to WordPress MCP servers such as Easy MCP AI or AI Engine when you want the coding agent to call site tools rather than only edit a local codebase.

    Can Claude Cowork use WordPress?

    Yes, when the WordPress integration is exposed as a compatible remote MCP connector. Anthropic documents remote custom connectors in Cowork, and Easy MCP AI explicitly lists Cowork. Meow Apps also documents AI Engine’s remote MCP connector working in Cowork. That does not mean every Claude plugin or local STDIO server automatically appears in Cowork; check the specific integration.

    Can Claude build a WordPress theme or plugin?

    Yes. The Build with WordPress marketplace listing says Claude Code can build themes, plugins, custom blocks, and WooCommerce stores. Treat generated code as development output: use a local or staging environment, inspect diffs, test capabilities and permissions, and review security-sensitive PHP before deployment.

    Does my Claude Pro or Max plan cover WordPress, or do I need an API key?

    It depends on the direction. Claude-side MCP connections use Claude as the client and consume your Claude account/plan according to that product’s limits. Claude Code can use included plan usage on supported plans. WordPress-side integrations such as AI Provider for Anthropic use an Anthropic API key and API billing. A paid Claude subscription does not include Claude API credit.

    What is the difference between a Claude MCP connector and WordPress Settings → Connectors?

    A Claude MCP connector lets Claude discover and call tools on an external service such as WordPress. WordPress Settings → Connectors is a WordPress-side framework for storing and managing credentials to external services such as Anthropic. The first direction is Claude → WordPress. The second is WordPress → Claude.

    Are there Claude skills or plugins for WordPress development?

    Yes. Build with WordPress includes WordPress development capabilities plus WooCommerce and Jetpack skills. Anthropic’s current plugin system can make skills and commands available across supported Claude surfaces, while hooks and sub-agents have narrower surface support. The Build with WordPress product page itself is specifically positioned for Claude Code, so use that as the documented WordPress workflow.

    The Practical Takeaway

    The keyword claude wordpress plugin is really an architecture question. Decide whether Claude should operate WordPress, build WordPress code, be called by WordPress, or sit inside a content-production workflow. That answer determines the plugin category, the credential path, the billing model, and the safety controls you should evaluate.

    For a live site, make the first test small: use staging when practical, create or choose a limited-role account, expose only the tools you need, and verify which billing path is active before running a long task. The ecosystem is changing quickly, so re-check the official source linked in the relevant section before standardizing a workflow across client or production sites.
  • ChatGPT WordPress Plugin: Pick the Right One for the Job You Actually Need Done

    ChatGPT WordPress Plugin: Pick the Right One for the Job You Actually Need Done

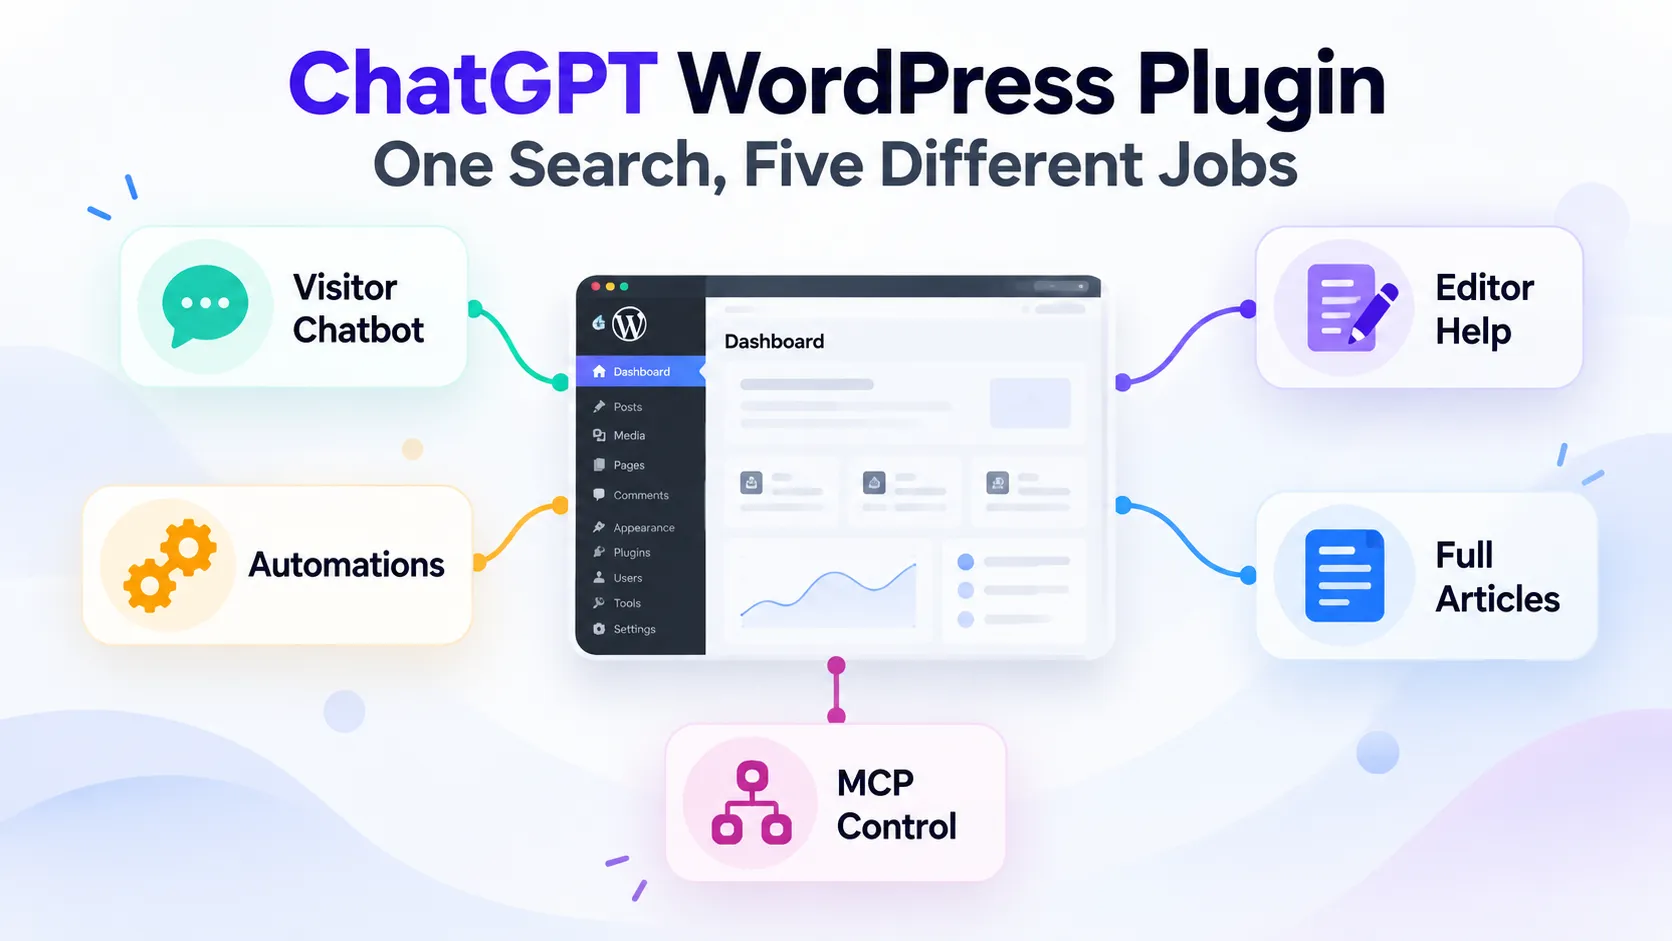
    You search for “ChatGPT WordPress plugin” and get a page full of tools that look interchangeable. They are not. That search term now covers at least five different jobs: a visitor chatbot, writing help inside the editor, no-code automations, full article generation, and MCP-style site control from ChatGPT or Claude.

    The first question is therefore not “Which plugin is best?” It is “What job do you actually need done?” A chatbot-first plugin can be a poor choice for long-form publishing. An automation engine can be excellent at connecting WooCommerce, forms, email, and AI without being an editorial tool. And a full-article pipeline may have no reason to include a visitor-facing chatbot at all.

    WordPress 7 adds another layer of confusion. Core now includes a Settings → Connectors screen and a provider-agnostic AI Client, but those are infrastructure. They do not turn WordPress Core into a writing assistant, and a key configured there does not automatically become available to every third-party AI plugin.

    One more distinction matters before you install anything: a ChatGPT subscription and OpenAI API billing are separate systems. If a plugin asks for an OpenAI API key, your ChatGPT Plus or Pro subscription does not fund those API calls. That misunderstanding is one of the easiest ways to choose the wrong setup and pay twice for something you expected to be included.

    i
    Publisher disclosure
    How this comparison was built
    This guide compares seven plugins by the jobs documented on their official WordPress.org listings or vendor pages, checked October 1, 2026. One of them — Contentosapp Studio — is made by the publisher of this site. It is evaluated under the same rule as the others: documented capabilities in, undocumented claims out, and limitations stated explicitly. Paid-tier prices are omitted where they vary by region or could not be verified consistently from a stable official source.

    Quick summaryChatGPT WordPress Plugins: Match the Tool to the Job

    • WordPress 7 Connectors: Core can centralize provider credentials for plugins built on that stack. In this guide, the WordPress AI plugin is the clear documented example; do not assume every third-party plugin reads the same key.
    • Billing: ChatGPT subscriptions and OpenAI API billing are separate. Plugins that call OpenAI with your API key create API charges on your OpenAI platform account.
    • Five jobs: visitor chatbot, editor assistance, automation recipes, full article generation, and MCP site control.
    • Job-first shortlist: WPBot / AI Puffer / AI Engine for chatbots; WordPress AI / Jetpack AI for editor help; Uncanny Automator for automation-first workflows; Contentosapp Studio for a source-grounded article pipeline; AI Engine or Jetpack AI for MCP-style site control.
    • Managed AI exists too: Jetpack AI, AI Puffer Cloud, Uncanny Agent, and ContentOS Auto can reduce or remove the need to manage your own provider key, depending on the mode you choose.

    What WordPress 7 Already Does — and What It Doesn’t

    WordPress 7.0 introduced the Connectors API, a standardized way for WordPress to register and manage connections to external services. The first featured AI connectors are Anthropic, Google, and OpenAI. Core can read credentials from an environment variable, a PHP constant, or the WordPress database.

    One security detail is worth stating precisely: WordPress Core’s Connectors documentation says database-stored API keys are masked in the interface but are not encrypted by Core itself. The separate free WordPress AI plugin includes an opt-in Key Encryption experiment that encrypts AI provider keys at rest with libsodium. Those are two different layers, and they should not be conflated.

    WordPress 7.0 also ships a provider-agnostic AI Client. That gives plugin developers a consistent PHP interface for sending prompts to configured models. It is infrastructure, not a user-facing writing tool. WordPress Core by itself does not suddenly write posts, run a chatbot, or generate a complete article because the AI Client exists.

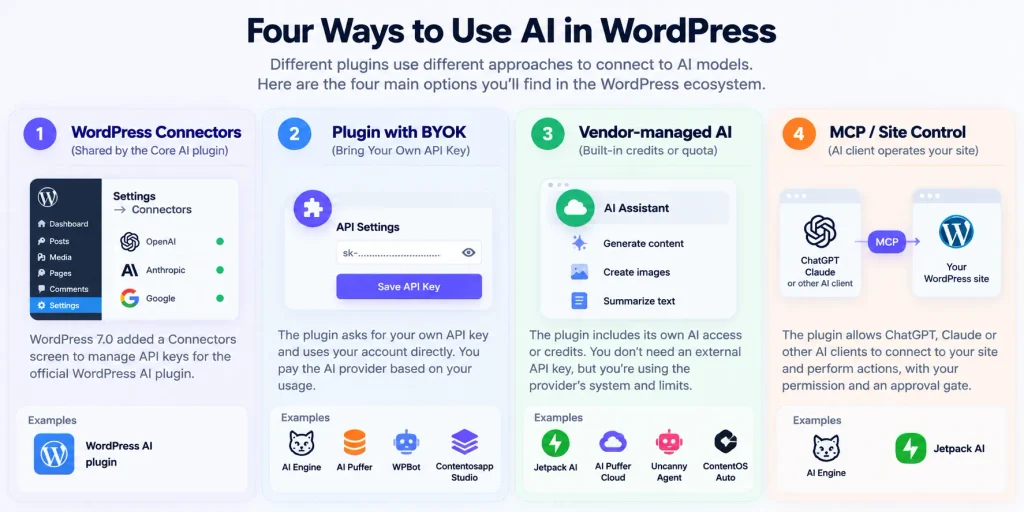
    The practical takeaway: the WordPress AI plugin is explicitly built around Connector plugins and the Settings → Connectors screen. AI Engine, AI Puffer, WPBot, and Contentosapp Studio expose their own provider configuration when you use their BYOK modes. Uncanny Automator can use external AI accounts in recipes but also offers its own Uncanny Agent mode without an API key. Jetpack AI offers a vendor-managed assistant and an MCP connection path. In other words, one key in Settings → Connectors is not a universal key for every AI plugin you install.

    Infographic showing four ways WordPress plugins connect to AI: WordPress Connectors, BYOK API keys, vendor-managed AI, and MCP site control
    WordPress AI plugins can connect to models in four different ways: through WordPress Connectors, a plugin-specific API key, vendor-managed AI credits, or MCP-based site control from an external AI client.

    Your ChatGPT Subscription Does Not Become WordPress API Credit

    OpenAI’s own billing documentation is clear: ChatGPT and the API platform have separate billing systems. A ChatGPT Plus or Pro plan gives you access to ChatGPT features under that subscription. It does not automatically create API credit for a WordPress plugin that asks for an OpenAI API key.

    ≠
    Billing distinction

    ChatGPT subscription and OpenAI API credit are not the same thing

    ChatGPT Subscription

    ChatGPT Plus / Pro

    What it pays for Using ChatGPT features inside the ChatGPT product.
    Typical use Chatting, drafting, brainstorming, or connecting an external AI client through supported workflows.
    Does not automatically provide API credit for a WordPress plugin that asks for an OpenAI API key.
    ≠

    OpenAI API

    API key + platform billing

    What it pays for Requests sent by BYOK plugins that call OpenAI models from WordPress.
    Typical use Editor tools, chatbots, automations, or content generation running through a plugin’s API integration.
    Usage is billed separately on your provider platform account when the plugin makes API calls.

    One newer exception: AI Provider for ChatGPT, a third-party plugin that is not made by OpenAI, connects a ChatGPT Free, Plus or Pro account to the WordPress AI Client through OAuth. Plugins built on that client, such as the WordPress AI plugin, can then use your subscription instead of an API key. It is an early release that supports text but not images, it does not support Business, Edu or Enterprise accounts, and its own listing asks you to review OpenAI’s Terms of Use before enabling it on a production site. Plugins that use their own OpenAI key field instead of the WordPress AI Client will not use it.

    There are two different directions of integration. In a traditional BYOK setup, WordPress calls the AI provider: the plugin sends requests using a provider key and usage is billed by that provider. In an MCP-style setup, your AI client connects to WordPress: AI Engine and Jetpack AI both document ways for ChatGPT, Claude, Claude Code, or another MCP-compatible client to operate on the site. That does not turn your ChatGPT subscription into WordPress API credit; it is a different architecture entirely.

    If you want to avoid provider-key management, there are vendor-managed routes. Jetpack AI includes 20 free requests before requiring a paid plan. AI Puffer offers an optional Cloud provider with a free monthly allowance and top-ups. Uncanny Automator includes free Uncanny Agent usage in Lite and more usage in paid plans. Contentosapp Studio’s Free plan includes three one-time ContentOS Auto trial productions, while BYOK remains separate. For exact OpenAI model prices, use the live OpenAI API pricing page rather than hard-coding a rate into a buying decision; model names and pricing tiers can change.

    If you want the setup details for BYOK specifically, the Contentosapp BYOK guide walks through the account, key, billing, and WordPress-side configuration.

    Five Jobs, One Keyword: A Decision Map

    “ChatGPT WordPress plugin” is really a bundle of different intents. Start with the job, then choose the tool.

    Decision map

    One Search. Five Completely Different Jobs.

    Start with what you need WordPress to do. The plugin category becomes much clearer after that.

    1

    Visitor Chatbot

    Answer visitor questions, provide support, capture leads, or use site content as a knowledge base.

    Look at WPBot · AI Puffer · AI Engine
    2

    Editor Assistance

    Write, rewrite, summarize, translate, generate images, or improve content inside WordPress.

    Look at WordPress AI · Jetpack AI · AI Engine
    3

    Automation Recipes

    Trigger AI actions when something happens across WordPress plugins, forms, stores, or external apps.

    Look at Uncanny Automator · AI Puffer · WPBot
    4

    Full Article Generation

    Produce complete posts rather than isolated snippets, titles, or paragraph rewrites.

    Different workflows Contentosapp Studio · AI Puffer · AI Engine · Jetpack AI
    5

    MCP Site Control

    Let an external AI client inspect or operate your WordPress site through controlled permissions.

    Look at AI Engine · Jetpack AI

    The distinction matters because feature overlap is not the same as job fit. AI Puffer, for example, spans chatbot, article generation, and automation. AI Engine spans chatbot, editor help, content generation, and MCP. WPBot is chatbot-first but now also documents a visual Automator. Jetpack AI spans editor assistance and MCP-style site control. A job-first matrix is therefore more useful than a generic “top plugins” ranking.

    You will also see SEO plugins and page builders in “best ChatGPT plugin” lists, because several of them, such as AIOSEO, Rank Math, Elementor and SeedProd, now ship AI features of their own. If you already use one of them, check those built-in features before adding another AI plugin. This guide focuses on standalone AI plugins.

    If your real question is whether you should keep working conversationally in ChatGPT or move to a structured publishing pipeline, this separate ChatGPT vs. AI content pipeline comparison covers that decision directly.

    How to Vet Any ChatGPT WordPress Plugin Before You Install

    Checklist
    Six checks before you install
    1. Maintenance: compare the last-updated date, changelog, and “tested up to” version with your WordPress install. Do not treat age alone as proof of quality or risk.
    2. Your actual job: verify that the official listing documents the feature you need — chatbot, editor help, automations, full posts, or MCP — instead of inferring it from the word “AI.”
    3. Provider and model support: check the plugin’s current provider list, then confirm the provider’s live model documentation. Model names and pricing change faster than many plugin pages.
    4. Credential path: confirm whether the tool uses WordPress Connectors, its own API-key settings, a vendor-managed credit system, or an external MCP client.
    5. Data flow: read the plugin’s external-services and privacy disclosures. Know what content, prompts, files, or user data leave WordPress and which provider receives them.
    6. “Free” economics: a free plugin may still generate provider charges. Separate plugin cost, AI usage cost, and any managed-service quota before comparing options.

    Decision Matrix: Seven Plugins Across Five Jobs

    The matrix below is intentionally descriptive rather than ranked. “Not documented” means the reviewed official page did not document that capability; it is not proof that the feature can never exist in an add-on, beta, or separate product.

    Plugin Primary job(s) Chatbot Editor help Automation Full posts MCP / site control AI access Free starting point
    WordPress AIBlock-editor AINo visitor chatbot listedYesWorkflow automation listed as coming soonNo dedicated end-to-end article pipeline listedMCP developer tool listed as coming soonWordPress Connectors + provider connector pluginPlugin free; provider usage separate
    AI EngineChatbot, editor, content tools, MCPYesYesNot a dedicated recipe engineContent Studio generates postsYesOwn provider connectorsFree plugin; paid features exist
    AI PufferChatbot, content, images, automation, WooCommerceYesYesYesYes — article/blog generatorNot documentedBYOK or AI Puffer CloudFree plugin; Cloud has free allowance
    WPBotVisitor chatbot + WordPress AutomatorYesNo editor copilot documentedYes — visual AutomatorNo editorial article tool documentedNot documentedOpenAI, Gemini, OpenRouter, Dialogflow, or non-LLM modesFree plugin
    Uncanny AutomatorAutomation recipes + Uncanny AgentNo visitor chatbot listedNot a writing copilotYes — core jobCan automate content actions; not an editorial pipelineNo MCP setup required for its own AgentBYOK integrations or managed Uncanny AgentLite includes free Agent usage
    Jetpack AIEditor AI + MCP site controlNo visitor chatbot listedYesNot a cross-plugin recipe engineCan generate blog posts/pages; not a sourced multi-agent pipelineYes — ChatGPT, Claude, Claude Code & MCP-compatible agentsAutomattic-managed AI or connected external AI client20 free requests
    Contentosapp StudioSource-grounded article pipelineNoNo editor copilotNo cross-plugin recipesYes — seven-agent workflowNo MCP server documentedBYOK or ContentOS AutoBYOK has no plugin fee; Free plan includes 3 one-time Auto trials

    Sources: official WordPress.org listings, WordPress Core development notes, and Jetpack’s official AI page, checked October 1, 2026. “Not documented” means the reviewed official source did not document the capability.

    Plugin-by-Plugin Analysis

    WordPress AI Plugin

    The free WordPress AI plugin is the clearest fit when your job is AI-assisted editing inside modern WordPress. It requires WordPress 7.0+ and the Block Editor; Classic Editor is not supported. Its current feature set includes title, excerpt, meta-description and slug suggestions, alt text, image generation and editing, summarization, translation, content resizing, editorial notes, comment tools, and other opt-in experiments.

    Its architectural distinction is Connector integration. You install a provider connector such as OpenAI, Google, or Anthropic, configure it under Settings → Connectors, and the AI plugin uses that infrastructure. The plugin also offers an opt-in Key Encryption experiment that encrypts provider API keys at rest. Do not attribute that encryption to WordPress Core itself; it is a feature of the AI plugin.

    This is not currently the tool for a visitor chatbot or a dedicated end-to-end article pipeline. It is also explicitly experimental, so test it in staging before making it part of a production editorial process.

    AI Engine

    AI Engine is the broad-framework option in this set. Its official listing documents chatbots, an editor assistant, Content Studio, image tools, forms, a full-screen Workspace, multi-provider connectors, and an MCP server. If you want several AI capabilities from one plugin rather than one narrowly defined workflow, that breadth is the main reason to evaluate it.

    The MCP implementation is especially well documented. ChatGPT, Claude, Claude Code, and other clients can connect to the WordPress site; desktop clients can use OAuth, and the tools exposed to the agent are permission-aware. The listing also documents cross-site chatbots that can be embedded on external websites. This is materially different from a plugin simply sending a prompt to OpenAI.

    AI Engine supports multiple providers and self-hosted/OpenAI-compatible endpoints. It requires PHP 8.1+. Paid features and pricing can change, so check the current official listing and vendor page before deciding which modules require a paid tier. For the architectural distinction between content pipelines and site-operator agents, see the agentic AI for WordPress guide.

    AI Puffer (formerly AI Power)

    AI Puffer is a broad AI suite. Its listing documents a trainable chatbot, article and blog-post generation, image generation, AI forms, an automation engine, WooCommerce tools, content assistance, a vector knowledge base, and REST access. For BYOK it supports OpenAI, Google Gemini, Azure, OpenRouter, DeepSeek, xAI, Ollama, and other integrations listed on the plugin page.

    The chatbot can be grounded in posts, pages, products, PDFs, and other files, and the plugin can also enable web search with supported providers. That makes it more flexible than describing it as a site-content-only bot. If your goal is “one plugin with chatbot + content generation + images + automation,” AI Puffer is one of the strongest documented fits in this set.

    You can use your own provider key or the optional AI Puffer Cloud. The Cloud option includes a monthly free allowance and top-ups; the plugin does not require hosted credits if you prefer BYOK. No MCP server is documented on the reviewed listing.

    WPBot

    WPBot remains chatbot-first, but its current scope is broader than older comparisons suggest. It can operate in non-LLM modes as well as with OpenAI, Gemini, OpenRouter, and Dialogflow, and its listing now documents a visual WordPress Automator for trigger-and-action workflows.

    For AI-assisted support, its Pro feature set includes RAG-style knowledge bases that can use site content and other supported sources. That makes WPBot particularly relevant when the primary goal is front-end support or lead generation and you want the option to expand into automations without changing the chatbot product.

    What it is not: an editorial writing environment comparable to a block-editor copilot or a structured article-research pipeline. If your main requirement is long-form publishing, choose a tool built around that job rather than stretching a chatbot product into it.

    Uncanny Automator

    Uncanny Automator is automation-first. Its core value is connecting triggers and actions across WordPress plugins and external apps without code. AI can be one step in those recipes, and the product now also includes Uncanny Agent and an AI page-building workflow.

    The current listing states that Lite includes free Uncanny Agent usage with no separate AI subscription or API key required. For recipe steps that use external providers, Uncanny Automator also supports BYOK integrations with providers such as OpenAI, Anthropic, Gemini, Perplexity, Mistral, Cohere, and xAI.

    If your problem is “when X happens in WordPress, have AI do Y and then trigger Z,” this is the right category to investigate. It is not primarily a visitor-chatbot product or a source-grounded editorial pipeline.

    Jetpack AI

    Jetpack AI combines two modes: a vendor-managed assistant inside WordPress and an external-agent connection for ChatGPT, Claude, Claude Code, and other MCP-compatible clients. The free tier includes 20 requests; paid plans add higher request capacity and MCP access according to Jetpack’s current plan page.

    Inside the editor, Jetpack AI can generate text, images, tables, lists, titles, summaries, and longer blog/page content. So it would be inaccurate to label it “no full article generation.” The important distinction is that Jetpack’s official page does not describe the same source-grounded multi-agent research pipeline used by Contentosapp Studio; it is a different workflow.

    Its MCP controls are now documented in useful detail: agent access is opt-in, read and write permissions are separate, writes wait for confirmation, and actions are recorded in the activity log. Jetpack Backup can be used to restore content after an unwanted change when that product is part of your plan.

    Contentosapp Studio

    Publisher disclosure: Contentosapp Studio is made by the publisher of this site. The claims below are limited to its official WordPress.org listing and linked public documentation.

    Contentosapp Studio is built around one primary job: producing source-grounded article drafts through a seven-agent workflow — Discoverer, Strategist, Researcher, Writer, Editorial Reviewer, Visual Designer, and Social Media. The Researcher gathers source material before the Writer drafts, and reference URLs supplied by the user can be read as grounding material rather than merely appended as citations.

    Contentosapp Studio in WordPress showing a completed seven-agent production, article output and publishing status
    Contentosapp Studio runs content production inside WordPress through seven sequential agents — from discovery and strategy to research, writing, editorial review, visual planning, and social distribution.

    BYOK mode supports OpenAI, Google Gemini, and Anthropic Claude, has no plugin fee, and the official listing states there is no per-article cap or local production limit in that mode; provider quotas and billing still apply. The listing also links a publisher-run case study reporting 25 articles in 25 days at roughly $0.20 per article in AI usage. Treat that number as a publisher case study, not an independent benchmark: in our later six-model test, API cost ranged from about $0.05 to $1.17 per article, depending on the model and the brief. The Free plan also includes three one-time ContentOS Auto trial productions; check current ContentOS Auto pricing for paid quotas.

    The boundaries are clearer than the marketing category name: supported output languages are English, Spanish, and Brazilian Portuguese; there is no visitor chatbot or MCP server documented; and BYOK credentials are configured in Contentosapp Studio rather than through the WordPress 7 Connectors screen. If model choice is your next decision, the six-model blog-writing benchmark compares cost and editorial outcomes inside the same pipeline.

    Recommendations by Use Case

    If you mainly need a visitor chatbot: start with WPBot, AI Puffer, or AI Engine. WPBot is chatbot-first and can work without an LLM in some modes. AI Puffer is attractive if you also want content generation, images, RAG, and automation. AI Engine is the broader framework if MCP and editor tooling matter too.

    If you mainly need writing help inside Gutenberg: the WordPress AI plugin is the most native fit for the WordPress 7 Connectors stack. Jetpack AI is the more vendor-managed path and avoids provider-key setup for its built-in assistant. AI Engine is worth considering if you want editor help as part of a larger AI framework.

    If you mainly need cross-plugin automation: Uncanny Automator is the automation-first option. WPBot also now documents a visual Automator, but its center of gravity remains chatbot/support. AI Puffer also includes an automation engine when you want automation inside a broader AI content suite.

    If you mainly need complete article drafts: first decide what “complete” means. AI Puffer and Jetpack AI can generate long-form posts. AI Engine has Content Studio. Contentosapp Studio is the option in this set whose public positioning is specifically a source-grounded seven-agent article pipeline. Those are different workflows, not interchangeable implementations of the same feature. If draft quality is the deciding factor, our guide to the best AI content plugins for WordPress compares them on that basis.

    If you want ChatGPT or Claude to operate the site: evaluate AI Engine and Jetpack AI. AI Engine documents a deep MCP toolkit with OAuth and permission-aware tools. Jetpack AI documents direct ChatGPT/Claude/Claude Code connections, read/write permission controls, confirmation before writes, and activity logging.

    If you want the broadest single-plugin feature surface: AI Engine and AI Puffer deserve the closest look. AI Engine combines chatbot, editor, content, images, Workspace, providers, and MCP. AI Puffer combines chatbot, writing, images, RAG, WooCommerce, forms, and automation. The right choice depends on which of those capabilities is actually central to your site.

    One category gap remains important: official listings are inconsistent about language coverage, research depth, and how “full article” generation is implemented. Do not interpret an undocumented language list as proof that a plugin cannot write in other languages. Treat it as an evidence gap and test the workflow with your own content before standardizing on it.

    Frequently Asked Questions

    Is there a free ChatGPT WordPress plugin?

    Yes. Several tools here have free entry points, but “free plugin” and “free AI usage” are different things. The WordPress AI plugin itself is free but needs a configured provider connector and provider usage may cost money. AI Engine, AI Puffer, WPBot, and Uncanny Automator have free plugin tiers. Jetpack AI includes 20 free requests. Contentosapp Studio is free in BYOK mode and its Free plan includes three one-time ContentOS Auto trial productions.

    Can I use my ChatGPT Plus subscription in WordPress plugins?

    Only through one specific route. ChatGPT subscriptions and OpenAI API billing are separate, so a plugin that asks for an OpenAI API key bills your API account, not your ChatGPT plan. The exception is AI Provider for ChatGPT, a third-party plugin that connects a ChatGPT Free, Plus or Pro account to the WordPress AI Client, which plugins such as the WordPress AI plugin can use. MCP is a separate case: an external ChatGPT or Claude client connects to WordPress through a compatible plugin, instead of WordPress calling a model with your key.

    Does WordPress have AI built in now?

    WordPress 7.0 includes AI infrastructure: the Connectors API and a provider-agnostic AI Client. Those pieces help plugins manage connections and call models consistently, but they are not a user-facing writing assistant by themselves. The separate WordPress AI plugin adds editor-facing AI features on top of that infrastructure.

    How do I add a ChatGPT-style chatbot to my WordPress site?

    Choose a chatbot-first or chatbot-capable plugin such as WPBot, AI Puffer, or AI Engine, then configure the provider or managed mode it supports. If you need answers grounded in your own site content, verify the plugin’s RAG/knowledge-base setup and which sources can be indexed before you deploy the widget publicly.

    Can ChatGPT connect to my WordPress site and make changes?

    Yes, with an MCP-compatible setup. AI Engine documents direct connections from ChatGPT, Claude, and Claude Code, including OAuth for supported desktop clients. Jetpack AI also documents ChatGPT, Claude, Claude Code, and other MCP-compatible agents, with separate read/write permissions and confirmation before writes.

    Do WordPress AI plugins use my API key or their own AI credits?

    Both models exist. BYOK tools send usage to the provider account you configure. Managed tools or modes bundle AI usage into the vendor’s service or quota. AI Puffer offers both BYOK and AI Puffer Cloud; Uncanny Automator offers external-provider integrations plus Uncanny Agent; Contentosapp Studio offers BYOK plus ContentOS Auto; Jetpack AI’s built-in assistant is vendor-managed.

    Can ChatGPT build a WordPress plugin for me?

    It can generate useful plugin boilerplate and implementation code, but that is a development workflow, not the same problem as choosing an AI plugin from the directory. Treat generated PHP as code that still needs staging tests, capability checks, nonce validation, sanitization, escaping, and a human security review before production deployment.

    The Practical Takeaway

    A “ChatGPT WordPress plugin” is not one product category anymore. The useful decision is job-first: chatbot, editor assistant, automation engine, article generator, or site-control agent. Once you identify that job, the feature lists become much easier to read and the billing model becomes much easier to compare.

    Before installing anything, verify three things on the current official page: the job you need is explicitly documented, the credential path matches the way you want to pay for AI, and the plugin is maintained for your WordPress/PHP environment. That is a more reliable buying method than choosing the longest feature list or the largest install count.

  • Best AI Model for Blog Writing: We Tested 6 Models on the Same Two Briefs

    Best AI Model for Blog Writing: We Tested 6 Models on the Same Two Briefs

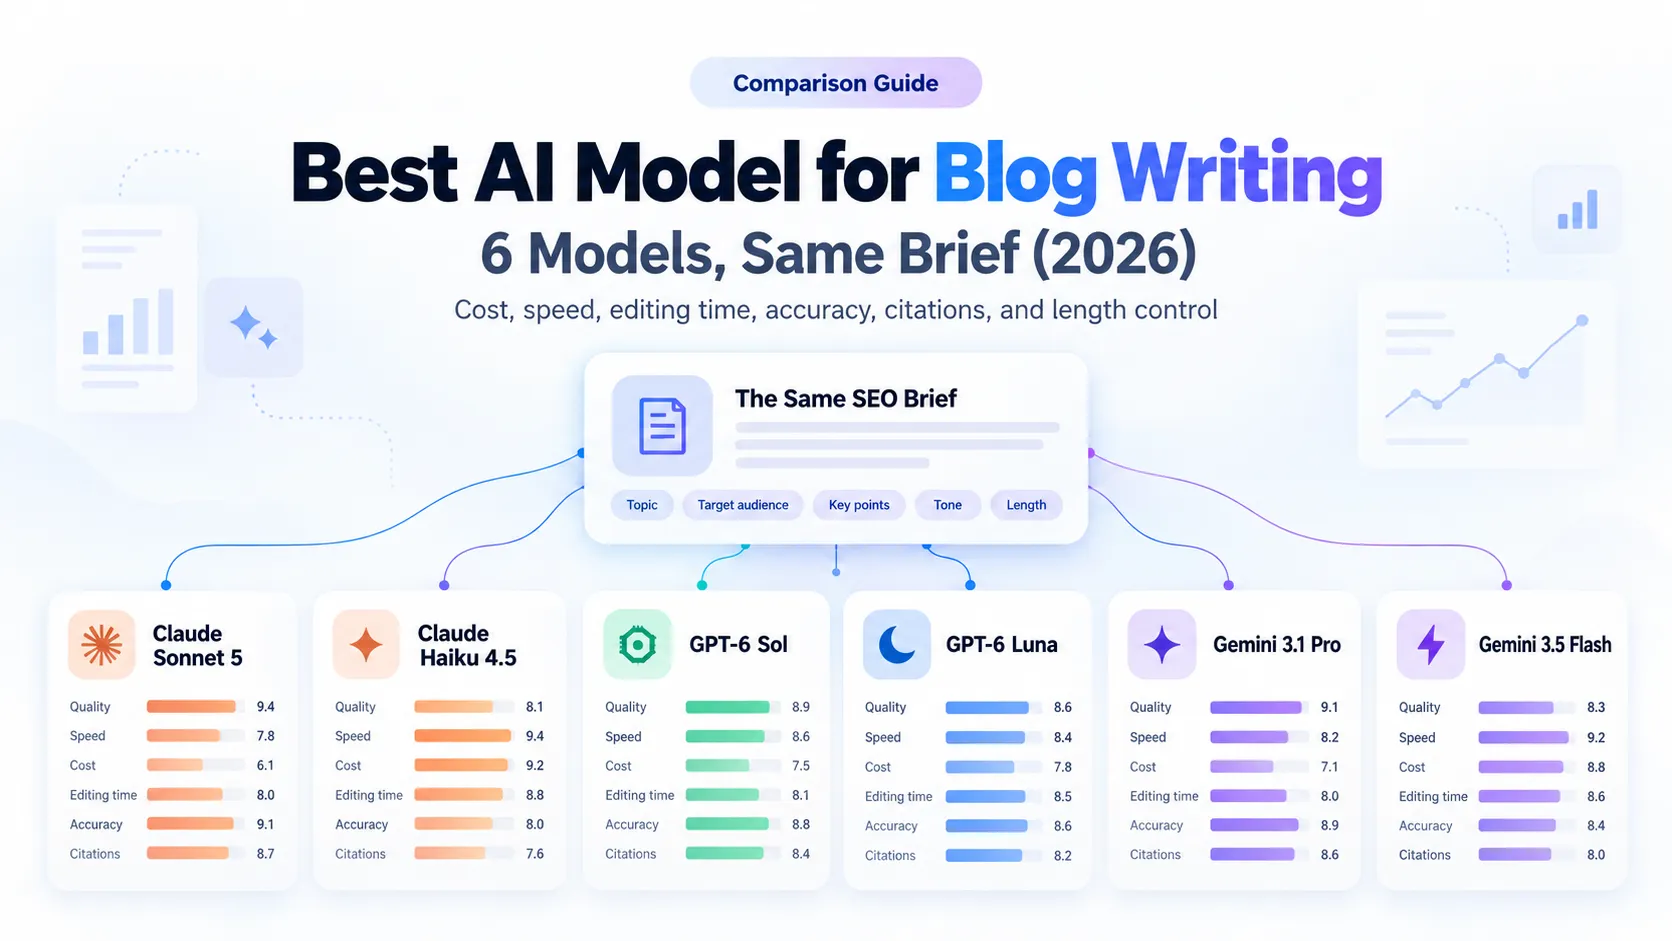
    No model won every category, but Claude Sonnet 5 came closest to being the best AI model for blog writing in our test. We ran six models through the same two SEO briefs. Sonnet 5 had the highest blind reader score (9.55 out of 10), the fewest factual errors (1 in 20 checked claims) and the lowest real cost per publish-ready article: $5.54, once editing time is counted. It lost only on generation speed and raw API price.

    GPT-6 Sol was the runner-up on quality. GPT-6 Luna had by far the smallest API bill, about $0.05 per article, yet it turned out to be one of the most expensive models to finish.

    Most “best AI for writing” lists rank models from feature pages and a few chat prompts. We wanted numbers from the job bloggers actually do: turn a brief into a draft, then fix that draft until it’s ready to publish. So we kept the whole pipeline fixed, changed only the model and timed the cleanup.

    One disclosure up front: the test ran inside Contentosapp Studio, the WordPress plugin this site publishes. This article was also drafted with it and then edited by a human. Every number below comes from those runs or from the vendors’ official pricing pages, checked September 28, 2026.

    At a Glance: What the Test Showed

    • Best prose and accuracy: Claude Sonnet 5 scored 9.55 out of 10 with blind readers, had all 10 checked citations supported and made 1 factual error in 20 checked claims.
    • Best value: Sonnet 5 was also the cheapest per publish-ready article, at $5.54, because it needed only 9 minutes of editing. GPT-6 Sol ($6.58) and Claude Haiku 4.5 ($6.65) came next.
    • Cheapest tokens, not cheapest posts: GPT-6 Luna has the lowest API price in the test, but its drafts needed 17.5 minutes of editing on average, for a real cost of $8.80 per article.
    • Editing is the real bill: at $30 an hour, editing made up 81% to 99% of the total cost for every model. Gemini 3.1 Pro was the fastest to generate a draft and the slowest to fix one, at 21 minutes.

    How We Tested Six AI Models on the Same Two Briefs

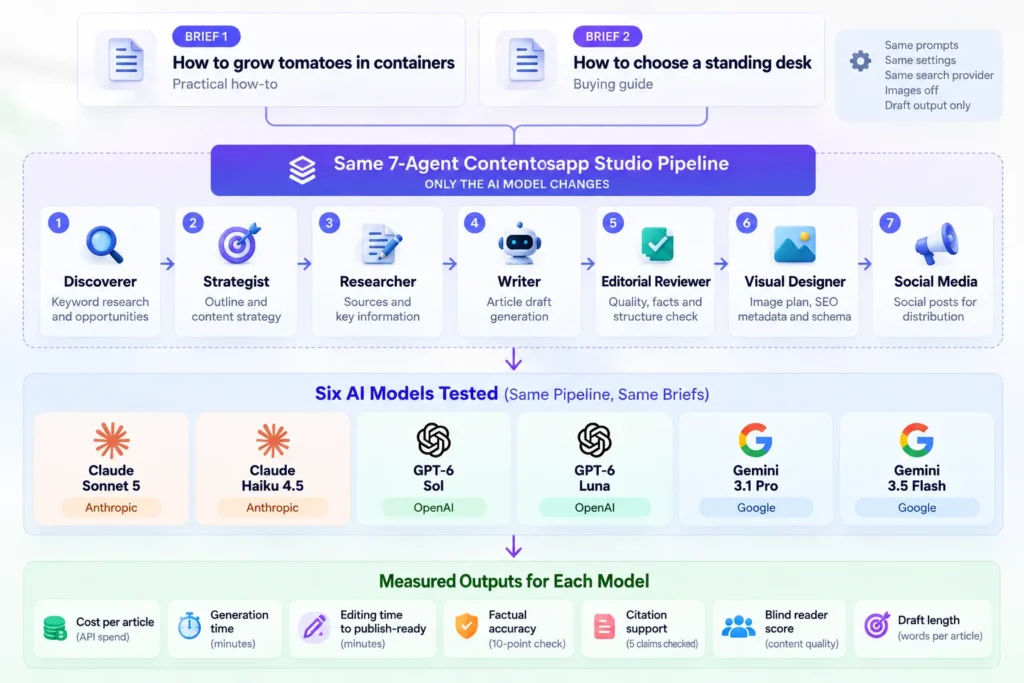
    Two briefs, six models, one pipeline. Each model wrote the same two articles: “how to grow tomatoes in containers,” a practical how-to, and “how to choose a standing desk,” a buying guide. Everything except the model stayed fixed: the Contentosapp Studio seven-agent workflow, the system prompts, the web search provider, the brand voice and the settings. Images were off, and every run ended as a draft.

    Test setup: two briefs, one 7-agent pipeline and six AI models, with the metrics measured for each draft
    Only the model changed: same briefs, prompts, search provider and settings for every run.

    The six models were Claude Sonnet 5 and Claude Haiku 4.5 from Anthropic, GPT-6 Sol and GPT-6 Luna from OpenAI, and Gemini 3.1 Pro and Gemini 3.5 Flash from Google. That gave us 12 drafts. We scored every draft before anyone edited it, then timed the edit.

    What we measuredHow we measured it
    API cost per articleCost of all seven agent calls behind one draft
    Generation timeFrom the start of the run to the finished draft
    Blind reader scoreReaders scored each draft from 1 to 10 without knowing which model wrote it
    Citations supportedFive cited claims per draft, each checked against the page it links to
    Factual errorsTen verifiable claims per draft (numbers, dates, specs), checked against reliable sources
    Editing timeMinutes a human editor needed to make the draft ready to publish
    Studio reviewerHighest severity flagged by the plugin’s built-in editorial reviewer (minor, major or critical)

    This was an API test with fixed prompts. Claude.ai, ChatGPT and the Gemini app wrap the same models in their own instructions, so results there can differ. If you write inside a chat app, treat these numbers as a guide, not a forecast.

    Test limitations. Two briefs per model is a small sample. We used one pipeline with its default prompts, and model versions change fast, so a different prompt setup could shift the ranking. Read this as evidence from a real production workflow, not a lab benchmark. For a longer run with the same plugin, see our 25-article case study on WordPress.

    The Results: Six Models Side by Side

    Here is how each model performed, averaged across both briefs. The best result in each column is in bold.

    ModelAPI cost per articleGeneration timeBlind score (of 10)Citations supportedFactual errorsEditing time
    Claude Sonnet 5$1.0413m 09s9.5510 of 101 of 209 min
    Claude Haiku 4.5$0.659m 33s8.658 of 103 of 2012 min
    GPT-6 Sol$1.087m 48s9.109 of 103 of 2011 min
    GPT-6 Luna$0.05*6m 23s8.307 of 105 of 2017.5 min
    Gemini 3.1 Pro$0.675m 05s7.957 of 106 of 2021 min
    Gemini 3.5 Flash$0.945m 37s8.057 of 105 of 2013 min

    *GPT-6 Luna’s API cost is an estimate. The cost recorded in our runs ($0.70 and $0.84) didn’t match Luna’s token prices, so we recalculated it from GPT-6 Sol’s measured cost at Luna’s rates, which are exactly 1/20 of Sol’s for both input and output. That assumes a similar token count per run. Luna wrote about 18% fewer words than Sol, so its real cost may be slightly lower.

    Sonnet 5 led every quality column. GPT-6 Sol was the only other model to average above 9 with readers. And the fastest models were not the cheapest to finish: Gemini 3.1 Pro produced a draft in about five minutes, then needed more editing than any other model.

    The Studio’s automated reviewer found no critical issue in any of the 12 drafts. It flagged at least one major issue in three of them: Claude Haiku 4.5 and GPT-6 Luna on the tomato brief, and Gemini 3.1 Pro on the desk brief.

    Length varied more than you’d expect from identical briefs. GPT-6 Sol wrote the longest drafts, 2,841 words on average, about 46% more than Gemini 3.5 Flash (1,941). GPT-6 Luna was the least consistent, with 2,123 words on one brief and 2,543 on the other. Sonnet 5 stayed within 77 words across both. Extra length didn’t cost Sol much editing time, but Luna’s swings came with the second-longest edits in the test.

    Official API pricing and specs

    ModelInput / output per 1M tokensLong-context priceContext windowKnowledge cutoff
    Claude Sonnet 5$2.00 / $10.00Same rate across the full 1M1M tokensJan 2026
    Claude Haiku 4.5$1.00 / $5.00—200K tokensFeb 2025
    GPT-6 Sol$2.00 / $10.00$4.00 / $15.001.05M tokensApr 20, 2026
    GPT-6 Luna$0.10 / $0.50$0.20 / $0.751.05M tokensMay 18, 2026
    Gemini 3.1 Pro (Preview)$2.00 / $12.00$4.00 / $18.00 above 200KNot confirmedNot confirmed
    Gemini 3.5 Flash$1.50 / $9.00Same rate above 200KNot confirmedNot confirmed

    Prices come from the official Anthropic, OpenAI and Google Cloud pricing pages, checked September 28, 2026. Google lists the Pro model as “Gemini 3.1 Pro Preview,” so its price and availability can still change. We could not confirm the Gemini context windows or knowledge cutoffs on the pages we checked.

    What a Publish-Ready Article Actually Costs

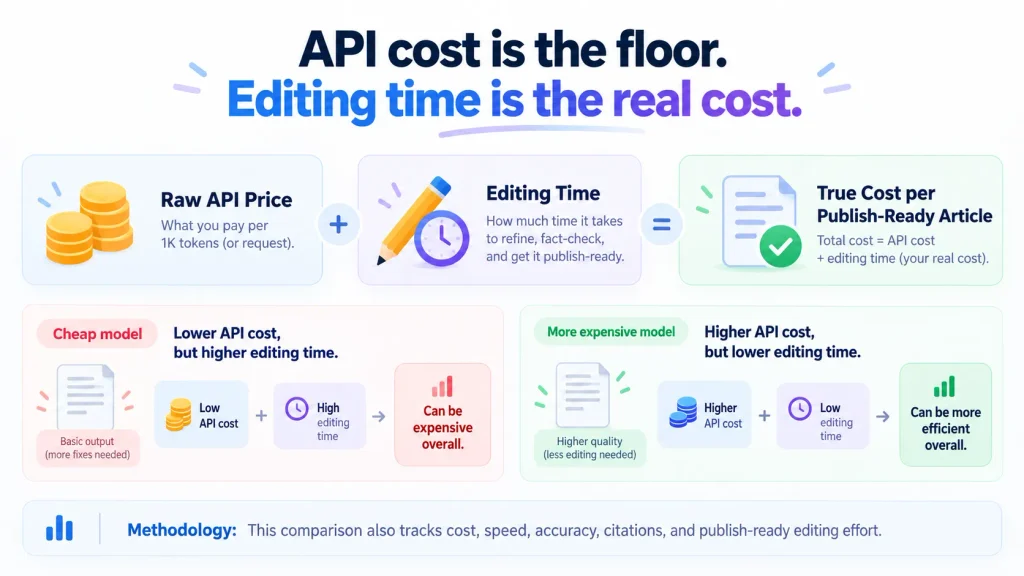
    The API price is the number everyone compares. It’s also the smallest part of the bill. The real cost of a finished post is API cost + (editing minutes ÷ 60) × your hourly rate. We valued editing time at $30 an hour.

    Diagram: true cost per publish-ready article equals API price plus editing time; cheap models can cost more overall
    In our test, editing made up 81% to 99% of the total cost per article.
    ModelAPI costEditing timeEditing cost at $30/hrTotal per publish-ready article
    Claude Sonnet 5$1.049 min$4.50$5.54
    GPT-6 Sol$1.0811 min$5.50$6.58
    Claude Haiku 4.5$0.6512 min$6.00$6.65
    Gemini 3.5 Flash$0.9413 min$6.50$7.44
    GPT-6 Luna$0.05*17.5 min$8.75$8.80
    Gemini 3.1 Pro$0.6721 min$10.50$11.17

    Real cost per publish-ready article

    API costEditing at $30/hr

    Claude Sonnet 5$5.54
    GPT-6 Sol$6.58
    Claude Haiku 4.5$6.65
    Gemini 3.5 Flash$7.44
    GPT-6 Luna$8.80
    Gemini 3.1 Pro$11.17

    Editing made up 81% to 99% of the total for every model. That flips the usual advice. GPT-6 Luna costs 20 times less than Sonnet 5 per token, yet a finished Luna article came to $8.80 against $5.54 for Sonnet, because Luna’s drafts took almost twice as long to fix. Swap in your own hourly rate and the leader holds: Sonnet 5 stays the cheapest per finished post at any editing rate above about $8 an hour.

    Per-token prices mislead for a second reason. According to Anthropic, Claude models from Opus 4.7 onward use a newer tokenizer that produces roughly 30% more tokens for the same text. Comparing rate cards across vendors, or even across Claude generations, isn’t comparing like with like. Measuring cost per article avoids that problem.

    If you’re weighing this against a subscription tool, our breakdown of AI content cost per article adds seat fees and word caps to the same math. And if you’d rather pay the provider directly, a BYOK AI writer keeps the API part of the bill at the provider’s own price.

    Model-by-Model Results

    Claude Sonnet 5

    Sonnet 5 was the strongest writer in the test. Readers gave it 9.7 on the tomato brief and 9.4 on the desk brief, the two highest scores of all 12 drafts. All ten checked citations held up, and its desk draft had zero errors in ten checked claims. Editing took 10 and 8 minutes.

    The trade-off is speed. At about 13 minutes per draft, it was the slowest model here, more than twice as slow as either Gemini model. For a draft you don’t have to watch, that rarely matters. Anthropic charges $2 input and $10 output per million tokens, and that is now the standard rate: the increase to $3/$15 scheduled for September 1, 2026 was canceled. Sonnet 5 also bills its full 1M-token context at that rate, with no long-context surcharge.

    Claude Haiku 4.5

    Haiku 4.5 was the cheapest Claude model to run, at $0.65 per article on average. Quality landed mid-table: a blind score of 8.65, 8 of 10 citations supported and 3 errors in 20 claims. Editing took 12 minutes on both briefs, which made it the most predictable model to clean up.

    Two caveats. Its reliable knowledge ends in February 2025, the oldest cutoff among the models we could confirm, so recent topics need extra checking. And in its models overview, Anthropic commits to keeping Haiku 4.5 available only until at least October 15, 2026. Check its retirement status before you build a workflow around it.

    GPT-6 Sol

    Sol was the runner-up almost everywhere: 9.10 with blind readers, 9 of 10 citations supported, 3 errors in 20 claims and 11 minutes of editing. Its tomato draft needed only 9 minutes, the least of any draft on that brief. It also wrote the most, about 14% more words than Sonnet 5, and finished in under 8 minutes.

    At $2/$10 per million tokens, Sol costs the same as Sonnet 5 on standard requests, but OpenAI’s long-context rate rises to $4/$15. Its knowledge cutoff is April 20, 2026, three months newer than Sonnet 5’s, which helps on fast-moving topics.

    GPT-6 Luna

    On paper, Luna is the bargain: $0.10 input and $0.50 output per million tokens, 20 times below Sol, which puts its API bill at about $0.05 per article (estimated, see the note under the results table). Once editing time is counted, that advantage disappears. Its drafts averaged 8.30 with readers, 7 of 10 citations held up, and its tomato draft had 3 errors in 10 claims, the most on that brief. Editing took 20 and 15 minutes, for a real cost of $8.80 per article.

    Luna does have the most recent knowledge cutoff among the models we could confirm, May 18, 2026. If you publish at high volume and accept heavier edits, OpenAI’s batch rate lowers it further, to $0.05 input and $0.25 output.

    Gemini 3.1 Pro

    Gemini 3.1 Pro was the fastest writer, at about 5 minutes per draft, and one of the cheapest to run, at $0.67. It was also the hardest to fix. Its desk draft took 32 minutes of editing, had 4 errors in 10 checked claims and only 3 of 5 citations held up. That single draft was the weakest result in the test.

    On the tomato brief it did fine: 10 minutes of editing and 2 errors. Google lists it as “Gemini 3.1 Pro Preview” on its pricing page, at $2/$12 per million tokens ($4/$18 above 200K tokens), so price and availability can still change.

    Gemini 3.5 Flash

    Flash sat in the middle: a blind score of 8.05, 7 of 10 citations supported, 5 errors in 20 claims and 13 minutes of editing, for $7.44 per finished article. It wrote the shortest drafts, 1,941 words on average.

    Know this before you choose it: Google has since released Gemini 3.8 Flash, priced at $0.75 input and $3.75 output per million tokens through December 31, 2026, and $1.50/$7.50 from January 1, 2027. We tested 3.5 Flash, at $1.50/$9, so treat these results as a baseline for the newer model, not a verdict on it.

    Tomatoes vs. Standing Desk: How the Brief Changed the Results

    The buying guide was harder on average. Across the six models, the desk drafts needed 16 minutes of editing against 11.8 for the tomato drafts, and they had 13 factual errors in 60 checked claims against 10.

    Most of that gap came from one draft. Without Gemini 3.1 Pro’s 32-minute desk article, the desk average drops to 12.8 minutes, close to the tomato average. Product advice is where weak drafts get expensive: specs, sizes and price ranges are easy to state wrongly and slow to check.

    So match the ranking to what you publish. If most of your posts are buying guides, weigh the factual-error and citation columns more heavily than the blind score. If you mostly publish how-tos, the editing gap between models is smaller: 9 to 20 minutes on the tomato brief, against 8 to 32 on the desk brief.

    Best AI Model for Blog Writing by Use Case

    No single model led every criterion, so the right pick depends on what you optimize for.

    Best prose and accuracy: Claude Sonnet 5. Highest blind score (9.55), every checked citation supported and 1 factual error in 20 claims. Pick it when your name is on the byline.

    Best value per finished post: Claude Sonnet 5. $5.54 per publish-ready article at $30 an hour, and still the cheapest at any editing rate above about $8 an hour. GPT-6 Sol ($6.58) is the runner-up if you already work with OpenAI.

    Lowest API bill: GPT-6 Luna. About $0.05 per article in API fees, the cheapest by far, but plan for 15 to 20 minutes of editing per draft. For better drafts on a small budget, Claude Haiku 4.5 ($0.65) needed less editing; confirm its retirement date first, since Anthropic only commits to it through October 15, 2026.

    Research-heavy posts: Claude Sonnet 5, then GPT-6 Sol. They had 10 and 9 of 10 checked citations supported. If your topics are very recent, Sol’s April 2026 knowledge cutoff is newer than Sonnet 5’s January 2026.

    Fastest drafts: Gemini 3.1 Pro. About 5 minutes per draft, but budget time to fix it, especially on product-heavy topics.

    Once you’ve picked a model, here’s how to use your own AI API key in WordPress.

    Frequently Asked Questions

    Is Claude better than ChatGPT for blog writing?

    In our test, yes, by a small margin. Claude Sonnet 5 beat GPT-6 Sol on blind reader score (9.55 vs. 9.10), citations (10 vs. 9 of 10), factual errors (1 vs. 3 in 20) and editing time (9 vs. 11 minutes). Both cost $2/$10 per million tokens. This was an API test with fixed prompts, so Claude.ai and ChatGPT may behave differently.

    Claude vs. Gemini for writing: which is more accurate?

    Claude, in our runs. Sonnet 5 made 1 factual error in 20 checked claims and Haiku 4.5 made 3, against 6 for Gemini 3.1 Pro and 5 for Gemini 3.5 Flash. Citations followed the same pattern: 10 and 8 of 10 supported for the Claude models, 7 of 10 for both Gemini models.

    Gemini vs. ChatGPT for writing: which is better?

    GPT-6 Sol beat both Gemini models on every quality measure we took, with a blind score of 9.10 against 7.95 and 8.05. The Gemini models were faster, at about 5 minutes per draft against Sol’s 8, but their drafts needed more editing.

    Which AI model is cheapest per blog post?

    It depends on what you count. GPT-6 Luna had the lowest API cost, about $0.05 per article. With editing time at $30 an hour, Claude Sonnet 5 was the cheapest at $5.54 per publish-ready post, while Luna came to $8.80.

    How much does it cost to write a blog post with your own API key?

    In our test, the API cost of one full seven-agent article ranged from about $0.05 with GPT-6 Luna to $1.17 with Claude Sonnet 5 and GPT-6 Sol, depending on the brief. Editing is the bigger number: 8 to 32 minutes per draft, or $4 to $16 at $30 an hour. Our AI content cost per article guide compares this with subscription tools.

    What is the best free AI for blog writing?

    None of the models in this test is free through the API; all six bill per token. Free chat plans are a different setup, with usage caps and no control over the system prompt, so these results don’t transfer directly. If you want low cost rather than zero cost, the cheapest drafts in our test, from GPT-6 Luna, cost about $0.05 each in API fees.

    What to Do With These Results

    The biggest difference between these six models wasn’t the API bill. It was the 12 minutes of editing that separated the easiest model to finish from the hardest.

    Your next step: pick the two or three models that fit your use case and run the math with your own hourly rate: API cost + (editing minutes ÷ 60) × hourly rate. The lowest total that still clears your quality bar is the model worth putting an API key behind.

    Raw Results: All 12 Drafts

    ModelBriefAPI costTimeWordsStudio reviewerCitations (of 5)Errors (of 10)EditingBlind score
    Claude Sonnet 5Tomatoes$0.9112m 32s2,456Minor only5110 min9.7
    Claude Sonnet 5Desk$1.1713m 46s2,533Minor only508 min9.4
    Claude Haiku 4.5Tomatoes$0.549m 12s2,232Major4112 min8.6
    Claude Haiku 4.5Desk$0.769m 54s2,355Minor only4212 min8.7
    GPT-6 SolTomatoes$0.997m 37s2,789Minor only519 min9.2
    GPT-6 SolDesk$1.177m 59s2,893Minor only4213 min9.0
    GPT-6 LunaTomatoes$0.05*6m 10s2,123Major3320 min8.4
    GPT-6 LunaDesk$0.06*6m 35s2,543Minor only4215 min8.2
    Gemini 3.1 ProTomatoes$0.604m 56s1,989Minor only4210 min8.1
    Gemini 3.1 ProDesk$0.735m 13s2,090Major3432 min7.8
    Gemini 3.5 FlashTomatoes$0.905m 33s1,890Minor only4210 min7.9
    Gemini 3.5 FlashDesk$0.985m 40s1,992Minor only3316 min8.2

    *Estimated from GPT-6 Sol’s measured cost at Luna’s token rates (1/20 of Sol’s). See the note under the results table.

    Sources

    Anthropic: Claude API pricing
    Anthropic: Claude models overview
    OpenAI: API pricing
    OpenAI: Models
    Google Cloud: Agent Platform pricing
    All pages checked September 28, 2026.

  • ZimmWriter Alternatives: Pick the Right One for Your Reason for Leaving

    ZimmWriter Alternatives: Pick the Right One for Your Reason for Leaving

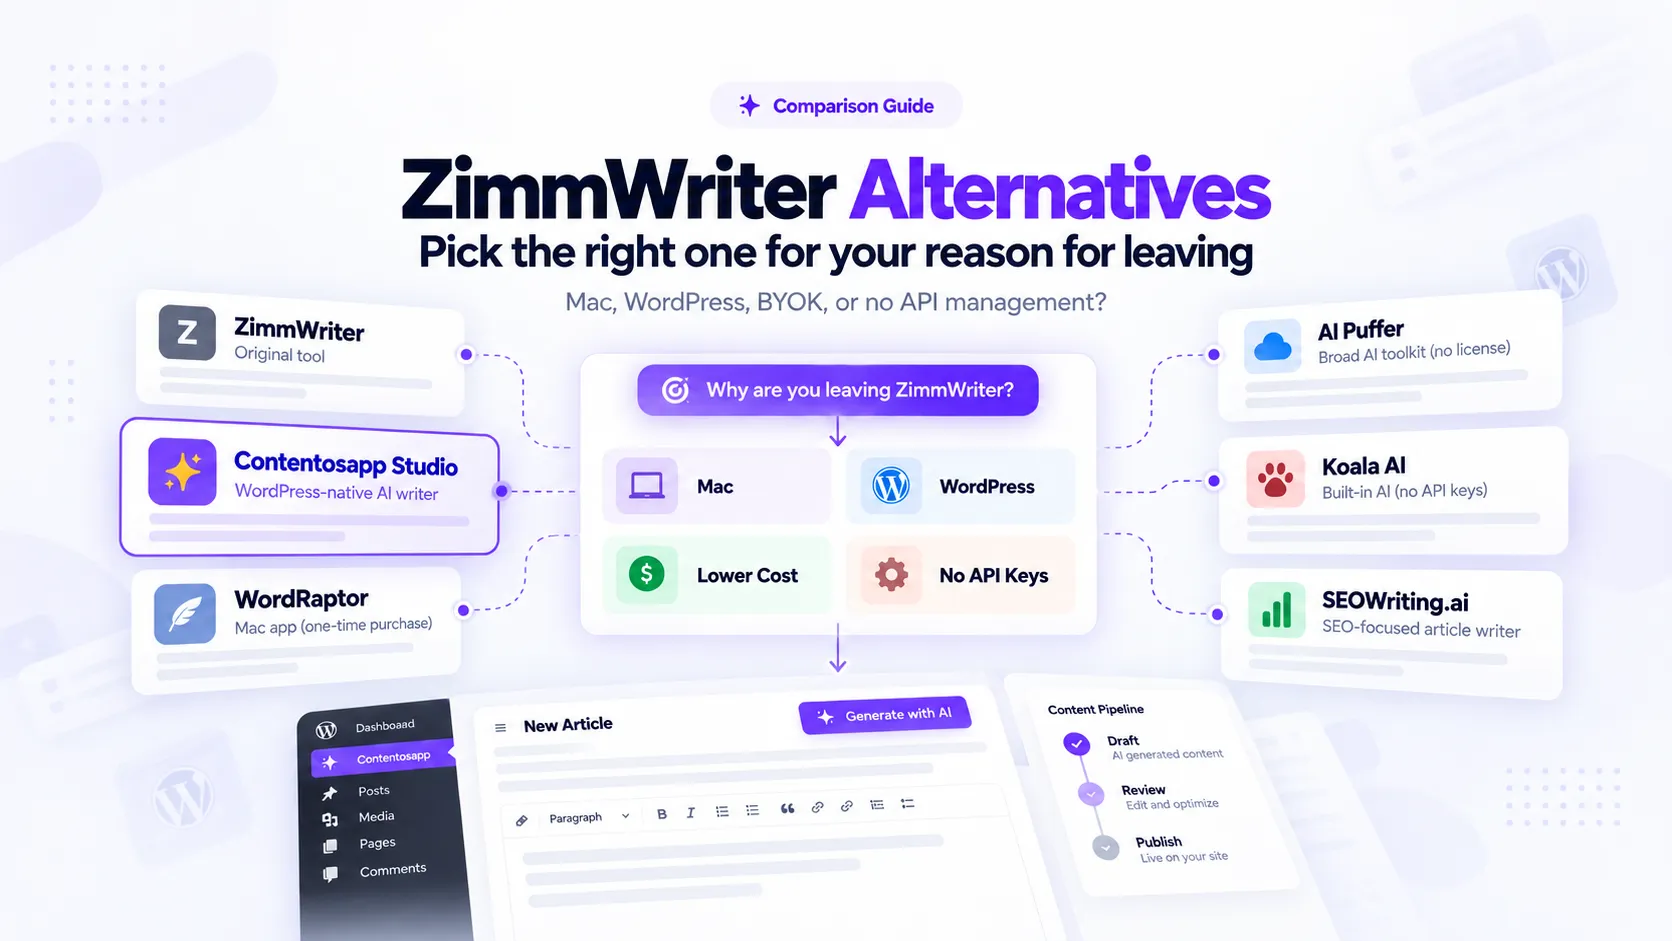
    Something changed. Maybe you switched to a Mac and realized ZimmWriter won’t install. Maybe the monthly license plus your OpenAI bill crossed a number you can’t justify. Maybe you want the article to land in WordPress as a draft you review — not auto-publish straight to your live site. Whatever the trigger, you’re not looking for a generic “top AI writing tools” list. You already know what ZimmWriter does. You want to know which ZimmWriter alternative solves your specific problem without creating a new one.

    This guide covers six tools: ZimmWriter, Contentosapp Studio, WordRaptor, AI Puffer, Koala AI, and SEOWriting.ai. Every claim is traced to an official source. Prices are date-stamped at September 2026. Where a fact could not be verified, this guide says so rather than inventing a cell to fill a table.

    One disclosure before anything else: Contentosapp Studio is made by the publisher of this article. It receives no special treatment here — the same evidence rules, the same constraint reporting, and the same evidence gaps apply to it as to every other tool. You’ll see its limitations stated directly.

    The guide is organized around four exit reasons. Not feature categories. Not price brackets. The actual reasons niche-site builders leave ZimmWriter:

    • Mac support — ZimmWriter runs on Windows. Full stop.
    • WordPress-native workflow — you want AI generation to happen inside your CMS, not a separate desktop app.
    • No license fee on top of API costs — you already pay OpenAI or Anthropic; a second monthly bill is the friction.
    • No API key management — you want a tool that handles AI costs inside a subscription so you don’t touch provider accounts at all.

    Find your reason. Everything else in this guide follows from it.

    Quick Guide: Which Alternative Fits Your Exit Reason

    • On a Mac: WordRaptor is a native Mac app with a one-time purchase — but only OpenAI and Claude are currently active; Gemini and Ollama are listed as coming soon.
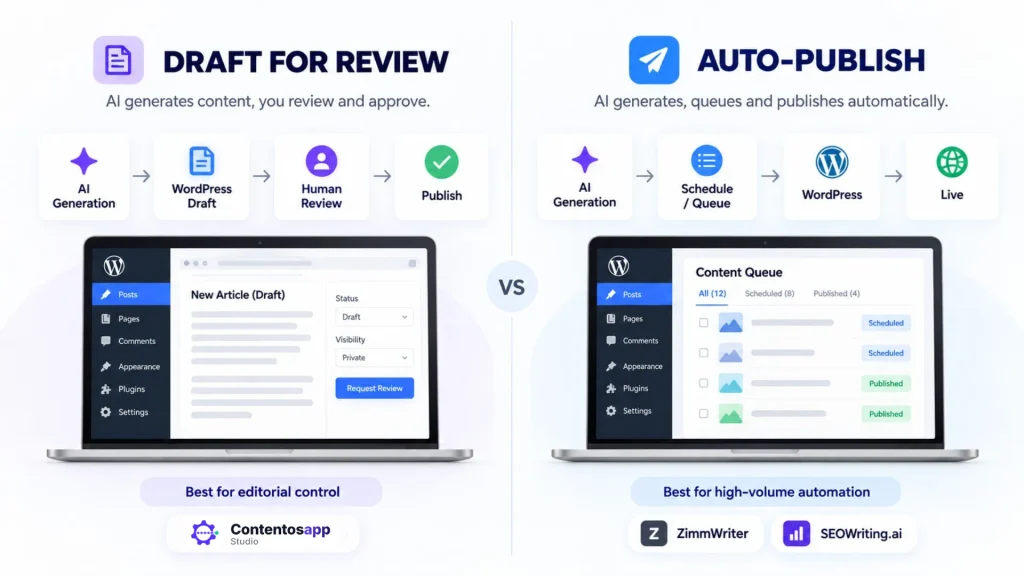
    • Want to work inside WordPress: Contentosapp Studio (free BYOK, draft-for-review pipeline) or AI Puffer (broad toolkit, but not a focused long-form article writer).
    • Done paying a license on top of API costs: Contentosapp Studio (free BYOK tier), AI Puffer (free plugin), or WordRaptor (buy once). Each trades something — language support, pipeline depth, or Mac-only access.
    • No API key management: Koala AI (subscription with AI included, word caps per plan) or SEOWriting.ai (auto-posts to WordPress in bulk; pricing not publicly verified).
    • Stay with ZimmWriter if: you run 50–1,000 article batches on Windows and publish across many sites simultaneously — no alternative in this guide verifies that combination at the same scale.
    • No tool here currently combines verified bulk volume with a mandatory human review step at scale — that gap is real and worth factoring before you switch.

    Why Your Reason for Leaving ZimmWriter Determines the Right Alternative

    These are not variations of the same preference. They are structurally different problems that lead to structurally different tools. Getting this wrong means you switch, hit a wall you didn’t see coming, and switch again.

    If you’re on a Mac, no amount of features in a Windows-only app helps you. The platform question is binary. ZimmWriter positions itself explicitly as the best AI writer for a Windows computer — that sentence is a constraint statement, not a selling point, for anyone outside Windows. WordRaptor was built specifically for this gap. It’s a native Mac app; your drafts stay on your machine, and it uses your own API keys. That’s the entire value proposition, and it matches the exit reason precisely.

    If you want the AI to run inside WordPress, the platform question disappears — but the workflow question opens up. Contentosapp Studio and AI Puffer both live in the WordPress dashboard. The difference is what they’re designed to do: Contentosapp Studio is a focused seven-agent article pipeline that outputs a draft into your WordPress editor for human review; AI Puffer is a broader AI toolkit with chatbot, automation scheduling, image generation, WooCommerce tools, and an article writer as one of many features. Same platform, different primary job.

    If your issue is the license fee, understand what you’re actually paying for. ZimmWriter’s cost is $24.97/month or $247/year — on top of your API bill. Free-tier alternatives like Contentosapp Studio and AI Puffer eliminate the license layer. WordRaptor replaces recurring fees with a single purchase. But “BYOK” is never truly free: every article still costs you tokens, and a high-volume batch on GPT-4o or Claude Sonnet can exceed a flat subscription at scale. The BYOK AI Writer explainer covers this arithmetic clearly — read it before you assume BYOK is automatically cheaper.

    If API key management itself is the friction — you don’t want a provider account, you don’t want to think about token limits — Koala AI solves this with AI usage bundled into its subscription. SEOWriting.ai does not document a BYOK requirement, but its AI billing model could not be fully verified from official sources.

    Decision Matrix

    Every cell below is traceable to an official source at the URLs listed in this guide. Where a fact could not be confirmed, the cell says so.

    Tool Platform Pricing model (Sep 2026) BYOK / AI included Batch volume WordPress publishing flow Languages verified
    ZimmWriter Windows desktop only $24.97/mo or $247/yr license + API costs billed separately BYOK only — required (GPT, Claude, Perplexity Sonar, OpenRouter, Ollama) Up to 1,000 articles; 50 product roundups per batch Direct publish or schedule to up to 100 WP installs Not publicly verified
    Contentosapp Studio WordPress plugin only Free (BYOK, no plugin fee, no article cap); optional managed plans from 5 to 100 articles/month BYOK — Gemini, OpenAI, Claude; no plugin markup One production at a time per site Draft by default for human review; Scheduled or Published optional per production English, Spanish, Brazilian Portuguese only
    WordRaptor Mac native app only One-time purchase; vendor states under $50 on Mac App Store — verify current price BYOK — OpenAI and Claude; Gemini, Groq and Ollama marked coming soon Batch confirmed; maximum size not publicly verified Publish to WP, Shopify, Wix, Ghost, Webflow — draft-vs-auto-publish detail not publicly verified 8+ languages: EN, FR, ES, PT-BR, IT, DE, NL, AR, RO
    AI Puffer WordPress plugin only Free plugin; Pro tier pricing not publicly verified BYOK — OpenAI, Gemini, Azure, OpenRouter, DeepSeek, xAI, Ollama; no hidden credits Automation engine supports scheduled batch tasks; max article batch size not publicly verified Publishing-status control in the article generator; automation engine schedules recurring tasks Not publicly verified
    Koala AI Web app (browser) Starter $25/mo; Professional $49/mo; Boost $99/mo; 20% off annual No BYOK — AI usage included in subscription; word caps per plan Bulk writing mode; 2x faster bulk on Boost and above Direct publish to WP, Shopify, Webflow, Ghost, webhooks — draft-vs-review detail not publicly verified Not publicly verified
    SEOWriting.ai Web app (browser) Not publicly verified — check current pricing Not publicly verified Up to 100 articles per batch with auto-posting Auto-posts to WP directly — mandatory review step not confirmed Not publicly verified

    What Each Tool Actually Costs: License Fee, API Bill, or Subscription

    Three cost structures exist in this market. You need to know which one you’re buying into before you switch.

    The first is license plus API bill. ZimmWriter charges a recurring license — $24.97/month or $247/year — and your AI provider charges separately per token. You bring your own keys; there are no word limits, but every generation hits your provider account directly. WordRaptor replaces the recurring license with a one-time purchase (vendor states under $50 on the Mac App Store — this is WordRaptor’s own claim on their comparison page; confirm the live price before purchasing) and similarly passes API costs to your provider. Contentosapp Studio and AI Puffer remove the license fee entirely — both have free tiers where you supply your own key and pay your provider nothing beyond what the requests cost. Contentosapp Studio explicitly states no plugin markup and no per-article cap on the free BYOK tier. AI Puffer advertises no hidden credits — you use your own account and control your costs.

    The second structure is subscription with AI included. Koala AI bundles AI generation into its plan pricing. Starter is $25/month for 45,000 KoalaWriter words and 500 credits; Professional runs $49/month for 100,000 words and 1,000 credits; Boost is $99/month with 2x faster bulk creation. Annual billing saves 20%. No API accounts needed. But word caps are real — a productive niche site can exhaust a Starter plan’s monthly allowance on a handful of long articles.

    The third is unverified. SEOWriting.ai’s pricing page was not accessible at the evidence date. Do not make a cost decision based on what you read elsewhere — check current pricing directly on their site.

    ✦ Cost structure

    Three Ways AI Writing Tools Charge You

    The sticker price is only part of the equation. What matters is who charges for the tool and who charges for the AI usage.

    Model 01

    License + API Usage

    Tool license
    AI provider

    ZimmWriter charges a recurring software license while your AI provider bills usage separately.

    Two separate costs

    Model 02

    BYOK Without a Recurring License

    Free / buy once
    AI provider

    Contentosapp Studio and AI Puffer offer free BYOK paths. WordRaptor uses a one-time purchase model.

    You still pay API usage

    Model 03

    Subscription With AI Included

    Subscription
    AI included

    Koala AI bundles generation into the subscription. You do not manage separate provider API accounts.

    One bundled bill
    SEOWriting.ai is not placed in a cost model here because its current pricing and AI billing structure could not be verified from official sources at the evidence date.

    The honest math for BYOK: if you’re running ZimmWriter with GPT-4o at volume, your API bill may already be substantial. Switching to a free BYOK plugin only removes the license layer — the AI spend stays. For lighter-volume publishers, the license savings are real. For high-volume operations, run the actual token calculation before assuming you’ll save money. The BYOK AI Writer explainer walks through this comparison in detail.

    The Six Tools, Analyzed

    ZimmWriter — Reference Baseline

    ZimmWriter’s core value proposition is batch volume without word caps, on Windows. You can generate up to 1,000 blog posts in one run, handle product roundups up to 50 per batch, and publish or schedule directly to up to 100 WordPress installations. The model roster is broad: GPT-5 variants, the full GPT-4.1 and 4o family, Claude 3.5 Haiku, Claude 4 Sonnet and Opus, Perplexity Sonar, OpenRouter (hundreds of additional models), and locally hosted models via Ollama. Beyond article generation, it works across Word, Google Docs, VS Code, Gmail, LinkedIn, and over 1,000 other applications through a cross-app AI assistant.

    The constraint is plain: Windows-only. Mac users have no supported path. Output language support is not stated on the official site — that’s an evidence gap, not a verified limitation, but it means you can’t confirm multilingual support from official sources. If you’re on Windows, running volume, and publishing to many sites, nothing in this guide verifiably matches that combination at the same scale.

    Evidence gaps: output languages; trial or refund policy; draft-vs-publish workflow controls beyond direct publish.

    Official source: ZimmWriter official website

    Contentosapp Studio — Publisher’s Product

    Disclosure: Contentosapp Studio is built by the publisher of this article. The same evidence rules apply.

    Contentosapp Studio is a WordPress plugin that runs a seven-agent pipeline: Discoverer, Strategist, Researcher, Writer, Editorial Reviewer, Visual Designer, and Social Media. Each article passes through all seven before landing in your WordPress editor. Draft is the default, so a person reviews each article before it goes live, and the pipeline is built around that step. You can also set a production to Scheduled or Published when you want it to go out automatically.

    BYOK works without a license. You connect your own Gemini, OpenAI, or Anthropic key; requests go directly from your site to that provider with no plugin markup and no per-article cap. The publisher’s own case study — vendor-reported, not independently audited — documented 25 articles in 25 days at approximately $0.20 per article in AI usage. Optional managed plans (ContentOS Auto) start with 3 free done-for-you articles, then Starter (5 articles/month), Pro (30) and Studio (100), with 2 months free on annual billing. Current prices are listed on contentosapp.com.

    The hard constraints are worth stating directly. One production runs at a time per WordPress site — this is not a bulk-batch tool. Supported languages are English, Spanish, and Brazilian Portuguese only. And it requires a WordPress installation; there is no standalone web or desktop version.

    Evidence gaps: total active installs; article length or token limits per run.

    Official source: Contentosapp Studio on WordPress.org

    WordRaptor — Mac-Native Alternative

    WordRaptor was built for one audience: Mac users who want to generate and publish articles without Windows virtualization overhead. It’s a Mac app, not a web service — your drafts live on your computer, not on a third-party server. API keys and CMS credentials are stored with SwiftData encryption and never leave your Mac.

    The integrations grid on the official site shows OpenAI, Claude and Apple Intelligence without a badge and marks Gemini, Groq and Ollama as coming soon. The feature list on the same page says Groq and Gemini can be connected, so confirm the current version if you need a provider other than OpenAI or Claude. CMS publishing covers WordPress, Shopify, Wix, Ghost, and Webflow. Language support is meaningful: 8+ languages are listed, including English, French, Spanish, Brazilian Portuguese, Italian, German, Dutch, Arabic, and Romanian — more than any other item in this guide with publicly verified language coverage.

    Pricing is a one-time purchase. WordRaptor’s own comparison page states “under $50 on the Mac App Store” — this is vendor marketing, not an independent price check. Confirm the current live price on the Mac App Store before purchasing. Batch generation is confirmed as a feature, but the maximum batch size is not publicly stated in official documentation.

    Evidence gaps: exact live price on Mac App Store; maximum batch size; research/source-grounding methodology; draft-vs-auto-publish toggle detail.

    Official source: WordRaptor official website

    AI Puffer — WordPress AI Toolkit

    AI Puffer is best understood as an all-in-one AI platform for WordPress, not a specialized long-form SEO article pipeline. It includes an AI chatbot, content generator, image generator, automation engine for scheduled tasks, AI-powered forms, WooCommerce product description tools, and a vector database for training on your own content. That breadth is genuine — and it means the article generation feature exists alongside a lot of other functionality you may or may not need.

    BYOK covers OpenAI, Google Gemini, Microsoft Azure, OpenRouter, DeepSeek, xAI, and Ollama, with no hidden credit layer. The free plugin tier is available on WordPress.org. Its article generator includes a publishing-status control, according to the official listing, and the automation engine can schedule recurring content tasks.

    Pro tier pricing is not publicly verifiable from official documentation. If cost is a key criterion, you can confirm the free tier structure but cannot accurately calculate Pro tier costs without checking the plugin page directly.

    Evidence gaps: Pro pricing; article batch size limits; output languages.

    Official source: AI Puffer on WordPress.org

    Koala AI (KoalaWriter) — Subscription with AI Included

    Koala AI is a browser-based platform where AI usage is bundled into the subscription — no provider account required. Starter is $25/month for 45,000 KoalaWriter words and 500 credits; Professional is $49/month for 100,000 words and 1,000 credits; Boost is $99/month for 250,000 words and 2,500 credits, with 2x faster bulk article creation. Annual billing carries a 20% discount. The platform starts free without a credit card.

    Beyond article generation, the Starter plan includes real-time factual data, live Amazon data for affiliate content, bulk writing mode, and direct publishing to WordPress, Shopify, Webflow, Ghost, and webhooks. Professional and above add an article editor with AI chat edits and SEO scoring, KoalaLinks internal linking for up to 50 sites, deep research, and the KoalaMCP server for connecting AI assistants. The Boost plan adds Content Calendar Autopilot.

    The model selection on Starter, as listed in September 2026, includes GPT-6 and Claude Sonnet 5. There is no BYOK option mentioned on the pricing page — if you want to use a specific model not on the plan, or reduce costs by connecting your own key, that path is not confirmed as available.

    For a more detailed look at how it compares to other web-based platforms, the Koala AI alternatives guide covers adjacent tools in this category.

    Evidence gaps: output languages; draft-vs-auto-publish controls in the WordPress publishing flow; rollover of unused word credits.

    Official source: Koala AI pricing

    SEOWriting.ai — Bulk Auto-Post Platform

    SEOWriting.ai is designed for volume. Its stated workflow is 1-click article generation with automatic SERP competitor analysis, followed by bulk auto-posting of up to 100 articles per batch to WordPress. The platform automatically optimizes for both traditional search results and AI engines such as ChatGPT, Perplexity, and Google AI. Image generation is included, and 20+ pre-trained models for affiliate content are available for product roundups, reviews, and how-to guides.

    The auto-post workflow is the defining characteristic. Articles can be published or scheduled automatically — that’s the design. Whether a draft-only mode exists, where content lands for human review before publish, is not confirmed in official content. For publishers who want mandatory review, this is a meaningful gap to investigate before committing.

    Pricing is not publicly verifiable. The pricing page was inaccessible at the evidence date. Do not rely on third-party price claims — check the current pricing at SEOWriting.ai directly.

    Evidence gaps: pricing (entirely unverified); BYOK vs. included AI (not stated); output languages; whether a draft-review mode exists; AI usage model.

    Official source: SEOWriting.ai

    ZimmWriter Alternatives: Comparison between draft-for-review and auto-publish workflows for AI-generated WordPress content
    Draft-for-review adds a human approval step before publishing, while auto-publish workflows move AI-generated content directly through the publishing queue.

    Strengths and Limitations by Use Case

    If you’re on a Mac, WordRaptor is the only tool in this guide built as a native Mac application. The privacy-first argument — drafts on your device, keys never leave your Mac — is real and documented. The trade-off is that Gemini, Groq, and Ollama integrations are listed as coming soon, not currently active. If your workflow depends on Gemini or local models, confirm availability before purchasing. Nothing else here runs as a Mac native app.

    If you want to write inside WordPress, Contentosapp Studio and AI Puffer are the two options. Contentosapp Studio fits publishers who want a structured, research-grounded pipeline with human review before publish — the seven-agent design means each article has gone through intent mapping, sourcing, writing, and editorial review before it appears in your editor. AI Puffer fits publishers who want more than an article writer: if you also want a chatbot, automation scheduling, WooCommerce product copy, or a custom knowledge base, its breadth becomes an advantage. If you only want articles, that same breadth may be more tool than you need.

    ✦ Quick fit

    Start With the Constraint You Actually Need to Solve

    The best alternative changes depending on what made ZimmWriter stop fitting your workflow.

    Your constraint

    You Work on a Mac

    WordRaptor Native Mac

    The only tool in this comparison built as a native Mac application. OpenAI and Claude are currently documented as active integrations.

    Your constraint

    You Want to Work Inside WordPress

    Contentosapp Studio AI Puffer
    WP Native

    Contentosapp Studio focuses on a structured article production pipeline. AI Puffer is a broader WordPress AI toolkit with content generation among other features.

    Your constraint

    You Don’t Want Another Recurring License

    Contentosapp AI Puffer WordRaptor
    BYOK

    Contentosapp Studio and AI Puffer offer free BYOK paths. WordRaptor replaces the recurring license with a one-time purchase. API usage still costs money.

    Your constraint

    You Don’t Want to Manage API Keys

    Koala AI SEOWriting.ai*
    Managed

    Koala AI has documented AI usage bundled into its subscription. SEOWriting.ai does not document a BYOK requirement, but its AI billing model was not fully verified.

    These cards identify the closest fit for each constraint, not an overall ranking. Batch volume, language support, publishing controls, and provider support still differ between tools.

    If your goal is no license fee on top of API costs, the real question is what you trade for that. Contentosapp Studio’s free BYOK tier trades batch volume (one article at a time) and language breadth (three languages). AI Puffer’s free tier trades pipeline focus: article generation is one feature among many (chatbot, forms, images, automation) rather than the product’s single focus. WordRaptor trades platform access — Mac only, and some AI providers are still pending. None of these trades is a dealbreaker by itself, but they’re real.

    If you don’t want to manage API keys at all, Koala AI gives you the cleanest managed experience with transparent pricing and a documented feature set. SEOWriting.ai offers bulk auto-posting at scale, which is a direct functional match for ZimmWriter’s volume workflow — but pricing is unverified and the auto-post default means less editorial control. For publishers thinking about scaling bulk content production, the Programmatic SEO with AI guide covers the trade-offs between automated publishing and Google’s documented position that using automation primarily to manipulate rankings violates its spam policies — a distinction that matters when publishing at volume.

    Worth noting directly: Google’s guidance on AI-generated content is that automation is not against its guidelines. The violation occurs when automation is used “primarily to manipulate ranking in search results.” That distinction — helpful content versus ranking manipulation — applies equally to a 1,000-article ZimmWriter batch and a 100-article SEOWriting.ai auto-post run. The publishing workflow you choose, and the quality control you apply, determines which side of that line you’re on.

    Category Gaps: What This Set of Tools Does Not Clearly Solve

    No tool in this guide publicly verifies the combination of bulk article generation and a mandatory human review step at scale. ZimmWriter produces volume and auto-publishes. SEOWriting.ai produces volume and auto-publishes. Contentosapp Studio defaults to human review but runs one article at a time. If you need 50 articles per week with each one reviewed before publish, you are assembling a workflow from pieces — no single tool here documents that end-to-end capability.

    ✦ Category gap

    The Combination No Tool Here Clearly Solves

    Each capability exists somewhere in this market. The gap is finding all three in one documented workflow.

    Bulk Generation
    Produce many articles in a single workflow
    Mandatory Human Review
    A person approves every article before publish
    At Scale
    Sustain high publishing volume across the operation
    ?
    No verified all-in-one fit

    Language support is sparse across the board. WordRaptor lists 8+ supported languages as a documented feature. Contentosapp Studio is limited to English, Spanish, and Brazilian Portuguese. Every other tool in this guide has output language coverage listed as not publicly verified from official sources. That’s not a judgment — it’s a gap in what’s documented. If you’re building a multilingual site, confirm language support directly with each vendor before purchasing.

    Pricing opacity affects two items enough to matter. SEOWriting.ai’s pricing is entirely unverifiable from official sources at the evidence date — any figure you see in a third-party comparison article may be outdated or inaccurate. AI Puffer’s Pro tier pricing is similarly undocumented in extracted official content. For tools where cost is your primary reason to switch, an unverifiable price is a real planning problem — check both directly before committing.

    Frequently Asked Questions

    Is there a ZimmWriter for Mac?

    ZimmWriter explicitly positions itself as a Windows application — there is no Mac version listed on the official site. WordRaptor is the closest structural equivalent: a buy-once native Mac app with BYOK support and direct CMS publishing. It was built specifically for this gap. Browser-based tools also work on a Mac: Contentosapp Studio runs inside WordPress, and Koala AI and SEOWriting.ai are web apps.

    How much does ZimmWriter cost?

    ZimmWriter is priced at $24.97/month or $247/year as of September 2026. That is a license fee paid on top of your API costs — your AI provider (OpenAI, Anthropic, Perplexity, or others) bills separately per token or per request. The license alone does not cover AI usage.

    Is ZimmWriter free?

    No. There is no free tier listed on the official ZimmWriter site. The tool requires both a paid license and funded API accounts with your chosen providers.

    Does ZimmWriter have a lifetime deal?

    A lifetime purchase option is not listed on the official ZimmWriter site as of September 2026. The documented pricing is monthly or annual. If a lifetime deal exists or has been offered, it is not publicly verified from the official source.

    Do I still pay for API usage with a BYOK alternative?

    Yes — with any BYOK tool, including Contentosapp Studio, AI Puffer, and WordRaptor. You pay your AI provider directly per token or per request; the tool itself may be free or one-time, but the API usage is always a separate cost. The exception is subscriptions with AI included: Koala AI, SEOWriting.ai (though its pricing is not publicly verified), and Contentosapp Studio’s optional managed plans. The BYOK AI Writer explainer details how to calculate real all-in costs before switching.

    Can I use a ZimmWriter alternative without an OpenAI account?

    Yes. Koala AI bundles AI usage into its subscription plans — no API accounts required. SEOWriting.ai also does not list a BYOK requirement, though its AI usage model is not publicly verified in official sources. AI Puffer and WordRaptor require your own API key from at least one supported provider. Contentosapp Studio works either way: with your own key, or through its managed plans, which need no provider account.

    What is the difference between “draft for review” and “auto-post” in AI writing tools?

    Draft-for-review means the AI output lands in your editor — you read it, edit it, and hit publish manually. Auto-post means the tool publishes directly to your live site, often on a schedule, without a human step in between. Contentosapp Studio saves articles as drafts for review by default; scheduling or direct publishing is opt-in per production. SEOWriting.ai and ZimmWriter both document automated publishing workflows. The distinction matters beyond convenience: Google’s guidance holds that automation is not against its policies, but content produced primarily to manipulate rankings is. A human review step is one of the clearest ways to demonstrate that articles are produced for readers rather than for ranking manipulation.

    Conclusion

    Pick the tool that resolves the specific constraint that made you search for a ZimmWriter alternative. Platform comes first. If you need a native Mac app, WordRaptor is the only one here; if you don’t, Contentosapp Studio (inside WordPress), Koala AI and SEOWriting.ai all run in the browser on a Mac. Workflow location matters — WordPress-native means Contentosapp Studio or AI Puffer. Cost structure is layered — “free” tools still have API costs, and Koala AI’s bundled plans are simpler to budget but cap the words you can generate each month. And publishing flow is a quality-control decision, not a convenience preference.

    The one question worth sitting with before you switch: how much of ZimmWriter’s value to you is the platform itself, and how much is the specific combination of volume, model breadth, and multi-site publishing? If your main constraint is the platform, every tool in this guide solves at least part of that. If you genuinely need 500 articles a week across 50 WordPress sites, none of the alternatives here publicly verify that capability at the same ceiling. That’s not a reason to stay — it’s a reason to pressure-test before you commit.

    References

    External sources

    1. ZimmWriter Official Website – Learn More About AI & SEO — https://www.zimmwriter.com/
    2. Contentosapp Studio – AI Content Writer & SEO (BYOK) – WordPress plugin | WordPress.org — https://wordpress.org/plugins/contentosapp-studio/
    3. WordRaptor — The AI Writer for Mac — https://www.wordraptor.com/
    4. AI Puffer – Chat. Create. Automate. (formerly AI Power) – WordPress plugin | WordPress.org — https://wordpress.org/plugins/gpt3-ai-content-generator/
    5. Pricing | Koala AI — https://koala.sh/pricing
    6. SEO WRITING – AI Writing Tool for 1-Click SEO Articles — https://seowriting.ai/
    7. WordRaptor – The Privacy-First Alternative to ZimmWriter | AI Writing Software — https://www.wordraptor.com/zimmwriter-alternative-for-mac
    8. Google Search’s guidance about AI-generated content | Google Search Central Blog | Google for Developers — https://developers.google.com/search/blog/2023/02/google-search-and-ai-content

    Related content

  • How to Automate WordPress Posts: The Four-Layer Framework (Scheduling, Importing, Publishing, and Creating)

    How to Automate WordPress Posts: The Four-Layer Framework (Scheduling, Importing, Publishing, and Creating)

    You’ve probably already tried to automate WordPress posts. Maybe you copy-pasted ChatGPT output directly into the editor, hit publish, and spent the next week worrying about a Google penalty. Or you built a Zapier zap that pushed posts to WordPress on a schedule — and then found three posts went live with the wrong title, or didn’t go live at all. Neither failure means automation is the problem. It means you were solving the wrong layer of it.

    “Automate WordPress posts” sounds like a single task. It isn’t. It’s four fundamentally different jobs that happen to share the same destination: your WordPress database. Scheduling a pre-written post to go out at 9 a.m. Tuesday is a completely different operation from importing RSS content from a partner feed. Which is different again from triggering post creation from an external spreadsheet. Which is different again from generating a draft using an AI writing pipeline. Each layer has different tools, different risk profiles, and a different answer to the question “can this run unattended?” — and getting that answer wrong on Layer 4 in particular has real consequences for your site’s rankings.

    The problem with most “automate WordPress” guides is that they treat all four jobs as interchangeable. A blogger who just wants reliable post scheduling ends up reading about REST API payloads. An agency operator who needs to push content from a project management tool into WordPress finds themselves wading through AI plugin reviews. The mismatch wastes time and often leads to setups more complicated than the actual problem demands.

    This article maps all four automation layers — scheduling, importing, external publishing, and AI content creation — with a decision table that lets you identify your layer before reading anything else. Each layer gets a dedicated section covering the tools that work, the risks to manage, and whether it’s safe to run unattended. Two layers deserve extra attention: one because it’s technically misunderstood by almost everyone running a small WordPress site, and one because it intersects with Google’s content policies in a way that can quietly hurt your long-term traffic if you get it wrong.

    If you already know your layer, use the headings to navigate directly. If you’re not sure which automation problem you actually have, start with the decision table.

    Quick Guide to WordPress Post Automation

    • Four distinct jobs: automating WordPress posts covers scheduling, importing/syndication, external publishing, and AI content creation — each requires different tools and carries a different level of risk.
    • Scheduling is safe unattended — after one fix. WordPress's default WP-Cron is visitor-triggered, not time-triggered; posts on low-traffic sites miss their publish time silently unless you add a real server cron job.
    • Importing and syndication is conditionally safe. Set imported content to draft, add a canonical tag pointing to the original source, and confirm you hold rights to republish before running it unattended.
    • External publishing via Zapier, Make, or n8n is safe for human-approved content. Use Application Passwords for authentication; set status to publish only for copy that has already been reviewed by a human.
    • AI content creation must never auto-publish. Google's scaled content abuse policy flags AI-generated content pushed live at scale without editorial review. The fix is mandatory: land as draft, review, then publish.
    • The full REST API payload walkthrough for external publishing lives in How to Auto-Publish AI Content to WordPress — this article stays at the framework level.

    The Four Layers of WordPress Post Automation (and Which One Is Yours)

    Before touching a single plugin or Zapier zap, you need to know which automation job you’re actually trying to solve. The table below is the diagnostic. Find your row, then go directly to that layer’s section.

    Layer What it automates Example tools Skill level Safe on full autopilot?
    1 — Scheduling Publishing pre-written posts at a future date/time within WordPress Native WP scheduler, SchedulePress Beginner Yes — content is already human-approved; fix WP-Cron first
    2 — Importing / Syndication Pulling external content (RSS, feeds) into WordPress as posts or drafts WP RSS Aggregator, Feedzy, Zapier RSS template Beginner–Intermediate Conditional — safe as draft; risky as publish without copyright and canonical review
    3 — External Publishing Triggering post creation in WordPress from an outside system Zapier, Make, n8n, WordPress REST API Intermediate Yes — for human-written content pushed via an approved workflow
    4 — AI Creation Generating post drafts using AI inside or outside WordPress AI writing plugins, multi-agent pipelines (e.g., Contentosapp Studio) Beginner–Intermediate No — must land as draft; human review gate required before publish

    Readers who only need scheduling can stop at Layer 1. If you’re running a multi-site publishing operation where content gets approved in a spreadsheet before it ever touches WordPress, you want Layer 3. If you’re using AI to draft posts that a human then edits and approves, you need Layer 4 — and the review-gate rules that come with it. Don’t build all four layers at once. Start with the one that solves your actual bottleneck today.

    Layer 1 — Scheduling WordPress Posts (and the Missed-Schedule Problem)

    Scheduling is the simplest automation layer: you write a post, set a future date and time in the WordPress block editor, and WordPress publishes it automatically. No third-party tools required. For teams using an editorial calendar, plugins like SchedulePress add a visual drag-and-drop interface on top of the native scheduler — useful when you’re managing dozens of posts across a content pipeline and want to see gaps at a glance.

    But here’s what almost nobody explains: the WordPress scheduler is not a real scheduler.

    According to the WordPress Developer Handbook, WP-Cron — the system WordPress uses to handle all time-based tasks, including scheduled posts — “does not run constantly as the system cron does; it is only triggered on page load.” That sentence has a real-world implication that catches operators off guard. If you schedule a post for 9 a.m. and your site receives no visitor traffic until noon, that post does not go live at 9 a.m. It goes live when the next page load happens to trigger WP-Cron’s queue check. On a low-traffic site, that delay could be hours. The handbook is direct about this: “Scheduling errors could occur if you schedule a task for 2:00PM and no page loads occur until 5:00PM.”

    The fix is a two-step conceptual change, not a complex development task. First, you disable WP-Cron’s visitor-triggered behavior by adding define('DISABLE_WP_CRON', true) to your wp-config.php file — this stops WordPress from checking the task queue on every page load. Second, you create a real server-side cron job (available through any cPanel or Plesk hosting panel under “Cron Jobs”) that calls WordPress’s wp-cron.php file on a fixed interval — every minute is the standard recommendation. With that in place, scheduled posts fire at the time you set, regardless of whether any visitors are on the site. It takes about ten minutes to configure and eliminates the missed-schedule problem permanently.

    Layer 2 — Importing and Syndicating Content Into WordPress

    This layer is about pulling external content — RSS feeds, Atom feeds, custom API sources — into WordPress, either as drafts you edit before publishing or as posts that go live automatically. WP RSS Aggregator and Feedzy are the two most-used plugins for this pattern. Zapier’s WordPress integration also provides a native “Post RSS feed items to WordPress” Zap template, which means you can set this up without installing any additional WordPress plugin if you’re already using Zapier for other workflows.

    Two risks come with Layer 2, and you need to address both before running it on autopilot. The first is copyright. RSS feeds are copyrighted content. Importing and republishing full-text feed items without a written syndication agreement with the original publisher is copyright infringement, regardless of whether you attribute the source. This is a legal exposure, not just an SEO question — and “I linked back to them” is not a defense. The safe use cases for Layer 2 are: content from your own secondary sites, licensed content with explicit republication rights, or feeds you control. The second risk is duplicate content in the index. Google doesn’t apply a formal penalty for duplicate content, but the canonical version of a page — the original — will typically outrank your imported copy, and your version may be filtered from search results entirely. The fix is to set rel="canonical" pointing to the original source URL on every imported post.

    The practical guardrail is simple: always set imported posts to draft status by default. Review them before publishing, confirm you have redistribution rights, check that the canonical tag is in place, and then make the call on whether to publish or archive. If the source is your own content ecosystem — pulling from a staging site or a different property you own — this layer is low-friction and low-risk. If the source is any third-party feed, the review step is not optional.

    Layer 3 — Publishing to WordPress from Outside (Zapier, Make, n8n, and the REST API)

    Layer 3 is structurally different from scheduling. In Layer 1, the content already exists inside WordPress and you’re timing its release. In Layer 3, the content doesn’t exist in WordPress yet — it’s being pushed in from an external system. An approved row in a Google Sheet triggers a post creation. A completed task in Asana pushes a brief into WordPress as a draft. A newsletter email gets converted into a blog post. These are Layer 3 workflows.

    Three no-code and low-code tools make this accessible without writing custom API code. Zapier’s WordPress integration connects to over 9,000 apps and includes native triggers and actions for WordPress posts — creating, updating, and finding existing posts. Make’s WordPress module requires installing the Make Connector plugin on your WordPress site, but once connected it gives you granular field mapping across posts, categories, comments, media, users, tags, and taxonomies. n8n’s WordPress node supports creating, updating, and retrieving posts and users natively — and it can function as an AI tool node within agent pipelines, which matters if you’re building more advanced multi-step workflows. n8n is self-hosted, which is relevant to agencies with data-sovereignty requirements or clients who can’t let content flow through third-party cloud infrastructure.

    Authentication for all three tools works the same way: Application Passwords, a built-in WordPress feature since version 5.6, allow external tools to authenticate against the REST API without session cookies or plugins. Each automated user or service account gets its own Application Password — generated from the WordPress user profile screen — which you paste into Zapier, Make, or n8n’s credentials settings. Under the hood, every post creation runs through a POST request to /wp-json/wp/v2/posts. The status field determines whether the post goes live immediately (publish), gets queued for a future date (future, used alongside the date field), or lands in drafts for review (draft). For the full payload breakdown of how to configure these fields for automated publishing, How to Auto-Publish AI Content to WordPress covers that territory in detail — this section covers the framework.

    Layer 4 — AI Content Creation: The One Layer That Should Never Run Unattended

    Layers 1 through 3 automate the movement and timing of content you already control. Layer 4 is different: it automates the creation of content from scratch. That difference is exactly why the oversight requirement is different — and why getting this wrong has consequences that the other layers don’t.

    Google’s official guidance on AI content draws a precise line. As stated in Google’s 2023 guidance on AI-generated content: “Using automation — including AI — to generate content with the primary purpose of manipulating ranking in search results is a violation of our spam policies.” The guidance goes on to clarify that not all AI content is spam — the violation is in the intent and the absence of editorial judgment, not in the method of production. Google’s scaled content abuse policy names this practice explicitly as a spam category: content generated at scale through automated processes to manipulate search systems. The critical word is “scale” paired with “without editorial judgment.” An AI-generated draft that a human reviews, fact-checks, adds original perspective to, and then publishes is not scaled content abuse. An AI pipeline that creates and publishes 40 posts per week with no human in the loop almost certainly is. For a deeper look at how Google’s policy has evolved and what the data shows about AI content rankings, Does Google Penalize AI Content? is worth reading before you build any AI content pipeline.

    How to Automate WordPress Posts:: AI-generated WordPress drafts passing through a human review gate before approval and publication
    AI can help create WordPress content, but publication should still pass through a human review gate for accuracy, source checks, and editorial approval.

    At the simpler end of the tool spectrum, single-step AI writing plugins generate text in your editor and leave the rest to you — you edit, approve, and publish manually. At the more complex end are multi-agent pipelines that handle research, briefing, drafting, image generation, and social copy in sequence. Contentosapp Studio is one example of this architecture: it runs as a multi-agent pipeline inside WordPress, supports your own AI API keys, and can be configured to save as draft or pause for manual review between pipeline stages, which is the correct implementation of the human-review-gate pattern. For a broader comparison of AI content plugins with different capability levels and workflow models, Best AI Content Plugins for WordPress in 2026 covers the tool landscape in detail.

    Building a Review Gate Into Any Automation Pipeline

    The human-review-gate concept sounds obvious in principle. Making it operational — something that actually runs as part of your workflow instead of a good intention you override when you’re in a rush — requires one concrete configuration choice and a clear definition of what “review” actually means.

    The configuration is a single field. In any external publishing tool — Zapier, Make, n8n — the WordPress action includes a status field. The WordPress REST API schema accepts the following values: publish, future, draft, pending, and private. For any pipeline that touches AI-generated content, that field should be set to draft. Not publish. Not future. Draft. One field change is the difference between a compliant pipeline and a scaled-content-abuse risk. Scheduling (Layer 1) and external publishing of human-written content (Layer 3) don’t carry this requirement — those pipelines can write directly to publish because the editorial judgment happened before the automation ran. AI-generated content is the specific exception, and it’s not a judgment call.

    The notification step is equally important. A draft that nobody knows exists doesn’t get reviewed. Every AI-content pipeline should trigger a notification to a specific human — email, Slack message, or an in-dashboard queue — the moment a new draft lands. That person’s job is defined: check factual accuracy, add any first-person experience signals, confirm the output matches the original brief, and verify the SEO fields (title tag, meta description, internal links) before hitting publish. If you want to build out that review process as a repeatable production system rather than an ad hoc check, WordPress Content Workflow: The End-to-End Production System for SEO Publishers maps the full process from brief to published post.

    Choosing Your Automation Stack: Matching Layer to Tool Without Overbuilding

    The most common mistake in WordPress automation isn’t using the wrong tool — it’s overbuilding for scale you don’t have yet. A fully automated n8n pipeline with webhook triggers, conditional branching, and error logging is the right setup for a 20-posts-per-month agency operation. It’s overkill for a solo blogger publishing five posts a month. Every additional component is a new failure point.

    Three realistic scenarios map to three appropriately-sized stacks. If you’re a solo blogger publishing 4–8 posts per month with human-written content and your only problem is that posts sometimes miss their scheduled time, you need Layer 1 only: implement the WP-Cron fix described above, and optionally add SchedulePress if you want a visual editorial calendar. That’s it. No Zapier account required. If you’re running a small agency with 10–20 posts per month across two or three client sites and content gets approved in a shared spreadsheet before anyone touches WordPress, Layer 3 is your answer: set up a Zapier or Make workflow that reads from the approved sheet and creates posts via the WordPress REST API. Set status to publish — the content is already human-approved by the time it hits the automation. If you’re using AI to generate draft posts that a human then edits before publishing, you need a Layer 4 pipeline configured to land in draft, plus Layer 1 for the final scheduled publication once the edited post is approved. That combination gives you speed at the generation step and control at the publishing step.

    The principle is: match the stack to the bottleneck. If your bottleneck is that posts go out at the wrong time, fix timing. If your bottleneck is that moving approved content from a spreadsheet into WordPress takes an hour per post, fix distribution. If your bottleneck is the time it takes to produce a first draft, fix creation — but don’t skip the review gate.

    What to Track Once Your Automation Is Live

    Automation without monitoring creates invisible failure. A missed scheduled post, a silently failed API call, or a growing backlog of AI drafts nobody is reviewing — all of these look like the automation is working until they don’t. Minimum viable tracking looks different for each layer.

    For Layer 1, check the WordPress Posts dashboard weekly. Filter by “Scheduled” and look for any posts where the publish time has already passed. Those are WP-Cron failures — posts that should have gone live and didn’t. If you’ve implemented the server cron fix, verify it’s running by scheduling a test post five minutes out and confirming it publishes on time. This takes two minutes and catches misconfigured hosting panel cron jobs before they cost you a news cycle.

    For Layer 3, log the HTTP response codes your external tool returns after each WordPress action. A 201 response confirms the post was created successfully. Anything in the 4xx range means an authentication or payload error — the post was not created, and the automation failed silently from the perspective of your editorial calendar. Zapier, Make, and n8n all maintain native execution history logs. Check them after the first ten runs, then spot-check weekly. Response codes don’t lie.

    For Layer 4, track two numbers: what percentage of AI-generated drafts actually reach publish after human review, and how long they sit in draft before someone looks at them. If drafts are accumulating with a review lag of more than a week, the pipeline is generating faster than the team can review. That’s not an automation problem — it’s a capacity problem, and the right response is to reduce generation frequency, not to remove the review gate. A sustainable review cadence is as important as the pipeline itself.

    Frequently Asked Questions

    Why does WordPress miss scheduled posts even when I set them correctly?

    WordPress’s scheduling system — WP-Cron — is visitor-triggered, not time-triggered. As documented in the WordPress Developer Handbook, it “does not run constantly as the system cron does; it is only triggered on page load.” If no visitor hits your site between when the post was scheduled and when it was supposed to publish, the task stays in the queue until the next page load fires it. The fix is to disable WP-Cron’s default behavior in wp-config.php and replace it with a real server-side cron job that runs on a fixed interval, regardless of traffic.

    What is the difference between scheduling a WordPress post and auto-publishing one?

    Scheduling (Layer 1) means the content already exists inside WordPress as a draft or scheduled post, and WordPress handles the timing of when it goes public. Auto-publishing (Layer 3) means content is created and sent to WordPress from an external system — a spreadsheet, a project management tool, or an automation platform like Zapier or Make — at the moment it’s triggered. Scheduling controls timing; external publishing controls creation and delivery. They often work together in a complete workflow.

    Can Zapier, Make, or n8n publish directly to WordPress without a developer?

    Yes. All three platforms offer native WordPress integrations that don’t require custom code. Zapier’s integration connects WordPress to over 9,000 apps; Make requires installing a dedicated connector plugin on your WordPress site; n8n’s WordPress node supports creating, updating, and retrieving posts natively. Authentication for all three uses WordPress Application Passwords — generated from the WordPress user profile screen — so no developer is needed to set up the credential. You will need to understand which fields to map (title, content, status, date) but that’s configuration, not code.

    Is it safe to auto-publish AI-generated content to WordPress without reviewing it?

    No. Google’s guidance on AI-generated content is explicit: using automation to generate content “with the primary purpose of manipulating ranking in search results is a violation of our spam policies.” The violation isn’t in using AI — it’s in publishing at scale without human editorial judgment. The correct technical implementation is to set the post status to draft in your automation pipeline. A human reviews the draft, makes editorial decisions, and publishes manually. Skipping that step is the specific behavior Google’s scaled content abuse policy targets.

    How do I import RSS feed content into WordPress without triggering a duplicate-content issue?

    The two-part answer: first, set your RSS importer to save content as draft rather than publish, so you have a review step before anything goes into the index. Second, add a rel="canonical" tag on every imported post pointing to the original source URL. This tells Google which version to treat as authoritative — the original — and prevents your imported copy from competing with it. Duplicate content itself doesn’t trigger a manual penalty from Google, but without a canonical, your imported page will typically be filtered from results and the original will rank instead.

    Does automating WordPress posts risk a Google penalty?

    It depends entirely on which layer you’re automating and how you’re doing it. Scheduling (Layer 1) and distributing human-approved content from external systems (Layer 3) carry no policy risk — the content is human-authored and editorially approved before it touches WordPress. Importing third-party content at scale without rights or review (Layer 2 misuse) and auto-publishing AI-generated content without human review (Layer 4 misuse) are the patterns that fall under Google’s scaled content abuse policy. The risk is in the absence of editorial judgment, not in the use of automation itself.

    Do I need the REST API to automate WordPress posts, or can I use plugins?

    You don’t need to write REST API code directly. Plugins like SchedulePress and WP RSS Aggregator handle Layers 1 and 2 entirely within WordPress. For Layer 3, Zapier, Make, and n8n use the REST API under the hood but expose it through visual workflow builders — no code required. The REST API becomes relevant if you’re building a custom integration that isn’t covered by an existing no-code connector, or if you need control over specific fields (like setting status: future with a precise date value) that a no-code tool doesn’t expose in its WordPress action. For most operators running 4–20 posts per month, plugins and no-code tools cover every layer without writing a single line.


    The four-layer framework is the takeaway. Before you install another plugin or build another Zapier workflow, identify which automation job you’re actually solving: scheduling, importing, external publishing, or AI content creation. Scheduling and distribution can run unattended when the content is human-approved. AI content creation cannot — not because AI drafts are inherently low quality, but because publishing them without editorial review is precisely what Google’s scaled content abuse policy targets, and the draft status field exists specifically to enforce that gate at the system level. Build the right layer, configure it correctly, monitor it after launch. If you want to see what a multi-agent content pipeline with a built-in review gate looks like running inside WordPress, Contentosapp Studio is worth a look — it’s designed around that draft-first, review-then-publish pattern from the ground up.

    References

    External sources

    1. Cron – Plugin Handbook | Developer.WordPress.org — https://developer.wordpress.org/plugins/cron/
    2. WordPress Integrations | Connect Your Apps with Zapier — https://zapier.com/apps/wordpress/integrations
    3. WordPress – Apps Documentation — https://apps.make.com/wordpress
    4. WordPress | Nodes | n8n Docs — https://docs.n8n.io/integrations/builtin/app-nodes/n8n-nodes-base.wordpress
    5. Authentication – REST API Handbook | Developer.WordPress.org — https://developer.wordpress.org/rest-api/using-the-rest-api/authentication/
    6. Google Search’s guidance about AI-generated content | Google Search Central Blog | Google for Developers — https://developers.google.com/search/blog/2023/02/google-search-and-ai-content
    7. Spam Policies for Google Web Search | Google Search Central | Documentation | Google for Developers — https://developers.google.com/search/docs/essentials/spam-policies
    8. Posts – REST API Handbook | Developer.WordPress.org — https://developer.wordpress.org/rest-api/reference/posts/

    Related content

  • WordPress Content Workflow: The End-to-End Production System for SEO Publishers

    WordPress Content Workflow: The End-to-End Production System for SEO Publishers

    Most WordPress publishers are running a workflow by accident. The keyword research happens in one tab. The brief lives in a Notion page nobody revisits. The draft comes back from Google Docs with broken heading levels and a paste that doubles every line break. SEO metadata gets added in the final three minutes before hitting publish. And the moment an article goes live, it disappears from the team’s attention — until someone notices it has never ranked for anything and suggests “we should probably update it.”

    That description isn’t a worst-case scenario. It’s the median reality for solo publishers and small agencies managing content across three to five disconnected tools. The WordPress Content Workflow problem isn’t that people don’t know what stages exist — it’s that no one has formalized those stages into a connected system with defined inputs, outputs, and human decision points at every gate. This article builds that system. Eight stages, each with a named input, a named output, a role, and a quality gate. The two stages most published workflow guides skip entirely — Opportunity Identification (before the brief) and the Performance Review Loop (after publication) — get the same treatment as every other stage, because skipping them is where most content failure originates. For the approval-gate detail — post statuses, team roles, multi-author handoffs — see the dedicated Editorial Workflow in WordPress guide. For the AI writing process in depth, the How to Write SEO Articles With AI guide covers it fully. This article is about the operational system those two resources sit inside.

    A WordPress Content Workflow is not a writing workflow. It is not an approval workflow. It is an operational system that connects discovery, research, production, quality control, delivery, and post-publish learning into a single repeatable loop — running inside WordPress, with humans controlling every decision point that matters.

    Key Takeaways

    • Eight formal stages: Opportunity Identification, Research and Source Verification, Editorial Brief, Writing and SEO Packaging, Visual Production, WordPress Build and Human Review, QA and Pre-Publish Check, and Performance Review Loop — each with a defined input, output, and quality gate.
    • Two stages most workflows skip: Opportunity Identification (before the brief) and the Performance Review Loop (after publication) are where most content failure originates — both are treated here as formal, gated stages.
    • Fragmentation has specific costs: Docs-to-WordPress paste breaks formatting; SEO metadata written in Docs never reaches WordPress fields; Slack feedback disappears in threads. The full eight-stage map is in the table below.
    • Post-publish loop is not optional: Triggered by Google Search Console data at 90 days, the refresh decision — update, expand, rewrite, or retire — is a formal, schedulable workflow event with specific metric thresholds, not a vague periodic task.

    The Full WordPress Content Workflow at a Glance

    Eight-stage WordPress content workflow from opportunity and research through publishing, performance review, and content refresh
    The eight-stage WordPress content workflow turns content production into a repeatable system with quality gates and a post-publish feedback loop.

    Before you dive into each stage, the table below gives you the map. Every H2 section after this expands one row. Print it, paste it into your project management tool, or pin it to your WordPress dashboard — it’s the reference point the rest of this article builds on.

    # Stage Input Output Accountable Owner Quality Gate
    1 Opportunity Identification Keyword data, GSC opportunities, competitor and SERP analysis Validated topic, target keyword, search intent, and opportunity rationale SEO Lead / Content Strategist Search intent confirmed; SERP fit and opportunity rationale documented
    2 Research & Source Verification Validated topic and research brief Verified source set, fact inventory, and claims matrix Researcher / Writer Material factual claims are supported by relevant, live, and authoritative sources
    3 Editorial Brief & Angle Research output and verified source set Structured brief with outline, editorial angle, information-gain opportunities, audience notes, and tone guidance Editor / Content Strategist Intent, angle, scope, and differentiation approved before drafting begins
    4 Writing & SEO Packaging Approved editorial brief and verified sources Complete draft with body copy, title, meta description, slug, links, and supporting SEO elements Writer / Editor Draft matches the approved brief; factual claims are verified and required SEO elements are complete
    5 Visual Production Approved draft and visual requirements Featured image, supporting visuals, screenshots, diagrams, and descriptive alt text Designer / Editor Visuals are relevant, appropriately sized, compressed, delivered in a modern web format, and include descriptive alt text where needed
    6 WordPress Build & Human Review Approved draft, visuals, and SEO assets Post assembled in WordPress with formatting, metadata, links, media, and editorial feedback resolved Editor / Publisher WordPress preview is correct; links, media, metadata, and editorial requirements are complete
    7 QA & Pre-Publish Check Fully assembled WordPress post Go / no-go publish decision Editor / Publisher Title, metadata, canonical settings, structured data, links, media, and final rendering verified
    8 Performance Review & Refresh Loop Published URL and accumulated performance data Performance assessment and documented next action: maintain, expand, update, rewrite, merge, or retire SEO Lead / Editor Enough performance evidence exists to support the next action; the decision is logged and the next review is scheduled when appropriate

    Two structural gaps explain most content that ranks nowhere and never gets fixed. Stages 1 and 2 — Opportunity Identification and Research — are almost always treated as pre-workflow activities, informal tasks someone does before the “real work” begins. They are not. They are the first two formal gates of the system, each with a named output and a quality check before the next stage opens. And Stage 8 is almost always missing entirely. A workflow that ends at “publish” is a production line without a feedback loop. The 90-day performance review is not a content marketing tip — it is the mechanism that makes publishing a learning system instead of a content landfill.

    Stage 1: Opportunity Identification and Brief Construction

    Here is the distinction that separates a functioning WordPress Content Workflow from a content calendar: a calendar item says “write about X.” A workflow-ready brief says “write X because it targets this specific intent gap, the competing articles miss Y, and the differentiating angle is Z, verified against current SERP structure.” The second is a gate with a deliverable. The first is a wish with a due date.

    Keyword discovery and brief construction are the first two formal stages of the workflow — not activities that happen before the workflow starts. The output of Stage 1 is a validated keyword with confirmed search intent, a volume-to-difficulty ratio within the site’s current authority range, and a documented reason why this article belongs in the production queue ahead of other candidates. Until that output exists, the brief stage cannot open. That is what makes it a gate rather than a suggestion.

    A completed brief — the Stage 1 output that unlocks Stage 2 — includes: the target keyword and its intent classification, a SERP analysis identifying who ranks and why, the article’s differentiating angle (what it does differently from the top-5 results), required sources, planned internal links, and a word-count range grounded in what currently ranks. Tools like Contentosapp run both stages natively inside WordPress — keyword research and brief generation happen in the editor, connected to the post, not in a separate tool that gets abandoned when drafting starts. The AI Content Case Study: 25 Articles in 25 Days shows what a tight upstream process produces at volume.

    Stage 2: Research and Source Verification

    Research is not optional background reading. It is a formal stage with a specific deliverable: a verified source set and a claims matrix — a list of every factual assertion the article will make, each matched to a citable, live, authoritative source before a single sentence of draft copy is written. The difference between research and reading is that research has an output you can hand to the next person in the workflow.

    The question most practitioners get wrong is what counts as a citable source for an SEO article. Government databases, academic institutions, regulatory bodies, primary research publications, and official platform documentation are citable. Secondary summaries — blog posts that cite other blog posts, aggregator articles, marketing pages — are not, even when they appear on high-DA domains. Source quality is not the same as domain authority. An unverified stat from a high-DA site is still an unverified stat, and it creates E-E-A-T risk that a reviewer has to catch downstream. The verification step must happen before drafting, not during it.

    WordPress 6.9 introduced block-level Notes, which lets you attach source context to specific content blocks inside the editor — a meaningful native improvement for research and review stages. The feature closes one of the persistent gaps in WordPress’s native workflow tooling: feedback and source references used to live outside the editor, disconnected from the content they referenced. With block-level Notes, a researcher can pin a verified source to the exact block that uses it, and a reviewer can flag a claim at the sentence level. That is infrastructure for a quality-controlled system, not a workaround.

    Source Verification Checklist (Before Drafting Opens)
    • Every factual claim in the brief has a named source
    • Each source is live, authoritative, and directly supports the claim (not a secondary summary)
    • Statistics include the publication date — data older than 24 months is flagged for freshness risk
    • Claims without a citable source are either cut or reframed as editorial assertions
    • Source URLs are pasted into the post draft (as Notes or a draft block) before writing starts
    • AI-generated research output has been cross-checked against a primary source — not treated as ground truth

    Stage 3: Writing and AI-Assisted Drafting

    Writing is the execution stage, not the workflow itself. That distinction matters because most people design their entire production process around the writing stage and treat everything else as peripheral. The brief is done informally. Research is cursory. The post-publish loop doesn’t exist. And then they wonder why the article that took four hours to write is sitting at position 34 six months later.

    At the workflow level, AI’s role in writing is well-defined: it executes discrete tasks (expanding the brief into a full draft, generating meta description candidates, suggesting H2 structures) while the human controls angle, voice, and factual accuracy. The workflow gate at this stage is not “is the draft done” — it is “does the draft match the approved brief’s angle, cover the verified sources correctly, and meet the content quality standard before it moves to packaging.” That is a human decision point, and it requires someone to actually open the brief alongside the draft and compare them. The complete AI SEO writing workflow goes deep on prompting structure, fact-checking steps, and iteration — if you want to go further on that specific execution layer, that guide is the right place to continue. This article treats writing as one stage in a larger system.

    The three-question review gate that closes Stage 3: Does the draft answer the stated search intent from the brief? Does it use the verified sources correctly, with no AI-hallucinated claims left in place? Does the angle match what was approved at Stage 1? If any answer is no, the draft goes back — not to a generic “needs revision” state, but to the specific earlier stage where the gap originated.

    Stage 4: Visual and SEO Packaging

    SEO packaging is a stage, not a last-minute checklist. The difference in practice: when it’s a stage, SEO metadata is written during production, by the person who knows the article’s intent best, with time to think. When it’s a checklist item added at publish, it’s written in two minutes by whoever is hitting the publish button, under time pressure, with no review.

    Before a post reaches the human review gate, the following must be complete: title tag and meta description written to intent and within character limits, featured image with descriptive alt text, internal links placed and anchored to the correct target articles, schema markup noted where applicable, and canonical URL set if needed. These are not optional polish items. Title and meta description directly determine click-through rate. Alt text is an accessibility requirement and an SEO signal. Missing internal links represent lost PageRank flow. None of these should be decided under publish pressure.

    The practical recommendation here is structural: treat the SEO packaging checklist as a block template or a WordPress custom field, not a separate document. When the packaging lives in the same place as the content — attached to the post, not in a Notion sidebar — it travels through every review stage. The reviewer sees it. The publisher checks it. It doesn’t get skipped because no one remembered to open the external checklist. That is a workflow design decision, not a discipline problem.

    Fragmented Workflow vs. WordPress-Centered System: What the Handoffs Actually Cost You

    The case against fragmented content stacks isn’t that they’re messy. It’s that each tool handoff is a specific failure point that introduces a specific, recoverable but often unrecovered error. A pattern practitioners consistently identify: the copy-paste step from Google Docs into WordPress is where the system breaks — SEO metadata decided during drafting never makes it into the published post’s actual fields. That’s not a coordination failure. It’s a structural consequence of keeping the content and the metadata in different systems.

    Here are the exact failure modes, labeled by risk category:

    Handoff Point Fragmented Stack Failure Risk Category
    Keyword data → Brief Keyword data lives in a spreadsheet or SEO tool, while the reasoning behind search intent, prioritization, and angle may never be carried into the brief Strategy risk — the brief loses the rationale behind the target topic and angle
    Research notes → Writer Sources and research notes live in separate Docs, Notion pages, or browser tabs; the writer may miss important evidence or lose the connection between a source and the claim it supports Evidence risk — unsupported or poorly sourced claims can enter the draft
    Docs draft → WordPress Formatting can degrade during transfer: headings, spacing, lists, links, tables, or other elements may require rebuilding or correction in WordPress Production risk — the published post may differ from the reviewed source document
    SEO metadata → Published post Approved title tags, meta descriptions, slugs, or schema notes may live in a document or comment and require a separate manual transfer into WordPress SEO fields SEO implementation risk — approved metadata may be omitted, altered, or left inconsistent with the final article
    Feedback → Writer Feedback spread across Slack, email, comments, and documents can lose context as the draft changes, making it harder to track what was requested and what was resolved Review-traceability risk — editors may lack a clear record of decisions and revisions
    Published post → Performance data Performance is checked manually or inconsistently; without a scheduled review trigger, declining impressions, weak CTR, or emerging query opportunities can remain unnoticed Performance risk — optimization opportunities may be discovered late or missed entirely

    A WordPress-centered workflow doesn’t fix these problems through better communication or stronger discipline. It fixes them by removing the handoffs. When the brief, draft, research notes, SEO metadata, editorial feedback, and post status all live inside WordPress — attached to the same post object — there is no transfer step where information gets lost. The VIP Workflow Plugin from Automattic demonstrates this at the enterprise level: custom statuses and transition notifications that keep every stage inside the WordPress environment, with no external coordination layer required.

    Fragmented content workflow compared with a connected WordPress-centered system for research, writing, review, and publishing
    A fragmented content stack creates handoff failures. A WordPress-centered workflow keeps research, writing, review, and publishing connected.

    Stage 5: Human Review and the Publish Gate

    The human review stage has one purpose: to verify that the content matches the brief, the sources are correctly used, the SEO packaging is complete, and the publish decision is intentional. It is not a spell-check. It is not a style pass. Those things happen earlier, during writing. The review gate exists to catch structural failures — a draft that drifted from the approved angle, a factual claim with no source, a meta description that was never written.

    WordPress’s native tools support this gate without any additional plugin. Post statuses — Draft, Pending Review, Scheduled, Published — provide the handoff structure. WordPress’s built-in roles and capabilities define who can move a post through each status transition: Contributors submit, Authors publish their own posts, Editors publish anyone’s. For teams needing custom intermediate statuses — “In Review,” “Approved,” “Needs Revision” — the Editorial Workflow in WordPress guide covers the full status and approval architecture in detail, including plugin options for teams who need more than core supplies.

    The publish gate itself is a three-check sequence. First: does the content match the approved brief? Second: are all sources cited and verified? Third: is SEO packaging complete and correct in WordPress — not in a Google Doc, but in the actual Yoast or Rank Math fields on the post? If any check fails, the post returns to the specific upstream stage where the failure originates, not to a generic revision queue.

    Stage 6: Publication and the Performance Clock

    Publication is a handoff point, not an endpoint. The moment a post publishes, its performance clock starts. That framing changes how you treat the publication step. Instead of “we’re done,” the question becomes “what is the earliest date we will pull Search Console data for this URL?” Write that date down. Schedule it as a task. The 90-day mark is the earliest meaningful signal for a typical SEO article — enough time for indexing, initial ranking movement, and impression data that reflects real query matching, not crawl variance.

    Before hitting publish or scheduling, run a final technical pass: canonical URL confirmed, all internal links live and pointing correctly, featured image published with the correct alt text, any structured data active, and the URL queued in Google Search Console for inspection. The inspection request doesn’t guarantee faster indexing, but it signals the URL to Google’s crawl prioritization queue — a low-effort, zero-cost step. Teams running automated publishing pipelines will find the auto-publishing AI content to WordPress guide directly useful — it covers scheduling logic and pre-publish QA checks in an automated context where the manual steps described here happen programmatically.

    The scheduling decision is a workflow feature, not a workaround. If a post has passed every gate but publication timing is strategic — managing cadence, building a topical cluster, coordinating internal links from posts that haven’t published yet — use WordPress’s native scheduling. The quality gate has already been passed. The post is ready. Scheduling it is a production decision, not a sign of delay.

    Stage 7: The Performance Review and Content Refresh Loop

    This is the stage that most published workflow guides either skip or mention in a single paragraph. “Keep your content fresh.” “Update old posts.” That framing treats the post-publish loop as a vague content maintenance habit. It is not. It is a formal, recurring workflow stage with specific triggers, defined decision criteria, and a clear output: a logged refresh decision that either spawns a new production task or closes the post’s review cycle until the next scheduled check.

    Post-publish WordPress content workflow showing performance data leading to expand, update, rewrite, and refresh decisions
    Publishing starts the performance loop: search data informs whether a page should be expanded, updated, rewritten, or refreshed.

    The review triggers at 90 days post-publish for a new article, and quarterly thereafter. The inputs are Google Search Console data — specifically the Search Performance report, which provides impressions, average position, and click-through rate at the query and page level. Google’s guidance on creating helpful content makes clear that post-publish quality assessment is an ongoing obligation, not a one-time check — confirming that the refresh loop is a production requirement, not a periodic nice-to-have.

    The decision framework below is an operational construct — not rules prescribed by Google, but a defensible, threshold-based system you can schedule and delegate. Treat the thresholds as editorial heuristics: adjust them to your site’s authority baseline, niche competitiveness, and typical indexing speed before applying them mechanically.

    GSC Signal Review Window / Evidence Recommended Action
    Impressions are growing and average position is approaching page one Typically after 60–90 days, once query and page data show a consistent upward trend Expand missing subtopics, strengthen relevant internal links, and improve sections already attracting impressions
    Promising rankings but CTR is weaker than expected Enough impressions have accumulated to make the CTR pattern meaningful for the page and query set Review the title tag and meta description for intent alignment, clarity, differentiation, and SERP appeal; test revisions where appropriate
    Clicks or impressions are declining across comparable periods A persistent decline across multiple comparable periods, rather than a short-term fluctuation Run a content and SERP audit: check freshness, competing pages, search-intent changes, lost query coverage, and internal-link support
    Little impression growth and weak alignment with the intended query set Roughly 90–180 days, depending on niche, crawl frequency, competition, and the site’s existing visibility Reassess search intent and editorial angle; consider expanding, rewriting, merging with a stronger page, or redirecting when consolidation makes sense
    Unexpected query clusters are consistently gaining impressions Repeated query-level signals show that Google is associating the page with an adjacent topic or intent Evaluate whether the queries fit the page’s purpose; if they do, expand the relevant sections and reinforce the topic with appropriate internal links

    The loop’s most important structural feature is what a rewrite decision triggers: it spawns a new brief, which restarts the workflow from Stage 1. The angle was wrong, or the keyword target was off, or the SERP has changed enough that the original approach no longer fits. A rewrite is not a “bigger update” — it is a new production cycle for a URL with an existing authority baseline. That is a faster path to ranking than starting a brand-new URL, and it is the mechanism that makes a WordPress Content Workflow a loop rather than a line.

    Frequently Asked Questions

    What is a WordPress content workflow?

    A WordPress Content Workflow is a stage-by-stage operational system that governs how content moves from keyword opportunity through research, brief, writing, visual production, review, publication, and post-publish performance analysis. Unlike a simple editorial calendar or an approval checklist, a workflow defines the input, output, accountable owner, and quality gate at each stage — so every article produced follows the same repeatable path regardless of who is working on it.

    What is the difference between an editorial workflow and a content workflow in WordPress?

    A content workflow covers the full production lifecycle: from deciding what to write (Opportunity Identification) through writing, packaging, review, publishing, and ongoing performance analysis. An editorial workflow is a subset of that — specifically the approval and handoff mechanics: who reviews a post, what statuses it moves through, who has permission to publish. Both are necessary. The Editorial Workflow in WordPress guide covers the approval architecture in detail; this article covers the broader system those approvals sit inside.

    How do I set up a content workflow in WordPress without a large team?

    A solo operator or two-person team can run a functional workflow using WordPress’s native tools: Draft and Pending Review statuses to separate writing from publication, the block editor for drafting and SEO packaging in a single environment, Google Search Console for post-publish performance data, and a simple task in your calendar for the 90-day review trigger. The stages are the same whether you have one person or ten — what changes is how you split the roles, not whether the gates exist.

    How do I manage content approvals in WordPress without a plugin?

    WordPress core ships four post statuses (Draft, Pending Review, Scheduled, Published) and four content roles (Contributor, Author, Editor, Administrator) that cover the basic approval flow without any additional plugin. A Contributor submits a draft; an Editor reviews and publishes. For teams needing custom intermediate statuses — “In Review,” “Approved,” “Needs Revisions” — the VIP Workflow Plugin from Automattic is a production-grade, first-party option. For simpler teams, Edit Flow provides modular additions including custom statuses, editorial comments, and a content calendar.

    How do I use Google Search Console data to decide when to refresh a post?

    Pull the Search Performance report for the specific URL at 90 days post-publish. Check average position, impressions, and CTR for the target keyword and related queries. Use the thresholds in the decision framework above as a starting baseline — adjust them to your niche and site authority. Position 11–20 with growing impressions points to a content expansion task; position 4–10 with low CTR points to a title and meta rewrite; position 30+ with no impression growth after 180 days suggests a rewrite with a revised keyword target or a redirect to a stronger related page. Schedule a calendar task for the review rather than checking ad hoc — the consistency is what makes the loop repeatable.

    How do I create a repeatable content workflow for SEO that scales?

    The key is separating decisions from execution. Decisions — what to write, what angle to take, what sources to use, whether the draft passes the quality gate — are human-owned and stage-gated. Execution — drafting, generating meta descriptions, producing image alt text — can be assisted or automated at the appropriate stages. When those two categories are clearly separated, adding AI tools or additional writers scales the execution layer without degrading the decision quality. The system scales; ad-hoc content production does not.

    At what stage should AI be used in a WordPress content workflow?

    AI adds the most value at the execution stages: Stage 1 (keyword clustering and SERP gap analysis), Stage 4 (drafting from a detailed brief, generating meta description candidates), Stage 5 (image description drafts), and Stage 8 (content gap analysis for the refresh decision). AI should not own the decision points: angle selection, source verification, the three-question review gate at Stage 3, and the refresh decision at Stage 8 are human responsibilities. Using AI at the execution stages while keeping humans at the decision points is what separates a quality-controlled workflow from AI slop at scale.


    The eight-stage system in this article is operational, not theoretical — you can map your current process against it today and identify exactly where your handoffs break. Most publishers will find the same two gaps: the upstream stages treated as informal tasks before the “real workflow,” and the post-publish loop that simply doesn’t exist. Fix those two structural holes and the rest of the system — writing, packaging, review, publication — runs on a foundation that actually produces compounding results. Start with Stage 1. Build the brief as a formal gate. Set the 90-day calendar task for every post you publish this month. The system works when you treat every stage as mandatory, not when you run the ones that feel productive and skip the ones that feel like overhead.

    References

    External sources

    1. GitHub – Automattic/vip-workflow-plugin: This WordPress plugin adds additional editorial workflow capabilities to WordPress. · GitHub — https://github.com/Automattic/vip-workflow-plugin

    Related content

  • Content Scaling: The Operational Framework for Growing Output Without Sacrificing Quality

    Content Scaling: The Operational Framework for Growing Output Without Sacrificing Quality

    Most content teams don’t fail at scaling because they publish too much. They fail because they compress the wrong things first — and they do it before they even realize the system is breaking. Research briefs get thinner. Editorial review collapses into a spell-check pass. Topic selection drifts toward keyword density instead of genuine intent fit. The output volume goes up. The quality quietly goes down.

    Content scaling — the real kind, not the volume-chasing version — is an operational problem. It is not solved by hiring a fifth writer or buying another AI tool. It is solved by building a system that encodes editorial standards into every production stage, so that quality is a structural output of the process rather than a heroic individual effort applied at the end. This article gives you that system: a precise operational definition, a self-diagnostic maturity model, a clear framework for what to automate versus what to protect, and a practical publishing workflow for small WordPress teams ready to increase output without sacrificing the research quality, editorial judgment, and brand voice that make content worth reading — and worth ranking.

    Key Takeaways: Content Scaling

    • It's a systems problem: Content scaling is the operational discipline of expanding production capacity while preserving editorial standards — not a publishing-frequency target or a headcount decision.
    • Quality erodes in sequence: The Compression Cascade shows that topic selection degrades first under volume pressure, then research depth, then editorial angle, then fact-checking — each stage making the next failure more likely.
    • Automate friction, protect judgment: Formatting, scheduling, brief population, and WordPress publishing are safe to automate. Intent interpretation, source credibility evaluation, claim verification, and brand voice calibration are not.
    • Use the maturity model: Four stages — Manual and Reactive, Templated and Brief-Driven, Workflow-Automated, Measured and Optimized — give you a self-diagnostic and a single priority action per stage.
    • Google's standard is non-negotiable: According to Google's own documentation, content that is mass-produced without individual page care is an explicit quality negative in their ranking evaluation — helpfulness and reliability are the durable standard, regardless of production method.

    What Content Scaling Actually Means (And What It Doesn’t)

    Content scaling is the systematic expansion of editorial production capacity without a proportional increase in cost, headcount, or quality degradation. That definition is deliberate. “More articles per week” is a volume target. It is not a scaling strategy. A volume target without an operational system is a stress test — one that reliably exposes every weak point in your editorial process, usually at the worst possible moment.

    Two specific misreadings get in the way here. The first is conflating content scaling with raw publishing velocity: the belief that getting to 20 pieces a month from 8 is, itself, the goal. It isn’t. The goal is building a system where 20 quality pieces per month is the repeatable output — and where you could get to 30 without the editorial standards collapsing. The second misreading is conflating content scaling with programmatic content. Programmatic SEO scales pages through templates, structured data, and database-driven generation — a different mechanism with a different risk profile and a different use case. The two overlap at the infrastructure layer, but they are distinct strategies. If you are building editorial content that requires research, original analysis, and brand voice, you are in the content scaling domain, not the programmatic SEO domain.

    The professional vocabulary for what you are building is ContentOps — treating content production as a repeatable operational function with defined inputs, measurable outputs, quality gates, and a feedback loop. This is the discipline that separates teams that scale successfully from teams that scale until something breaks.

    The Compression Cascade: How Quality Erodes Before You Notice It

    Here is the most underdiagnosed failure pattern in content scaling: quality doesn’t collapse all at once. It erodes sequentially, one production stage at a time, and each stage’s failure makes the next one more likely. This is the Compression Cascade — and understanding it changes how you diagnose underperformance.

    The cascade almost always starts at topic selection. Volume pressure pushes teams toward head terms with high search volume but misaligned intent — keywords that look attractive in a spreadsheet but don’t match what the reader actually needs at that moment in their decision process. High bounce rates follow. Then rankings for the wrong queries. The damage here compounds downstream because a misaligned topic produces a misaligned brief, which produces a misaligned article. The second stage to erode is research depth. Briefs get thinner because there’s less time. Source verification gets skipped. Claims get sourced from secondary aggregators instead of primary sources. Google’s quality evaluation framework explicitly asks whether content “provides original information, reporting, research, or analysis” and whether it “avoids simply copying or rewriting those sources.” When research compresses, both answers move toward “no” — quietly, one article at a time.

    The middle stages follow predictably. The editorial angle disappears: briefs default to “cover everything” without a distinctive thesis, producing competent summaries that fail to differentiate from the ten existing articles already ranking for the same term. Review collapses into proofreading. Factual errors and unsupported claims survive to publish. Internal linking becomes mechanical — inserted for coverage rather than contextual fit. The diagnostic signal that tells you a cascade is underway is this: if your published output looks individually acceptable but underperforms collectively, the problem started upstream — likely at topic selection or brief quality — not in the writing itself.

    Production Stage Quality Signal That Erodes First Early Warning Indicator Consequence at Scale
    Topic Selection Intent specificity Articles target head terms with misaligned intent High bounce rates; ranking for wrong queries
    Research Source authority and verification Claims sourced from aggregators, not primary sources Factual errors; E-E-A-T degradation
    Brief Creation Angle differentiation Briefs default to covering everything without a thesis Generic content that fails to rank
    Drafting Depth of insight Sections summarize existing content; no original analysis Content lacks Information Gain; treated as thin
    Editorial Review Claim accuracy check Review becomes structural/stylistic only Errors and unsupported claims published
    Publishing Internal link relevance Links inserted for coverage, not contextual fit Topical coherence degrades
    Measurement Performance attribution Traffic tracked but not attributed to content decisions No feedback loop — scaling continues blindly
    Topic Selection
    Research
    Brief Creation
    Drafting
    Editorial Review
    Publishing
    Measurement

    Quality erosion at scale is sequential and cumulative — by the time it shows up in traffic data, the damage to the brief and research stages is already months old.

    Automation Should Remove Friction, Not Judgment

    This is the central operating principle of any scaling system that works. It is also the most frequently violated one. Teams automate the wrong layer — not because they don’t care about quality, but because the line between friction and judgment is genuinely blurry until you map it explicitly.

    Friction tasks are repeatable, rule-based, and have a right answer that doesn’t depend on context: formatting a draft to match your WordPress template, populating a brief’s structural fields from a keyword, scheduling a published post, resizing a featured image, assigning a category. These are safe to automate. The cost of automation is low; the benefit is real. Judgment tasks are different. Interpreting search intent requires understanding what the reader is actually trying to do, not just what they typed. Evaluating source credibility requires knowing what distinguishes a trustworthy primary source from a well-formatted aggregator. Verifying a claim requires checking it against reality, not against another article’s assertion. Brand voice calibration requires a feel for tone that no checklist fully captures. These cannot be safely automated — not because AI tools are incapable of producing plausible-sounding output in these areas, but because the plausibility of the output is precisely what makes the failure mode dangerous.

    Google’s AI content guidance is explicit on this point: “using generative AI tools or other similar tools to generate many pages without adding value for users may violate Google’s spam policy on scaled content abuse.” The critical phrase is “without adding value.” An AI can draft a structurally correct article that sounds authoritative and is factually wrong, contextually misaligned, or brand-voice-neutral. Automating the judgment layer doesn’t produce bad-looking content — it produces content that looks fine and performs badly. That’s the harder failure mode to catch.

    Task Category Specific Task Safe to Automate? Risk If Automated Without Oversight
    Topic & Strategy Keyword research data pull Yes Low
    Topic & Strategy Search intent interpretation No — Human judgment Misaligned content targeting wrong query type
    Topic & Strategy Angle selection for competitive SERPs No — Human judgment Generic, undifferentiated positioning
    Research Source discovery / SERP scanning Yes Low
    Research Source credibility evaluation No — Human judgment Low-authority claims go unchecked
    Research Claim verification / fact-checking No — Human judgment Factual errors published at scale
    Drafting Brief population from template Yes Low
    Drafting First-draft generation from brief Partial (with review gate) Generic output published without editorial pass
    Drafting Brand voice calibration No — Human judgment Tonal drift across the content library
    Editorial Structural review (headers, flow) Partial Low if checklist-driven
    Editorial Depth and originality assessment No — Human judgment Thin content passes review undetected
    Publishing WordPress formatting and scheduling Yes Low
    Measurement Performance data aggregation Yes Low
    Measurement Diagnosing underperformance root cause No — Human judgment Wrong optimization action applied

    The Content Scaling Maturity Model: Where Is Your Team Right Now?

    No scaling framework is useful if it can’t tell you where you currently are. This four-stage model is designed as a self-diagnostic tool, not a hierarchy to feel bad about. Read the table, identify your stage, and focus on the single priority action for that stage before doing anything else.

    Element Stage 1 Stage 2 Stage 3 Stage 4
    Name Manual & Reactive Templated & Brief-Driven Workflow-Automated Measured & Optimized
    Operational reality Each article produced from scratch; no repeatable process; topic selection is ad hoc Content briefs standardize structure; research guided but still manual; editorial review informal Tooling handles formatting, scheduling, brief population; AI supports drafting; humans own judgment gates Every article tracked to performance metrics; topical gaps drive new content; underperformance triggers structured audits
    Primary bottleneck Writer bandwidth — no leverage exists anywhere Research and review compress first when volume pressure grows Measurement is absent — output grows but impact is unmeasured Sustaining editorial standard as team or contributor pool grows
    Quality risk Inconsistent depth and voice across articles Consistent in structure but not in depth or accuracy AI-assisted drafts bypass editorial review because “we have a system now” Dilution of standards when new contributors onboard without training
    Priority action Document your existing best process into a single repeatable brief template Add a structured review checklist with specific quality signals per production stage Build a publishing QA gate: no article publishes without passing a minimum editorial checklist Create a contributor onboarding system tied to brand voice, research standards, and QA protocols

    Stage 1 is where most solo bloggers and new content teams operate. Every article is a bespoke effort. There is no leverage anywhere in the system. The priority action is not to add tools — it is to document what you already do when you produce your best work, and turn that into a reusable brief template. That template is the foundation everything else is built on.

    Stage 2 is where a surprising number of established teams get stuck. The briefs exist. The process looks repeatable. But when volume pressure grows — a product launch, an editorial calendar push — research and review are the first things to compress. The priority action here is to make the review stage explicit: a checklist with named quality signals at each production stage, assigned to a specific person, before publishing.

    Stage 3 is where automation enters the picture. Tools handle the friction layer. AI supports first drafts. But Stage 3 teams consistently make the same mistake: they add tooling without adding a corresponding quality gate, and the system starts treating plausible AI output as review-ready output. The priority action is a hard publishing gate — no article publishes without a named editor confirming that the judgment-layer checklist has been completed. Stage 4 is a measurement and optimization operation. If you are reading this article for the first time, you are almost certainly at Stage 1 or Stage 2. That’s the right starting point.

    Building the Editorial System: Strategy, Research, and Briefs at Scale

    The brief is the most leveraged artifact in a content scaling system. A well-built brief does more editorial work than almost any other investment you can make. It encodes search intent, required sources, editorial angle, audience framing, and brand voice notes before a word of content is written. If the brief is right, the quality floor of every subsequent draft — human or AI-assisted — rises significantly. If the brief is thin, no amount of post-draft editing recovers the article fully.

    Topic selection within a scaling system should be driven by keyword clustering and explicit intent classification, not by keyword volume alone. Group related terms by the underlying question they represent, assign each cluster to a specific content format (definitive guide, comparison, tactical how-to, opinion piece), and sequence the editorial calendar to build topical authority around those clusters rather than scattering individual articles across unrelated topics. This is the difference between publishing content and building a content asset. For teams using AI in their workflow, writing SEO articles with AI requires this kind of structured upstream thinking — the quality of the AI output is directly constrained by the quality of the input brief.

    Content velocity — how fast pieces move from brief to published — is a useful diagnostic metric at this stage, but only as a signal, not a goal. If velocity slows at the research stage, the research process is the bottleneck: either the brief doesn’t surface sources efficiently, or the fact-checking step lacks a defined protocol. If velocity slows at the review stage, the review process is either under-resourced or undefined. Track velocity by stage, not just by total cycle time, and you get a map of where to invest next.

    AI as Infrastructure, Not Author

    The framing that works for AI in a scaling system is infrastructure, not authorship. AI handles research synthesis — summarizing source sets, surfacing PAA clusters, populating brief fields from a keyword — and first-draft scaffolding: structure, factual skeleton, and heading architecture. Human editorial work remains responsible for intent fit, original analysis, brand voice, claim verification, and final judgment calls. That’s the division that produces content worth reading.

    Google’s guidance on AI-generated content makes the standard clear: accuracy, quality, and relevance are the requirements, regardless of production method. The objection is not to AI-assisted content — it is to AI-generated content that does not add value. Google’s spam policies name “scaled content abuse” explicitly as a policy violation, covering “techniques used to deceive users or manipulate Search systems.” Generating volume without editorial judgment is the behavior that triggers this — not the use of AI itself. This distinction matters for how you position AI in your workflow: it is a production accelerator for the friction layer, not a replacement for the editorial layer.

    The AI content case study at Contentosapp — 25 articles in 25 days on WordPress illustrates what AI-supported scaling looks like at the operational level. The honest framing: results depend on the quality of the system around the AI, not the AI alone. If the brief is weak, if the review gate is missing, if the intent interpretation is delegated to the model — the output reflects those gaps. Use AI to make content rank by treating it as one component of a larger editorial system, not as the system itself.

    Automate

    Formatting and scheduling
    Brief population from keyword
    Metadata and tagging
    Performance data aggregation

    Protect — Human Judgment

    Search intent interpretation
    Source credibility evaluation
    Claim verification
    Brand voice calibration

    The productivity gain from AI in content production is real — but it accrues only when the division of labor is explicit: automation owns the repeatable, humans own the irreplaceable.

    The WordPress Publishing Workflow: Automating the Last Mile Without Losing Control

    The publishing stage is where small teams lose the most time to manual friction — and where automation has the highest return because it involves zero editorial judgment. Every minute spent manually copying metadata, assigning categories, attaching a featured image, and clicking “schedule” is a minute not spent on research or review. These tasks are mechanical, rule-based, and fully automatable.

    A practical WordPress publishing SOP for a scaling content team should cover:

    • Metadata completion: title tag, meta description, and Open Graph fields populated before scheduling
    • Category and tag assignment aligned to your topical cluster structure
    • Featured image attached and alt text written with the target keyword
    • Internal links confirmed (surfaced during brief creation, approved during editorial review)
    • Schema markup applied where relevant (Article, HowTo, FAQ)
    • Canonical URL set for any repurposed or syndicated content
    • Scheduled publish time set against your editorial calendar
    • Post-publish check: indexed correctly, no rendering issues, internal links resolving

    For teams ready to automate the publishing handoff programmatically, the WordPress REST API provides the infrastructure layer. As the official documentation states, it “provides an interface for applications to interact with your WordPress site by sending and receiving data as JSON objects” — meaning you can push formatted content, metadata, and scheduling instructions from an external application directly into WordPress without manual intervention. This is a Stage 3 capability. It is not the first thing to build — get the brief template and review checklist right first. But for teams that have those foundations in place, API-driven publishing is where the remaining manual friction disappears. Contentosapp Studio handles this publishing layer natively for WordPress-based operations, removing the need for custom API development on smaller teams.

    Common Scaling Failure Modes (And How to Catch Them Early)

    The failure modes that kill scaling efforts are predictable. They appear in a consistent order, and each has a detectable early signal — before it shows up in traffic data or ranking drops, which is the expensive moment to catch it.

    Volume targets set before systems exist. The team commits to 20 articles a month before a repeatable brief template, a review protocol, or a defined research process is in place. The volume target forces the compression cascade immediately. Early signal: cycle time is irregular — some pieces take days, others take a week, with no obvious reason for the variance.

    Brief quality degrades before draft quality degrades. This is the leading indicator no one watches. When briefs get thinner — less specific intent framing, fewer required sources, no angle guidance — the drafts that follow look fine individually but underperform collectively. Early signal: review edits cluster around “this doesn’t have a clear point of view” rather than structural or factual corrections.

    Review gates collapse first under deadline pressure. The editorial review stage is the most expensive in terms of senior time, so it’s the first to be shortcut when a deadline is tight. Early signal: the editor role shifts from “final judgment” to “last set of eyes before publishing” — a status check rather than a quality gate.

    Internal linking treated as optional. Links inserted for coverage rather than contextual fit, or skipped entirely when there’s no obvious candidate. Early signal: your topical cluster pages don’t reference each other in ways that reinforce the cluster’s authority.

    Content velocity measured; content quality not. The team tracks how many pieces published per month and calls that the scaling metric. Performance impact is assumed, not measured. Early signal: output is growing but organic traffic is flat or declining on a per-piece basis.

    Scaling Readiness Checklist

    • Do you have a documented content brief template that encodes your editorial standards?
    • Is there a named person responsible for final editorial review on every piece?
    • Do you have a process for verifying factual claims before publishing?
    • Is topic selection driven by intent classification, not just keyword volume?
    • Do you track content velocity by production stage (not just total cycle time)?
    • Is your internal linking process defined, not ad hoc?
    • Do you measure content performance at 90 days, not just at publish?
    • Can a new contributor produce a brief-quality piece without asking you how?

    How to Measure Whether Your Content Scaling System Is Actually Working

    Measurement is what separates Stage 3 from Stage 4. Without it, you are scaling output, not scaling performance — and those are different problems with different solutions. The metrics that matter fall into two categories: volume metrics and quality metrics. Teams that only track the former are running a publishing schedule, not a scaling system.

    Volume metrics tell you how much you published: pieces per period, cycle time from brief to publish, number of topics in the active pipeline. These are useful for diagnosing operational friction and capacity constraints. They tell you nothing about whether the system is producing content that earns rankings, retains readers, or serves actual search intent. Quality metrics fill that gap. Search impressions per piece at 90 days post-publish is a reliable proxy for whether a piece is surfacing at all in Google’s index for relevant queries. Average position by content cluster — not individual article — tells you whether your topical authority is building. Return visit rate, while imperfect as a stand-alone metric, functions as a useful proxy for usefulness: readers who found what they needed come back. Editorial defect rate — the percentage of published pieces requiring post-publish corrections for factual errors, broken links, or intent misalignment — is the quality metric most teams don’t track, and arguably the most informative one.

    The feedback loop is what makes measurement valuable. Google’s helpful content documentation asks directly: “Is the content mass-produced by or outsourced to a large number of creators, or spread across a large network of sites, so that individual pages or sites don’t get as much attention or care?” That question is a measurement instrument in itself. If your answer changes as you scale — if individual pages are getting less attention because output is growing — your measurement system should catch that before Google does.


    Frequently Asked Questions

    What is the difference between content scaling and programmatic SEO?

    Content scaling is the operational system for expanding editorial production — research-driven, voice-consistent, intent-matched articles — without proportional increases in cost or quality loss. Programmatic SEO is a narrower strategy that scales pages using templates, structured data, and database-driven generation. The two overlap at the infrastructure layer but serve different purposes. Programmatic SEO can produce thousands of location pages or product variants from a template; content scaling produces editorial articles that require research, original analysis, and brand voice. Most niche sites need both at different stages — but conflating them leads to applying programmatic logic to editorial content, which is where quality degrades fast.

    How do you scale content production without losing quality?

    The reliable answer is: build the quality into the process before scaling the volume. A documented brief template that encodes search intent, required sources, editorial angle, and brand voice standards means the quality floor of every piece rises before writing begins. A structured review checklist — not a judgment call, but a named set of quality gates — means errors and thin content don’t make it through. And a measurement system that tracks quality metrics (not just volume metrics) catches degradation before it compounds. These three systems — brief, review, measurement — are the minimum viable infrastructure for scaling without quality loss.

    At what point should a small content team start scaling output?

    When you can answer yes to the scaling readiness checklist: you have a brief template, a named reviewer, a fact-checking process, and intent-driven topic selection already in place. Scaling before those systems exist just means compressing them under volume pressure — which is the Compression Cascade in practice. A team producing 6 well-researched, well-reviewed, genuinely useful articles a month has a stronger foundation for scaling than a team producing 20 thin ones. Get the system right at low volume, then increase velocity.

    How can AI help with content scaling without producing generic output?

    Position AI as infrastructure, not as the author. Use it for research synthesis (summarizing source sets, surfacing related questions, populating brief fields), first-draft scaffolding (structure and factual skeleton from a strong brief), and publishing-stage automation (formatting, metadata, scheduling). Keep intent interpretation, source credibility evaluation, claim verification, angle selection, and brand voice calibration with a human editor. The AI content editing pass — reviewing at the sentence level for accuracy, voice, and originality — is the judgment gate that separates AI-assisted scaling from AI slop.

    How do you maintain brand voice when multiple people or AI tools are involved in production?

    Brand voice is an upstream problem, not a downstream one. It should be encoded in the brief template — not as vague adjectives (“conversational but authoritative”) but as specific, example-driven guidance: sentence length preferences, vocabulary choices to use and avoid, structural patterns the brand favors, and the stance the brand takes on contested questions in the niche. When AI tools are involved, the brief is what constrains the output toward the brand voice. When multiple human contributors are involved, the brand voice guide — anchored to real examples from your best-performing content — is what makes the standard transferable without a senior editor reviewing every sentence.

    What metrics actually tell you whether your content scaling strategy is working?

    The metrics that matter most: search impressions per piece at 90 days post-publish (is it surfacing at all?), average position by content cluster (is topical authority building?), return visit rate as a usefulness proxy, and editorial defect rate (percentage of published pieces requiring post-publish corrections). Volume metrics — pieces published per month, total cycle time — tell you about operational friction, not content performance. Teams that optimize for volume metrics without tracking quality metrics are running a publishing schedule, not a scaling strategy.

    What are the most common mistakes teams make when trying to scale content?

    Setting a volume target before building the operational system that supports it. Treating AI output as review-ready rather than draft-ready. Letting brief quality degrade silently before draft quality degrades visibly. Measuring only volume (pieces published) and not quality (performance per piece). And automating judgment tasks — intent interpretation, claim verification, angle selection — because they’re time-consuming, rather than automating friction tasks because they’re mechanical. Every one of these mistakes follows a predictable pattern; they appear in the failure modes section of this article with their early warning signals.

    How long does it take to build a repeatable content scaling system?

    The honest answer: the brief template can be documented in a day, if you already have a body of content to model it on. The review checklist takes a week to design and another month to refine through use. The measurement system takes a full quarter to produce meaningful data. Most teams reach a functional Stage 2 operation — templated, brief-driven, with a basic review gate — within 60 to 90 days of deliberate investment. Stage 3 (workflow-automated) and Stage 4 (measured and optimized) take longer, but the compounding return on each stage makes the investment straightforward to justify.


    Conclusion

    Content scaling works when it is treated as an operational system — not a publishing target, not a tool decision, and not a headcount problem. The teams that scale successfully are the ones that encode editorial standards into the process before increasing velocity: a brief template that carries intent and voice, a review gate that protects judgment, and a measurement system that catches quality degradation before it shows up in traffic data. The two most actionable steps from this framework: identify your current stage using the maturity model before adding any speed to the system, and map your production tasks explicitly against the friction/judgment distinction before deciding what to automate. Then run the scaling readiness checklist. The first gate that’s missing from your current operation is where to start — everything else can wait.

    References

    External sources

    1. Creating Helpful, Reliable, People-First Content | Google Search Central | Documentation | Google for Developers — https://developers.google.com/search/docs/fundamentals/creating-helpful-content
    2. Google Search’s Guidance on Generative AI Content on Your Website | Google Search Central | Documentation | Google for Developers — https://developers.google.com/search/docs/fundamentals/using-gen-ai-content
    3. Spam Policies for Google Web Search | Google Search Central | Documentation | Google for Developers — https://developers.google.com/search/docs/essentials/spam-policies
    4. REST API Handbook | Developer.WordPress.org — https://developer.wordpress.org/rest-api/

    Related content

  • Editorial Workflow in WordPress: A Step-by-Step System From Idea to Publish

    Editorial Workflow in WordPress: A Step-by-Step System From Idea to Publish

    Your editorial workflow in WordPress is broken — and the failure point is almost never the writing. A post enters “Draft” status on a Monday, collects three informal comments in a Slack thread, sits untouched for 19 days, and gets published without a featured image or a meta description because the person who finally hit Publish just wanted it off the list. That’s not a content quality problem. That’s an operations problem. And operations problems have operational solutions.

    A well-built editorial workflow gives every piece of content a defined path — from the moment an idea is captured to the moment the post goes live and the downstream tasks are handed off. This article covers that system across nine sections: six core operational phases (Idea → Brief → Draft → Review → Pre-Publish Gate → Publish), plus the human gate framework that enforces accountability, the WordPress-native and plugin tooling that makes it run, and a post-publish handoff that closes the loop. This is not a plugin overview or a content strategy explainer. It’s an operations guide for WordPress teams of one to five people who are tired of losing content in a process that was never designed to work.

    The Essentials: Editorial Workflow in WordPress

    • Nine-section system, six core phases: The pipeline runs Idea → Brief → Draft → Review → Pre-Publish Gate → Publish, covered across nine sections that add the human gate framework, tooling map, and post-publish handoff as discrete operational layers.
    • Hard Gates vs. Soft Gates: A Hard Gate physically blocks publishing until a named person changes the post status. A Soft Gate surfaces a checklist but does not block — both serve real functions at different handoff points in the pipeline.
    • WordPress 6.9 Notes: Adds block-level contextual feedback inside the editor — useful, but does not block publishing, does not track whether feedback was acted on, and must be paired with a Hard Gate to be operationally meaningful.
    • 10-field content brief template: A copyable table that maps directly to WordPress post settings and Yoast / RankMath SEO fields — the single artifact that prevents late-stage revision cycles by attaching intent to the post before a word is drafted.
    • WordPress's five native statuses cannot enforce approval, assign accountability, or track checklist completion — plugins or custom statuses close this gap for teams larger than one person.
    • AI-assisted drafts require three additional review criteria at the Human Gate: factual accuracy, tone consistency, and brand voice alignment — checks that traditional editorial checklists were never designed to catch.

    Stage 1: Idea Capture and Editorial Calendar Setup

    An idea that lives in someone’s head is not an idea — it’s a future regret. The first structural decision in any editorial workflow is defining where ideas go the moment they exist, and what minimum information must travel with them. Without this, you end up with a backlog of half-formed angles, no assigned owner, and no way to prioritize what gets resourced next week.

    The minimum viable idea record has five fields: the topic, the angle (what makes this specific take different from what’s already ranking), the target reader, at least one candidate for an internal link, and a priority rating. That’s it. Resist the urge to require a full brief at this stage — you’ll slow ideation to a crawl. The idea record is a parking lot, not a production commitment. In WordPress, a Draft post with a working title and a custom category (e.g., “Ideas Queue”) is enough to make the idea visible without cluttering the published post list.

    As WPNakama’s plugin documentation explains, content planning typically happens in one tool while the actual writing happens somewhere else — a spreadsheet or project management app for planning, then WordPress for production, with nothing connecting the two. For teams beyond one person, this fragmentation is where ideas die. A plugin like WPNakama solves this by giving you a Kanban board (Ideas → Brief → Writing → Editing → Review → Published) that lives inside WordPress, with tasks, deadlines, and notes attached to each card. The editorial calendar becomes the pipeline, not a separate layer you have to keep in sync manually.

    Ideas

    Brief

    Writing

    Editing

    Review

    Published

    A Kanban board with real stages — Ideas, Brief, Writing, Editing, Review, Published — turns the editorial calendar into the pipeline itself.

    Stage 2: Research and Angle Validation

    Before anyone writes a word, the angle needs a 30-minute validation pass. This is not a deep SEO audit — it’s a fast gate that answers three questions. Is the target keyword actually being searched? Is the intended differentiation real (do the top-ranking results leave a gap this piece could fill)? And does this post have at least two natural internal link candidates in the existing content inventory?

    The SERP scan is practical. Pull the top 10 results for the primary keyword and read the titles and H2s. If every result covers the same five angles at the same depth, you have a clear opening. If one result has 40,000 words and a .gov backlink profile, you need a different angle or a more specific long-tail target. PAA (People Also Ask) boxes are a fast proxy for what the reader still wants to know after seeing the top results — if no competing article addresses the PAA questions directly in a dedicated section, that’s your structural advantage.

    Internal link planning at this stage — not after publication — prevents orphaned posts and forces you to think about where the new content fits in your site architecture. Mapping internal links before drafting also gives the writer explicit signals about which existing posts to reference, which prevents the common failure mode of a new post being published with zero inbound links from the rest of the site.

    Stage 3: The Content Brief — The One Artifact That Eliminates Revision Cycles

    Here’s an original claim that competing editorial workflow guides skip entirely: a brief that cannot travel with the post is not a brief — it’s a hope. When the brief lives in a Notion page or a Google Doc and the post lives in WordPress, the connection between intent and execution degrades at every revision. By the third draft, the writer is referencing an outdated brief, the editor is reviewing against what they remember the brief said, and revision requests multiply. Embedding brief fields as post metadata — using ACF, native custom fields, or a plugin’s brief panel — keeps the brief physically attached to the post it governs.

    The table below is a copyable 10-field brief template. Each field maps to a specific WordPress post setting or SEO plugin field (Yoast / RankMath). This is the handoff artifact that moves a validated angle to an assigned draft. Multicollab’s own documentation frames the core problem directly: the absence of a structured handoff between planning and production means things fall through the cracks between applications, causing errors to go live that nobody catches in time. The brief template below is the structural answer to that problem.

    Brief Field Purpose Maps to WordPress / SEO Plugin Field
    Working title Writer orientation Post Title (H1 candidate — editable before publish)
    Target keyword (primary) SEO targeting Yoast / RankMath: Focus Keyword
    Target keyword (secondary) Semantic breadth Yoast / RankMath: Additional Keywords
    Search intent Structural guidance No native field — editorial decision
    Audience and reader pain Tone calibration No native field — brief only
    Mandatory sources (≥2) Accuracy gate No native field — linked in Draft notes
    Required word count range Scope control No native field — editorial convention
    Internal links to include Site architecture WordPress editor link panel
    Approved SEO title SERP preview Yoast / RankMath: SEO Title field
    Meta description (draft) Click-through optimization Yoast / RankMath: Meta Description

    Every field in this table has a job. The working title is directional, not final — the writer can adjust for natural language, but the keyword framing must stay intact. The mandatory sources field forces the editor to front-load the accuracy check: if the sourcing is weak at the brief stage, it will still be weak at submission. And the internal links field, when populated from your existing content inventory during Stage 2, eliminates one of the most common pre-publish failures: a published post with no inbound links from the site it belongs to. For the drafting technique that builds on this brief, the complete AI-assisted article workflow covers the production step in depth.

    Stage 4: Draft Assignment and Status Handoff in WordPress

    WordPress ships with five native post statuses: Draft, Pending Review, Private, Scheduled, and Published. These statuses serve basic visibility functions but enforce nothing operationally. Pending Review does not notify the editor. Draft does not tell anyone who is drafting, by when, or against which brief. Published does not confirm that a pre-publish checklist was ever completed. The statuses are labels, not a system.

    For a two-person team, native statuses may be enough — if both people share a mental model of what each label means and check the post list daily. But the moment a third contributor enters the workflow, or posts sit in Draft for more than a week, the native status system becomes invisible. No one knows whether “Draft” means “not started yet” or “waiting for feedback” or “ready but the editor hasn’t looked at it.” All three states look identical in the WordPress post list.

    The fix is custom post statuses that match your actual stages: “Idea Captured,” “Brief Complete,” “In Draft,” “Ready for Review,” “Edits Requested,” “Approved.” Each status change is a handoff — a visible signal that ownership has transferred from one person to the next. Custom statuses require either a plugin (PublishPress handles this well) or a small code addition via register_post_status(). The investment is one afternoon; the operational clarity lasts as long as you publish.

    Stage 5: Human Gates — The Approval Checkpoints Your Workflow Actually Needs

    Most editorial processes have gates — they’re just invisible. An editor reviews a draft and mentally decides it’s ready. A publisher glances at a post and clicks Publish. The problem with invisible gates is that they have no pass criteria, no accountability, and no record. You cannot improve a gate you cannot see.

    A Hard Gate and a Soft Gate serve different functions, and your workflow needs both. A Hard Gate is a physical block: publishing cannot happen until a named person changes the post status to a specific value. No override, no exceptions. The editor must move a post from “Ready for Review” to “Approved” before anyone else can schedule or publish it. WordPress does not enforce this natively — a plugin like PublishPress, or a custom capability restriction, creates the actual block. A Soft Gate is a checklist that surfaces incomplete items but does not physically prevent publishing. The Editorial Workflow Manager plugin is built precisely on this mechanic: it provides clear “ready vs. incomplete” feedback in Gutenberg without locking the publish action. Soft Gates work at self-check stages where the writer is accountable to themselves. Hard Gates belong at organizational handoff points where one person must sign off before another person can act.

    The table below maps both gate types to the stages where each belongs:

    Stage Gate Type Gate Owner Pass Criteria
    Idea → Brief Soft Gate Editor / Content Lead Brief fields complete; keyword confirmed
    Brief → Draft Hard Gate Writer Brief signed off before writing begins
    Draft → Review Soft Gate Writer self-checklist Word count, SEO fields, internal links present
    Review → Approved Hard Gate Editor All Notes resolved; no unresolved feedback
    Approved → Publish Hard Gate Publisher / Editor-in-Chief Pre-publish checklist 100%; scheduling confirmed
    Publish → Post-Publish Soft Gate Content team Social shared; internal links checked; analytics tagged

    One addition that 2025–2026 workflows must address explicitly: when drafts are AI-assisted, the Human Gate at Review requires three checks that traditional checklists never included. First, factual accuracy — AI models state incorrect information confidently, and the editor must verify specific claims, dates, and statistics against primary sources, not against the draft’s own citations. Second, tone consistency — AI drafts often shift register mid-article in ways a writer rarely does. Third, brand voice alignment — the gap between “sounds like a competent writer” and “sounds like us” is real, and only a human reviewer with context can close it. Add these three criteria explicitly to your Review → Approved gate pass conditions.

    Stage 6: The Review Stage — Using WordPress 6.9 Notes (And Where It Still Falls Short)

    WordPress 6.9 introduced block-level Notes — a genuine operational upgrade for small teams. Instead of copying a paragraph into a Slack message and writing “this section needs a stronger hook, see what I mean?”, a reviewer can now attach feedback directly to the block it concerns, inside the editor, without leaving WordPress. For teams doing async review across time zones, this reduces the “where exactly in the document?” coordination problem that made external tools feel necessary.

    But Notes is a UX improvement, not a workflow system. The operational limits are specific and worth stating plainly: Notes do not block publishing. A post with six open, unresolved Notes can be published by anyone with publish capability — nothing stops it. Notes also do not track whether a suggestion was accepted or rejected. The reviewer has no visibility into whether their feedback was acted on or silently ignored. And Notes provide no versioning for live content — if a post is published while a Note is still active, that Note doesn’t carry forward into a post-update workflow. For a team of two, where the reviewer and the editor communicate daily, these limits are manageable. For a team of three or more, they are system-level gaps that will eventually cost you a bad publish.

    The practical fix is a two-part pairing. First, a Soft Gate checklist inside the editor that includes a line item: “All Notes resolved before status moves to Approved.” This surfaces the unresolved state visibly without requiring anyone to remember to check. Second, for teams that need tracked suggestion acceptance — where a reviewer must confirm that their specific comment was addressed — Multicollab is the right plugin layer. It brings Google Docs–style inline commenting into Gutenberg, with comment resolution tracking and tagging. As Multicollab’s documentation states, the plugin works whether your editorial workflow consists of just two people or fifty — meaning the investment isn’t reserved for large teams. A solo publisher with one collaborating editor benefits from the same tracking clarity.

    Gutenberg Editor

    Approval Checklist

    Word count, SEO fields complete
    Internal links present
    All Notes resolved

    WordPress 6.9 Notes flag feedback at the block level, but only a Hard Gate checklist item — “All Notes resolved” — actually stops an unfinished review from publishing.

    Stage 7: Pre-Publish Checklist — The Last Hard Gate Before Go-Live

    The pre-publish checklist is not a reminder list. It’s a quality enforcement artifact with a binary outcome: every item is complete, or the post doesn’t go live. The distinction matters because a reminder list gets skimmed; a checklist with a gated status change gets worked through item by item.

    The minimum viable pre-publish checklist for a WordPress editorial workflow covers nine items. SEO title is set in Yoast or RankMath — distinct from the H1 post title. Meta description is written and within character limits. Focus keyword is confirmed in the SEO plugin’s keyword field. Featured image is uploaded with alt text that describes the image and includes the focus keyword. At least two internal links are inserted in the body. At least one external authority source is cited. URL slug is manually confirmed — not the auto-generated version WordPress creates from the title, which often includes stop words and is longer than it needs to be. Publish date and time are scheduled. Categories and tags are assigned correctly.

    Pre-Publish Checklist

    Minimum Viable Version

    Run through these essentials before publishing your article.

    • ✓ SEO title set in Yoast / RankMath (different from H1 post title)
    • ✓ Meta description written and within 155–160 characters
    • ✓ Focus keyword confirmed in SEO plugin keyword field
    • ✓ Featured image uploaded with descriptive alt text
    • ✓ At least 2 internal links inserted in body copy
    • ✓ At least 1 external authority source cited
    • ✓ URL slug manually confirmed (not auto-generated)
    • ✓ Publish date and time scheduled
    • ✓ Categories and tags assigned correctly

    A checklist that lives in a shared Google Doc has a critical weakness: it’s not in the writer’s eyeline when they’re about to hit Publish. Behavioral design beats policy every time. The Editorial Workflow Manager plugin surfaces this checklist inside Gutenberg — a red “incomplete” state is visible at exactly the moment it needs to be seen. No separate tab, no remembered link. The cost of enforcement is zero; it’s already part of the publishing interface.

    Stage 8: Publish, Notify, and Post-Publish Handoff

    Publishing is a status change that triggers a set of downstream actions — and if those actions aren’t defined, they don’t happen. For a solo publisher, this means a mental checklist of four tasks. For a team of three, it means clear ownership of who does what in the 30 minutes after a post goes live.

    The four post-publish tasks every workflow should define explicitly: internal notification (who on the team needs to know this is live, and why — not a broadcast, a targeted message to whoever owns the topic cluster or the newsletter), internal link update (which existing published posts should now link to this new one — this is the step most teams skip, which is why sites accumulate orphaned content over time), promotion handoff (social and newsletter, with copy already drafted at the pre-publish stage rather than improvised after go-live), and a 30-day review flag (a calendar note or task to check organic traffic, average position, and click-through rate at the one-month mark and decide whether the post needs an update or a structural revision). If your workflow includes automated scheduling or AI-assisted publish queues, the auto-publish setup guide covers how to integrate automation at the publish step without bypassing the human gates upstream.

    The 30-day review flag closes the loop. It turns the workflow from a linear pipeline into a cycle. Performance data from published posts feeds new angles back into Stage 1 — which posts are pulling traffic to adjacent topics that don’t yet have dedicated coverage? Which posts are ranking on page 2 and need a structural refresh to move to page 1? This is how a content operation compounds over time instead of just adding volume.

    Stage 9: Tooling Map — What to Use at Each Stage (And What to Skip)

    Tools serve stages. The failure mode is installing a plugin before defining what problem it’s supposed to solve in your specific workflow — you end up with three overlapping tools that each partially handle one stage and fully handle none of them. The table below maps recommended options to each stage so you can choose based on where your current process actually breaks, not based on a plugin’s marketing copy.

    Workflow Stage WordPress-Native Option Plugin Option Skip If
    Idea capture Draft + custom category WPNakama Kanban board Team of 1 with a reliable external notes system
    Briefing Custom fields (ACF / native) WPNakama card fields You already have a consistent external brief that gets followed
    Draft status tracking Draft / Pending Review Custom statuses via PublishPress Only 1 writer; status confusion is not a real problem
    Review feedback WordPress 6.9 Notes Multicollab Fully solo — no collaborator reviews your drafts
    Pre-publish gate Manual checklist Editorial Workflow Manager You have zero tolerance for missed items — use the plugin
    Publish + post-publish Schedule + manual task list WPNakama task system Solo publisher with no downstream promotion workflow

    The honest principle behind this table: most WordPress teams of one to three people can run a functional editorial workflow with a combination of custom post statuses (one afternoon of setup) and WordPress 6.9 Notes (zero setup). Add WPNakama when you need pipeline visibility across more than two contributors — its Kanban board connects content planning and publishing inside a single WordPress environment, which removes the tool-switching friction that kills editorial momentum. Add Multicollab when tracked suggestion acceptance matters. Add Editorial Workflow Manager when the pre-publish checklist is a frequent failure point rather than a reliable habit. Don’t install all four before you’ve identified where your current workflow actually breaks.


    Frequently Asked Questions

    What is an editorial workflow in WordPress, and why does it matter for small teams?

    An editorial workflow is the defined sequence of stages a piece of content moves through from idea to publication — with a named owner, a pass condition, and a status change at each handoff. For small teams, it matters because without it, accountability is assumed rather than assigned. “Pending Review” might mean three different things to three different people. A workflow makes the implicit explicit: who owns each stage, what “done” looks like at each step, and what changes when ownership transfers. The result isn’t bureaucracy — it’s fewer posts that stall in Draft for three weeks with no explanation.

    How do I set up a content approval process in WordPress without expensive project management tools?

    Start with custom post statuses. Register statuses like “Brief Approved,” “Ready for Review,” and “Approved” using a plugin like PublishPress or via register_post_status() in your theme’s functions.php. Map each status to a named gate owner and a specific pass condition. Then add the Editorial Workflow Manager plugin for a Gutenberg-embedded checklist at the pre-publish stage. This gives you a functional approval process entirely inside WordPress with no external tool dependency — and both plugins have free tiers adequate for teams of one to five people.

    What is the difference between a Hard Gate and a Soft Gate in an editorial workflow?

    A Hard Gate physically prevents publishing until a named person changes the post status. A Soft Gate surfaces a checklist or incomplete state but does not block the publish action. Both serve real functions: Soft Gates work at self-check stages where the writer is accountable to themselves — did I add the internal links? Hard Gates belong at organizational handoff points where one person must sign off before another person can act. Running a workflow with only Soft Gates means any post can go live at any time regardless of its review state. Running one with only Hard Gates creates bottlenecks at every stage — the combination is what makes the system functional without becoming punishing.

    How does WordPress 6.9 Notes change the review stage of a content workflow?

    WordPress 6.9 Notes lets reviewers attach contextual feedback directly to specific blocks inside the editor — a paragraph, a heading, an image — without leaving WordPress or copying text into a separate tool. That’s a real improvement over the previous state, where block-level feedback required approximate location descriptions in a Slack message. But Notes do not block publishing, do not track whether feedback was acted on, and do not notify the writer automatically in all configurations. On their own, Notes improve the review experience without enforcing the review outcome. Pair them with a Hard Gate that requires zero unresolved Notes before a post moves to “Approved.”

    What plugins are best for managing an editorial workflow in WordPress in 2026?

    It depends on which stage of your workflow is currently breaking. For pipeline visibility across a team, WPNakama provides a Kanban board inside WordPress. For inline review feedback with tracked suggestion acceptance, Multicollab brings Google Docs–style commenting into Gutenberg. For pre-publish checklist enforcement inside the editor, Editorial Workflow Manager adds required and optional items with clear ready/incomplete state feedback. For custom post statuses that create Hard Gates, PublishPress is the most established option. None of these are mutually exclusive — but installing all four before defining your stages is the wrong order of operations.

    How do I manage multiple authors in WordPress and keep drafts from going stale?

    Two mechanisms in combination: custom post statuses with explicit stage definitions, and deadlines attached to each status. A draft sitting in “In Draft” for 14 days with no deadline is invisible. The same draft with a deadline visible in a WPNakama board or a PublishPress calendar is a flagged item someone will act on. Additionally, the status change IS the handoff — if writers aren’t required to change a post’s status when they finish their stage, the pipeline stays invisible regardless of the tools you install. Make status changes a non-optional part of the workflow, not a courtesy.

    Can I add custom post statuses to WordPress, and do I need a plugin to do it?

    You can add custom post statuses without a plugin using the register_post_status() function in WordPress. The limitation of the code-only approach is that custom statuses added this way don’t always integrate cleanly with the WordPress post list filters or the Gutenberg editor’s status selector — you may see them in the database but not in the UI. PublishPress handles this integration correctly and is the practical choice for teams that need custom statuses to be visible and selectable in the editor. For teams comfortable with code and building a one-writer workflow, the native function works for basic use.

    What fields should a content brief include for a WordPress editorial team?

    At minimum: working title, primary and secondary target keywords (mapped to your SEO plugin’s focus keyword field), search intent, a one-sentence reader pain statement, mandatory sources (at least two), required word count range, internal links to include, approved SEO title, and a draft meta description. The full 10-field template in Stage 3 of this article maps each field to its corresponding WordPress post setting or Yoast / RankMath field — copy it as a starting point and remove any field your team consistently ignores. A brief that gets used is better than a comprehensive brief that gets skipped.


    Building an editorial workflow in WordPress is a half-day operational task, not a months-long systems project. Define your stages. Assign a gate owner to each handoff point. Copy the content brief template from Stage 3 into your first post’s custom fields this week. Add one plugin — whichever one closes the specific gap where your content currently gets stuck. The compounding value comes from running the same defined process on every piece of content that follows. Workflows don’t generate traffic on their own. But they reliably prevent the quiet failure mode that costs most WordPress teams more than bad writing ever does: good ideas that never become published posts because no one was ever clearly responsible for what happened next.

    References

    External sources

    1. WPNakama – Editorial Workflow & Content Planning for WP – WordPress plugin | WordPress.org — https://wordpress.org/plugins/wpnakama/
    2. Multicollab: Content Team Collaboration and Editorial Workflow – WordPress plugin | WordPress.org — https://wordpress.org/plugins/commenting-feature/

    Related content

  • What Is GEO? Generative Engine Optimization Explained in Plain English

    What Is GEO? Generative Engine Optimization Explained in Plain English

    You saw the term “GEO” in a newsletter, a job post, or maybe a tweet from someone in the SEO space, and now you’re wondering whether it’s a real discipline or just another rebranding of things you already do. Fair question. GEO — Generative Engine Optimization — is the practice of structuring your content so it gets cited by AI-powered tools like ChatGPT, Google AI Overviews, and Perplexity AI when those tools generate answers for users. That’s the working definition. And no, this is not the NCBI Gene Expression Omnibus — this is an AI and content strategy discipline, and it matters to anyone who produces content for search.

    Here’s the problem GEO solves: when an AI generates an answer, it doesn’t surface ten blue links. It writes a response. It synthesizes information from a handful of sources and presents a coherent output to the user. If your content isn’t one of those sources, you’re invisible — regardless of where you rank in a traditional search result. The sections below explain why GEO exists now, how the underlying mechanism works, and how it differs from SEO. No implementation tactics here; those live in the full guide. Think of this page as the foundation.

    GEO at a Glance

    • Definition: Generative Engine Optimization is the practice of structuring content so AI tools like ChatGPT, Google AI Overviews, and Perplexity retrieve and cite it when generating answers for users.
    • Why it exists: AI-generated answers are now the front page of search for millions of queries — and they cite sources instead of ranking them.
    • How it differs from SEO: Traditional SEO optimizes for ranked positions on a results page. GEO optimizes for citation inside a synthesized written answer — a binary outcome, not a gradient.
    • Three platforms to know: Google AI Overviews, ChatGPT Search, and Perplexity AI — each uses a different retrieval architecture.
    • This article covers the definition, mechanics, and key distinctions. For step-by-step implementation, see the full GEO guide on Contentosapp.

    How GEO Works — The Generative Mechanism

    The word “generative” is not a marketing adjective. It describes a specific computational act: text synthesis. Traditional search engines index documents and retrieve links — they show you a list of pages that might contain the answer. Generative engines do something fundamentally different. They read multiple sources simultaneously, combine the relevant material, and write a new answer. That single mechanical distinction is the entire reason GEO exists as a discipline separate from SEO. According to Mailchimp, when a user asks a complex question, AI search engines use machine learning models to provide a detailed, accurate overview rather than listing relevant links — which means the content you create must be something an AI can incorporate into a generated response, not just something a human would click on.

    Most major generative engines use a technique called RAG — retrieval-augmented generation — which means the model pulls live documents at query time and uses them as raw material for its response. Think of it as the AI doing a fast research session on your behalf, then drafting a summary. On the Google side, the official documentation confirms that AI Overviews and AI Mode may use a “query fan-out” technique, issuing multiple related searches across subtopics and data sources to build a response. ChatGPT Search and Perplexity AI use comparable retrieval approaches with different indexing layers. Optimization tactics exist for each platform — and the full GEO implementation guide covers those in detail — but understanding the synthesis model is the necessary starting point before any tactic makes sense.

    Source 1
    Source 2
    Source 3
    Source 4
    Synthesis
    Answer

    Generative engines don’t rank your content — they retrieve it, synthesize it, and either include it in their output or discard it entirely.

    GEO vs. SEO — What Actually Changes

    Use SEO as your reference point, because the comparison is instructive. Traditional SEO optimizes for a ranked position on a results page — position 1 beats position 4, position 4 beats position 9. The success model is a gradient. GEO success is a binary event. You are either cited in the generated answer, or you are not. There is no “position 4” in a ChatGPT response. The mechanical consequence of how generative engines work is that optimization shifts from climbing a ranked list to crossing a citation threshold — and that requires a fundamentally different way of thinking about what “winning” looks like in search. Content requirements change too: GEO-ready content needs to be quotable, factually dense, and structurally legible to a machine synthesizing across sources, not just keyword-matched and internally linked.

    AEO — Answer Engine Optimization — overlaps with GEO but is not identical. AEO focuses specifically on getting content surfaced as direct answers: featured snippets, voice results, AI-powered SERP features. GEO is the broader discipline covering citation visibility across all generative engine surfaces, including platforms like ChatGPT and Perplexity that have no traditional SERP at all. AEO is a component of the GEO strategy space, not a synonym for it. If you want the full breakdown of where AEO ends and GEO begins, the Answer Engine Optimization: The Complete 2026 Playbook goes deep on the distinction. The table below maps the key dimensions:

    Dimension Traditional SEO GEO
    Primary output Ranked list of links AI-synthesized written response
    Unit of success SERP position (gradient) Citation in generated answer (binary)
    Core optimization lever Keyword relevance + backlinks Answer quality, factual density, source credibility
    Visibility model Position 1 through 10+ Cited or not cited — nothing in between

    Which Generative Engines Matter for GEO

    Three platforms account for the majority of generative search activity worth tracking in 2026. Google AI Overviews is the closest surface to traditional SEO — it operates on Google’s own crawl index, and Google’s own technical documentation confirms that the same foundational best practices apply: meeting crawl requirements, following search policies, and producing helpful, people-first content. ChatGPT Search operates on a Bing-backed retrieval layer, pulling live web results at query time; structured, direct, quotable content performs well here, and a full breakdown of the tactical differences is available in the ChatGPT and Perplexity ranking guide. Perplexity AI uses explicit source-cited RAG, which means citations are visible to the user — authoritative, well-structured, and recently updated content carries strong signals on this platform, particularly for professional and research-oriented queries.

    The key strategic insight — and one that most introductions to GEO skip — is that these platforms use architecturally different retrieval mechanisms. Google AI Overviews is built on authority signals and crawlability that will feel familiar to any SEO practitioner. Perplexity rewards recency and source credibility in ways that don’t map directly onto Google’s ranking model. ChatGPT Search introduces its own entity and citation patterns. A tactic that reliably gets you cited on Perplexity may not transfer directly to Google AI Overviews, and vice versa. Platform awareness is foundational before any GEO strategy is built. The platform-by-platform breakdown — including what content signals matter on each — is covered in detail in the Generative Engine Optimization complete guide.

    Why GEO Matters Now — And Who Needs It

    GEO is not a prediction about where search is heading. It is a description of where search already is. Google’s own documentation for web publishers now directly addresses how content surfaces in AI-powered results, including specific technical eligibility requirements for appearing as a supporting link in AI Overviews and AI Mode. That is institutional recognition that GEO has moved from fringe theory to operational reality. The shift is structural: AI-generated answers now appear for the types of queries — informational, definitional, comparison-based — where solo bloggers and affiliate marketers have historically competed on content quality alone. The traffic exposure is direct. When an AI generates the answer to a question your article used to rank for, your ranking position doesn’t protect you.

    Who actually needs to act on this? If you produce product reviews, how-to guides, definitional content, or comparison articles, you are operating in the highest-GEO-risk content categories. Those are exactly the query types that generative engines handle most aggressively. The good news — and this is worth stating clearly — is that GEO does not require abandoning SEO. The foundational signals overlap: clear writing, authoritative sourcing, and structured content help both. Mailchimp’s analysis confirms that GEO goes beyond keyword matching to understand context and user intent, which means content built on genuine expertise serves both disciplines simultaneously. The differences are in emphasis and success metrics, not in whether to do one or the other.

    Traditional SEO

    1
    2
    3
    4
    5
    6
    7
    8
    9
    10

    Generative Engines (GEO)

    Cited
    Not cited

    Traditional SEO rewards every position from 1 to 10 — GEO gives you a single outcome: cited or not cited. The optimization logic has to change accordingly.

    Frequently Asked Questions

    Is GEO the same thing as SEO?

    No. SEO — Search Engine Optimization — targets ranked positions on a traditional search engine results page. GEO targets citation inside a generated answer produced by an AI tool. The optimization levers differ: SEO leans on keyword relevance, backlinks, and technical crawlability; GEO leans on factual density, answer quality, and source credibility. The two disciplines share foundational quality signals — clear structure, authoritative content, strong E-E-A-T — but they are not interchangeable. You can rank on Google without being cited in an AI answer, and you can be cited in an AI answer without ranking highly on a traditional SERP.

    What is the difference between GEO and AEO?

    AEO — Answer Engine Optimization — focuses on getting content surfaced as direct answers in AI-powered features: Google featured snippets, voice search results, AI Overviews. GEO is broader. It covers citation visibility across all generative engine surfaces, including platforms like ChatGPT and Perplexity that have no traditional SERP at all. Think of AEO as a subset of the GEO strategy space: AEO handles the answer-extraction layer, GEO handles the full synthesis-and-citation layer across multiple platforms. The Answer Engine Optimization complete playbook covers that distinction in full if you want the detailed breakdown.

    Which AI tools should I be optimizing for under GEO?

    The three platforms with the broadest reach right now are Google AI Overviews, ChatGPT Search, and Perplexity AI. Each uses a different retrieval architecture, which means optimization signals differ by platform. Google AI Overviews is the most familiar to SEO practitioners — it builds on crawl and authority signals you likely already manage. ChatGPT Search and Perplexity AI introduce different content and entity signals. Platform-specific tactics are covered in the full GEO implementation guide.

    Do I need to choose between GEO and traditional SEO?

    No — most content operations should run both in parallel. GEO and SEO share a strong foundational overlap: well-structured, authoritative, people-first content serves both disciplines. The differences show up in how you measure success (position vs. citation) and which specific content properties you emphasize. Running GEO-aware content practices alongside traditional SEO is not only feasible but strategic — quality signals reinforce each other across both surfaces.

    How do I know if my content is being cited by AI tools?

    The current baseline is manual citation checks. Search for your brand, your article’s core topic, or specific phrasing from your content directly in ChatGPT, Perplexity, and Google AI Overviews and see whether your content is referenced. It’s time-intensive but gives you real ground truth. Purpose-built GEO monitoring and tracking tools are an emerging category — purpose-built dashboards that automate citation monitoring across platforms are covered in the monitoring section of the full GEO guide.

    Does GEO apply to small blogs and affiliate sites, or only to large brands?

    GEO applies to any content publisher, regardless of domain size. This is one of its most significant differences from traditional SEO. The citation threshold in a generative engine does not differentially favor large domains the way Google’s PageRank-influenced rankings do. A well-structured, factually dense article from a small niche site can be cited in an AI answer over a larger domain’s thin coverage of the same topic — because the AI is selecting for answer quality and source clarity, not domain authority alone. For solo operators, that is a genuine opportunity worth understanding before it gets commoditized.


    GEO exists because the architecture of search changed. Generative engines don’t retrieve links — they write answers by synthesizing sources, and that mechanical fact creates a new optimization discipline that SEO alone doesn’t cover. The citation model is binary, the platforms are architecturally distinct, and the content signals that matter are already within reach for any publisher focused on quality. You don’t need to reinvent your content operation from scratch. You need to understand what changed and adjust accordingly. If you’re ready to move from definition to execution, the Generative Engine Optimization: The Complete Guide to Getting Cited by AI in 2026 is the logical next step.

    References

    External sources

    1. Generative Engine Optimization: The Future of SEO | Mailchimp — https://mailchimp.com/resources/generative-engine-optimization/
    2. AI Features and Your Website | Google Search Central | Documentation | Google for Developers — https://developers.google.com/search/docs/appearance/ai-features

    Related content

  • Best AI SEO Tools in 2026: Organized by the Job You Actually Need Done

    Best AI SEO Tools in 2026: Organized by the Job You Actually Need Done

    Most “best AI SEO tools” lists rank six products by a score nobody can verify, declare a winner, and send you off to buy the wrong subscription. You end up with three platforms that all grade your content and none that handle the job you actually spend Tuesday mornings on. That’s the real problem with how this category gets covered.

    This guide takes a different approach. It maps each of the best AI SEO tools in 2026 to the specific job it was built to do — keyword research, technical auditing, content briefing, on-page optimization, AI-search citation tracking, or WordPress publishing. Evidence comes directly from each tool’s official page, verified against the extraction date of September 7, 2026. Where a feature or price couldn’t be confirmed from the source, the matrix says so — “not publicly verified” is a real finding, not a cop-out. There is no overall winner here because the decision genuinely depends on which jobs account for most of your weekly SEO work. Understanding the actual cost of stacking AI content tools starts with knowing which jobs overlap across your subscriptions — that’s the question this guide is built to answer.

    Six tools are in scope: Semrush, Ahrefs, Surfer, Frase, Writesonic, and Contentosapp Studio. They are not interchangeable. A team that treats them as alternatives and buys two or three of the same job is burning budget on redundancy.

    Key Takeaways

    • Organized by job, not ranking: Six tools are compared across six distinct jobs — keyword research, technical auditing, content briefing, optimization, AI-search tracking, and WordPress publishing.
    • Overlap is real and costly: Four of these tools include AI-search citation tracking. Subscribing to more than one for that job means paying twice for the same output.
    • WordPress publishing: Only Contentosapp Studio has a verified WordPress publishing output among the six tools. Other tools are not publicly confirmed for this job.
    • No verified pricing: No tool published a verifiable price in its extracted source. Visit each official pricing page before committing to a subscription.
    • The right stack depends on which two or three jobs account for the majority of your weekly SEO work — not on who topped a ranked list.

    Six Jobs These Tools Are Actually Built For

    The market confusion around AI SEO tools starts with a category problem. “AI SEO tool” gets applied to a keyword database, a content scorer, an autonomous citation agent, and a WordPress publishing pipeline — four fundamentally different products. Before any tool enters the conversation, the six core jobs need to be defined on their own terms.

    Keyword and competitive research is about discovering what people search for and how hard it is to rank for those terms. Technical auditing is crawling a site to find structural, speed, and indexing issues before they compound. Content briefing produces structured outlines and optimization targets for writers to execute against. Content optimization scores a draft in real time and tells a writer which terms are under- or over-represented. AI-search monitoring — and this one matters more than most roundups acknowledge — tracks where AI systems like ChatGPT, Perplexity, and Google’s AI Overviews are citing competitors instead of you. This is not rank tracking. It operates at the prompt level: which branded queries trigger an AI recommendation, and whose brand appears in the answer.

    The sixth job is WordPress publishing pipeline — turning a completed draft into a formatted, source-attributed, human-reviewed post inside WordPress, without a copy-paste step. This is a workflow job, not a content job. A tool can produce perfect content and still require 45 minutes of reformatting before it appears on your site. That friction compounds at scale, and it almost never shows up in comparison tables. The distinction between these six jobs is the lens through which every tool in this guide is evaluated.

    Decision Matrix: One Row per Tool, One Column per Job

    Every cell below is traceable to the official source cited, or explicitly labeled. No cell is inferred from marketing tone or assumed from the absence of a denial. “Not publicly verified” means the capability was not described in the extracted official content — it is not a statement that the feature does not exist.

    Pricing is absent from every row. No verifiable price figure appeared in any of the six official sources extracted on September 7, 2026. Visit each tool’s pricing page directly before subscribing.

    Tool Keyword / Competitive Research Technical Auditing Content Briefing Content Optimization AI-Search Monitoring WordPress Publishing
    Semrush Verified — 28 billion keywords indexed Verified — audit module confirmed Partial — topic research and AI content tools listed; brief export not confirmed Verified — real-time content scoring Verified — prompt-level AI Visibility tracking Not publicly verified
    Ahrefs Verified — 41.9 billion keywords tracked Verified — Site Audit module Verified — Keywords Explorer and Content Explorer Verified — AI Content Helper and AI Content Grader Verified — Brand Radar tracks citations across AI chatbots Not publicly verified
    Surfer Not publicly verified Not publicly verified Verified — SEO briefs via Content Editor Verified — Content Editor (core product) Label present (“AI Visibility Platform”); monitoring dashboard mechanism not publicly verified Not publicly verified
    Frase Partial — SERP-based research confirmed; proprietary keyword index not confirmed Verified — site crawl with SEO and AI readiness scoring Verified — brief-to-draft loop Verified — draft and approval workflow Verified — tracks LLM citations across ChatGPT, Perplexity, and Gemini Partially verified — “publishing, hosting” stated; WordPress plugin integration not confirmed
    Writesonic Not publicly verified Partial — “technical work” stated; crawl scope not confirmed Not publicly verified Verified — AI content via agent fleet Verified — prompt-level AI mention tracking Not publicly verified
    Contentosapp Studio Not publicly verified Not publicly verified Not publicly verified Not publicly verified Not publicly verified Verified — seven-stage pipeline publishes to WordPress with source attribution and human review

    Individual Tool Analyses

    Semrush

    Best AI SEO Tools: Semrush homepage showing its 'Be found everywhere search happens' headline and AI PR journalist-matching tool
    Semrush frames itself as a brand-visibility platform spanning traditional SEO, AI-answer visibility, and PR — the AI PR module shown here is one of at least nine solutions bundled into the same interface.

    Semrush’s official page positions it as a platform for brand visibility across every digital channel — traditional SEO, AI-answer visibility, advertising, and PR, all in one interface. The 28 billion keyword index is the largest reported figure among the six tools in scope. The AI Visibility module is explicitly described as tracking “prompt-level visibility” and measuring AI market share against competitors — the vendor phrase is “get LLMs to cite your brand.” These are verified vendor claims, not independently audited outcomes.

    The core tension in Semrush is scope versus cost. It describes at least nine distinct solutions on its official page — SEO, AI Visibility, Traffic and Market, Content, Local, Advertising, AI PR, Social, and Enterprise. For teams that genuinely need all nine, consolidation has value. For a solo blogger who needs keyword research and nothing else, the platform is almost certainly oversized. Whether AI Visibility tracking is available at base plan levels or restricted to enterprise tiers is not publicly verified in the extracted source. WordPress native publishing is not mentioned anywhere in the extracted content.

    Evidence gap: Plan-level pricing, included feature limits, and seat costs are absent from the official source. Whether the AI Visibility module is included at all paid tiers or gated separately is unconfirmed.

    Ahrefs

    Best AI SEO Tools: Ahrefs homepage showing its 'Make your business discoverable' headline and AI citation tracking dashboard
    The dashboard preview shows AI citation counts across Google AI Overviews and ChatGPT — direct visual evidence of the Brand Radar feature the article documents as tracking brand mentions across AI chatbots.

    Ahrefs describes itself as “the only AI marketing platform built on a proprietary index of the web,” and the index numbers support that framing: 41.9 billion keywords tracked, 170 trillion pages in its web index, and 400 million monthly AI prompts processed, all per the vendor’s own page. The Brand Radar feature — tracking brand mentions, citations, and sentiment across AI chatbots — is a verified, named feature distinct from traditional rank tracking. Ahrefs also reports that marketers at 44% of the Fortune 500 use the platform, though this is vendor marketing, not an independently audited figure.

    The platform covers the most jobs of any single tool in this comparison: keyword research, technical auditing (Site Audit), content briefing (Content Explorer, Keywords Explorer), optimization (AI Content Helper, AI Content Grader), and AI-search monitoring (Brand Radar). Whether that breadth justifies the cost for smaller operations depends on which jobs are actually in use. Letaido — described as “marketing reports, apps, and automations” — appears on the official page but its specific capabilities and pricing are sparse in the extracted content.

    Evidence gap: Pricing, plan tiers, and whether Brand Radar is included on standard or enterprise-only plans are not confirmed. WordPress publishing is not mentioned in any extracted content.

    Surfer

    Best AI SEO Tools: Surfer homepage showing its 'AI Visibility Platform' badge and 'Be The Answer' tagline
    Surfer markets itself as an ‘AI Visibility Platform,’ but the official page’s content leans on content-optimization scoring — the source doesn’t confirm a monitoring dashboard that tracks AI citations, the way Semrush, Ahrefs, and Frase do.

    Surfer’s official page markets the platform as an “AI Visibility Platform,” but the extracted content is dominated by content optimization use cases — specifically the Content Editor, which provides real-time scoring and keyword recommendations for writers. The brief creation capability is explicitly verified: creating SEO-driven briefs is described as a core use of Content Editor, with user testimonials from practitioners including agency operators and independent SEOs. These testimonials are vendor-curated; the traffic growth figures cited by individual users are not independently audited.

    The “AI Visibility Platform” label warrants scrutiny. The extracted content does not confirm a monitoring dashboard that tracks where LLMs cite competitors by prompt — this is a different product category from content-optimization scoring. Readers evaluating Surfer for AI-search monitoring specifically should verify directly whether that dashboard exists and what it covers before subscribing. For the specific job of content briefing and on-page optimization, Surfer is well-documented. For keyword research at database scale, technical auditing, and WordPress publishing, the official source provides no supporting evidence. See also this analysis of Surfer SEO alternatives for a direct comparison of optimization-layer options.

    Evidence gap: The AI Visibility Platform label is present but the mechanism is not described. Keyword research depth, technical audit capability, and WordPress integration are all unconfirmed.

    Frase

    Best AI SEO Tools: Frase homepage showing 'Rank on Google. Get cited by AI.' headline with an AI-citation-tracking panel
    Frase’s AI Visibility panel tracks who gets cited across ChatGPT, Perplexity, and Gemini at the prompt level — one of four tools in this comparison with verified AI-search monitoring, alongside Semrush, Ahrefs, and Writesonic.

    Frase positions itself as a content operating system that runs the full loop: audit, research, writing, publishing, and hosting. The AI visibility monitoring feature is one of the more explicitly documented among the six tools — the extracted interface example shows real-time citation tracking across ChatGPT, Perplexity, and Gemini, with competitor citations visible at the prompt level. The site audit function crawls pages, scores them for both SEO and AI readiness, and prioritizes fixes by impact. The vendor’s framing — “Frase drafts the fixes for your approval” — positions it as a loop rather than a one-shot tool.

    The “publishing, hosting” claim on Frase’s official page is where precision matters for WordPress publishers. The source confirms those words appear, but does not specify whether publishing means a WordPress plugin, a REST API integration, a CMS-agnostic export, or a Frase-hosted page. That’s a material distinction for anyone running a self-hosted WordPress site. This comparison evaluating Frase versus Jasper covers related context on how Frase’s research engine differs from a standalone AI copywriter. The 7-day free trial with no credit card required is confirmed from the official page.

    Evidence gap: Whether “publishing” refers to WordPress plugin integration or Frase-hosted pages is unconfirmed. Proprietary keyword database (vs. SERP-scraping for research) is unconfirmed. Paid plan pricing is absent from the extracted source.

    Writesonic

    Best AI SEO Tools: Writesonic homepage showing 'Win customers from AI search' headline and a 12%-to-71% before/after visibility example
    The before/after panel shown here — AI mention rate moving from 12% to 71% — is a vendor-illustrated scenario on Writesonic’s own page, not a documented independent outcome, and shouldn’t be read as a typical result.

    Writesonic’s official page is the most explicitly AI-search-focused positioning of the six tools. The platform is framed as an “AI Search Growth Engine” — it monitors where AI systems ignore a brand, then deploys a Content Agent and Outreach Agent to earn citations and backlinks. The illustrated scenario on the official page shows a before/after in which AI mention rate moves from 12% to 71% for a tracked brand. This is a vendor-illustrated scenario, not a documented independent outcome, and should not be treated as a typical result.

    The agent-fleet framing sets Writesonic apart from the other tools in this group — the other platforms provide dashboards and recommendations; Writesonic describes autonomous execution. Whether that autonomous content and outreach activity produces reliable results at the account level, without editorial oversight, is a question the available sources do not answer. Traditional keyword research, content briefing for human writers, and WordPress publishing are not described in the extracted content. Trusted by 10,000+ marketing teams is a vendor claim on the official page. A 7-day free trial is confirmed.

    Evidence gap: “Technical work” is listed as a platform capability but the scope — crawl depth, audit detail, fix implementation — is not confirmed. Independent validation of agent-fleet citation outcomes is not available in reviewed sources.

    Contentosapp Studio

    Best AI SEO Tools: Contentosapp Studio homepage showing 'Get found on Google. Get cited by ChatGPT.' headline and 7-agent pipeline badge
    The ‘7 AI Agents. 1 Article. That Ranks.’ framing matches the seven-stage pipeline the article documents — draft, source, fact-check, and publish to WordPress with a human review step before anything goes live.

    Contentosapp Studio’s official page documents a seven-stage pipeline that drafts, sources, fact-checks, and publishes content to WordPress with human editorial review before publication. The evidence here is direct and observable: a published article exists as output, attributed to a named author, with four open external references cited for specific optimization purposes — GEO/AEO optimization, Perplexity and ChatGPT content signals, Google’s AI-content guidance, and the llms.txt proposal. The pipeline’s source attribution is transparent: each reference is labeled with its purpose and linkable.

    The “human-reviewed” gate is an explicit design choice, documented on the official page: “Fact-checked and edited by a human before publication.” This distinguishes the pipeline from fully automated AI publishing workflows. But it also means Contentosapp Studio is not competing directly with autonomous content-at-scale platforms. It is built for publishers who prioritize E-E-A-T signal density and source transparency over volume throughput. Keyword research, technical auditing, content briefing for external writers, and AI-search citation monitoring are not described in the extracted content. Importantly, Contentosapp Studio does not appear in any of the three independent roundup sources reviewed at this evidence date — which likely reflects its current market visibility stage, not its editorial quality.

    Evidence gap: Pricing, plan limits, post-volume capacity, and the specific WordPress integration mechanism (plugin, API, or block editor) are not publicly confirmed. AI-search monitoring is not mentioned.

    Strengths and Limitations by Job Category

    Keyword and competitive research: Semrush and Ahrefs are the only two tools in scope with verified large-scale keyword indexes — 28 billion keywords and 41.9 billion keywords respectively. Both are well-documented for this job. The remaining four tools are not publicly confirmed for database-scale keyword research; Frase appears to work with SERP-based competitive research rather than a proprietary index.

    Technical auditing: Three tools show verified technical auditing capabilities — Semrush, Ahrefs (Site Audit), and Frase (page-level SEO and AI readiness scoring). Writesonic references “technical work” but the scope is unconfirmed. Surfer and Contentosapp Studio do not mention technical auditing in their official content.

    Content briefing and optimization: Surfer’s Content Editor is the most explicitly documented briefing-and-optimization combination. Frase’s brief-to-draft loop is verified. Ahrefs’ AI Content Helper and Grader are verified as existing features. Semrush includes content scoring tools. Writesonic generates content via agents rather than producing structured briefs for human writers. Contentosapp Studio is not publicly confirmed for external brief output.

    AI-search monitoring: This is where the overlap problem is most visible. Semrush (AI Visibility), Ahrefs (Brand Radar), Frase (ChatGPT/Perplexity/Gemini tracking), and Writesonic (prompt-level monitoring) all include some form of this capability. Four tools, one job. Surfer uses the “AI Visibility Platform” label, but the specific monitoring dashboard mechanism is not confirmed in the extracted content. None of these tools’ AI-citation tracking claims are independently audited — the accuracy, latency, and LLM API coverage of each monitoring system cannot be verified from available sources.

    WordPress publishing: One tool has a verified, observable WordPress publishing output: Contentosapp Studio. Frase states “publishing, hosting” without confirming the WordPress integration mechanism. The other four tools do not mention native WordPress publishing. For teams evaluating AI content plugins for WordPress, this gap is a practical constraint, not an edge case.

    Verified Coverage by Job

    Keyword / Competitive Research2/6 verified
    Semrush, Ahrefs — Frase partial (SERP-based, not a proprietary index)
    Technical Auditing3/6 verified
    Semrush, Ahrefs, Frase — Writesonic’s “technical work” scope unconfirmed
    Content Briefing3/6 verified
    Ahrefs, Surfer, Frase — Semrush’s brief export unconfirmed
    Content Optimization5/6 verified
    Semrush, Ahrefs, Surfer, Frase, Writesonic — the most crowded job in this comparison
    AI-Search Monitoring4/6 verified
    Semrush, Ahrefs, Frase, Writesonic — Surfer’s “AI Visibility” label unconfirmed
    WordPress Publishing1/6 verified
    Contentosapp Studio — Frase states “publishing, hosting” but the mechanism is unconfirmed

    Category Gaps: What These Six Tools Don’t Clearly Solve

    No single tool among the six covers all six jobs without redundancy. A team that needs deep keyword research, technical auditing, and WordPress publishing currently has no verified single-vendor option. Semrush and Ahrefs cover the research and audit side; Contentosapp Studio covers the publishing end; there is no documented overlap between them.

    AI-search monitoring is the category with the largest evidence gap. Four tools claim it, but no independent audit of the accuracy, refresh rate, or LLM API coverage of any of these tracking systems is available in the sources reviewed. A team that chooses a tool specifically for AI-citation monitoring is making that decision on vendor-illustrated scenarios and feature descriptions — not on independently verified tracking precision. That’s a real risk in a purchasing decision, and it won’t resolve until independent benchmarks emerge.

    The WordPress publishing mechanism question is unresolved for all tools except Contentosapp Studio. “Publishing” can mean a native WordPress plugin that drops content directly into the block editor, a REST API push, a CMS-agnostic HTML export, or a copy-paste from a separate editor. These are meaningfully different workflows. Only one source — Contentosapp Studio’s official page — provides observable evidence of actual WordPress post output. For every other tool that mentions publishing, the integration type requires direct verification.

    Pricing transparency is a structural gap across all six. No tool published verifiable plan pricing in its extracted official content. Costs appear on pricing sub-pages, in sales flows, or in annual-versus-monthly toggles that were not captured in the extraction. This means any total-stack cost calculation would require live verification from each vendor — not something this guide can reliably model without fabricating numbers.

    Recommendations by Use Case and Stack Profile

    Solo blogger building topical authority on a tight budget. The jobs that matter most are keyword research and content briefing. Surfer covers briefing and optimization with the most documented workflow for individual content creators. Ahrefs or Semrush covers the keyword research side. But both of those research platforms are documented as broad platforms — verify whether a base-tier plan includes the keyword research depth you need before subscribing to one alongside an optimizer. This combination covers Keyword Research and Content Optimization. Note that if you add a tool with AI-search monitoring, you may be paying for a job you don’t yet have enough content footprint to benefit from.

    Small SEO agency running technical audits and content briefs for clients. Semrush or Ahrefs covers keyword research, technical auditing, and basic content tooling in one platform. Frase adds the brief-to-draft loop and AI-citation monitoring on top. This combination covers Technical Auditing, Content Briefing, and AI-Search Monitoring. Note that Semrush and Frase both include AI-search tracking — verify which platform’s monitoring is adequate for your reporting needs before paying for both.

    WordPress publisher who needs end-to-end: research to publish without copy-paste friction. No single tool in scope covers the full chain. Ahrefs (keyword research and audit) plus Contentosapp Studio (source-backed drafting and direct WordPress publishing) addresses the most jobs without verified overlap between those two tools. This combination covers Keyword Research, Technical Auditing, and WordPress Publishing. The AI content cost per article framework is worth consulting before finalizing any stack — the real cost includes editing time and reformatting friction, not just subscription fees.

    Brand or agency monitoring AI-search citation share. Writesonic is the only tool in scope positioned entirely around AI-search growth — monitoring, content production, and citation outreach in one agent-based system. Frase also covers AI-citation tracking alongside content workflow. Using both creates verified overlap in the monitoring job. Choose one based on whether you need an autonomous agent-fleet model (Writesonic) or a human-approval loop with monitoring (Frase), then supplement with a keyword research tool if needed. Every recommendation in this section should close with a verification step: confirm which features are available at your plan level directly with the provider, and identify any feature that appears in more than one tool before subscribing to both.

    Frequently Asked Questions

    Can AI tools replace traditional SEO software like Semrush or Ahrefs?

    Not for the jobs that depend on database scale. Keyword research, competitive intelligence, and backlink analysis still rely on large proprietary indexes — Ahrefs reports 41.9 billion keywords tracked and Semrush reports 28 billion. AI-focused tools like Writesonic and Contentosapp Studio are built for different jobs (citation tracking and publishing, respectively) and do not replicate that infrastructure. The more accurate framing: AI tools extend the stack for specific jobs they weren’t designed to replace.

    What is the difference between an AI content optimizer and an AI SEO writer?

    An optimizer scores existing content against ranking signals and tells a writer what to add, remove, or rebalance. Surfer’s Content Editor is the clearest example in this comparison — it grades a draft in real time. An AI writer generates draft content from a prompt or brief. Writesonic’s agent fleet generates content autonomously. Frase does both: it produces a brief, drafts against it, and puts the result in an approval queue. The distinction matters because you can pay for both jobs in two subscriptions or find one tool that covers the loop.

    How do AI SEO tools track visibility in ChatGPT and Google AI Overviews?

    The mechanism varies by tool and is not independently audited in available sources. Semrush describes prompt-level visibility tracking and AI market share measurement. Ahrefs’ Brand Radar tracks citations and sentiment across AI chatbots. Frase monitors citations across ChatGPT, Perplexity, and Gemini in real time. Writesonic tracks which prompts trigger brand mentions. What none of the official sources confirm is tracking refresh rate, LLM API access scope, or detection accuracy. Verify those specifics directly with each vendor before choosing a platform for this job.

    Which AI SEO tools work natively with WordPress?

    Based on verified official-source evidence, Contentosapp Studio is the only tool in this comparison with a documented WordPress publishing output — its seven-stage pipeline produces posts that are fact-checked and published with source attribution. Frase states “publishing, hosting” on its official page, but whether that means a WordPress plugin or a hosted CMS is not publicly confirmed. The other four tools do not mention WordPress publishing in their extracted official content. For context on the broader WordPress AI tooling landscape, see AI content plugins for WordPress in 2026.

    Are AI SEO tools worth the cost for solo bloggers or small agencies?

    That depends on which jobs you’re paying for. A solo blogger who needs keyword research and content briefing can potentially cover both jobs with one mid-tier subscription to a platform like Ahrefs or Semrush. Adding an optimizer, an AI writer, and a citation tracker on top — when two of those jobs overlap — is where the bill compounds without proportional benefit. The practical test: list the three jobs that account for most of your weekly SEO time, then check which tools in this guide verify those jobs. This varies by plan — confirm feature availability directly with each provider.

    What should I look for in an AI SEO tool if I publish more than 20 articles per month?

    At that volume, workflow friction compounds fast. The jobs that matter most are content briefing speed, optimization throughput, and — critically — how the finished content gets into WordPress. Copy-pasting and reformatting 20+ articles per month is a real time cost that rarely appears in feature comparison tables. Check whether the tool outputs directly to WordPress or requires an intermediate export step. Also verify whether any per-article credit caps or word limits apply at your plan level, since these can make a subscription unworkable at scale. That information varies by plan — verify directly with the provider.

    Conclusion

    The six tools in this comparison are not competing for the same job. Semrush and Ahrefs dominate at keyword research and auditing scale. Surfer and Frase own different parts of the content optimization and briefing workflow. Writesonic is built specifically for AI-search growth. Contentosapp Studio is the only tool with a verified WordPress publishing output. Stack those appropriately and you’re paying for coverage. Stack them carelessly — especially across the four tools that each include AI-search monitoring — and you’re paying for the same job four times.

    The practical next step: identify the two or three jobs that account for the majority of your actual weekly SEO work. Check which tools in the matrix verify those jobs. Then, before subscribing to any combination, confirm whether those features are available at the plan level you’re considering — and flag any job that appears in more than one tool on your shortlist. That single check is what separates a useful stack from an expensive one.

    References

    External sources

    1. Semrush: Your Unfair Advantage for Growing Brand Visibility — https://www.semrush.com/
    2. Ahrefs—AI Marketing Platform Powered by Big Data — https://ahrefs.com/
    3. Positive Surfer – AI Visibility Platform for maximum organic growth — https://surferseo.com/
    4. Official source for Frase — https://www.frase.io/
    5. Writesonic | The AI Search Growth Engine. Win Customers. — https://writesonic.com/
    6. AI Content Pipeline for WordPress | Contentosapp Studio — https://contentosapp.com/

    Related content